FUEL SUPPLY PUMP INSTALLATION

-
INSTALL INJECTION PUMP ASSEMBLY
Note
Do not put the injection pump at an angle more than 35°from the horizontal.
-
Install a new O-ring to the pump.
-
Apply a light coat of engine oil on the O-ring.
-
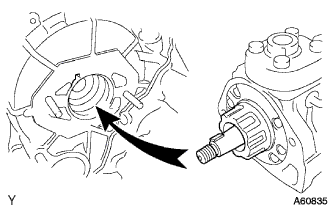
Align the set key on the drive shaft and groove of the injection pump drive gear.
-
Temporality install the injection pump assembly with the 2 nuts.
- Torque:
- 21 N*m { 214 kgf*cm, 15 ft.*lbf }
-
Remove the gum tape from the fuel pipe.
-
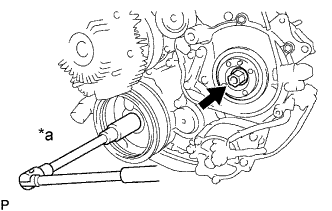
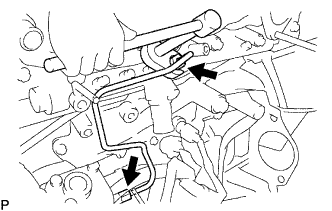
Text in Illustration *a Hold Install the injection pump drive gear set nut.
-
Hold the crankshaft pulley, and torque the nut.
- Torque:
- 63.6 N*m { 648 kgf*cm, 47 ft.*lbf }
Note
Do not turn the crankshaft pulley. The valve heads will hit against the piston top.
-
Check the thrust clearance of the injection pump drive shaft.
-
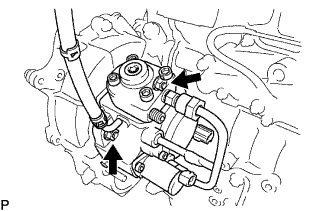
Connect the fuel hose to the injection pump.
-
-
INSTALL FUEL INLET PIPE SUB-ASSEMBLY
-
Temporarily install the fuel inlet pipe sub-assembly.
-
Using a union wrench 17 mm, tighten the fuel inlet pipe sub-assembly union of common rail side.
- Torque:
- 31.9 N*m { 325 kgf*cm, 23 ft.*lbf, for use with SST }
- 35 N*m { 357 kgf*cm, 26 ft.*lbf }
Tech Tips
Use a torque wrench with a fulcrum length of 30 cm (11.81 in)..
-
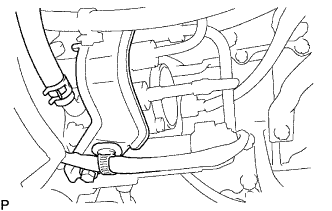
Using a union wrench 17 mm, tighten the fuel inlet pipe sub-assembly union of injection pump side.
- Torque:
- 31.9 N*m { 325 kgf*cm, 23 ft.*lbf, for use with SST }
- 35 N*m { 357 kgf*cm, 26 ft.*lbf }
-
Install the injection pipe clamp to the fuel inlet pipe sub- assembly.
Tech Tips
Use a torque wrench with a fulcrum length of 30 cm (11.81 in)..
-
-
BLEED INJECTION PIPE
-
Move the priming pump of the fuel filter up and down until it becomes hard.
-
-
INSTALL DIESEL THROTTLE BODY ASSEMBLY
-
INSTALL PUMP DRIVE SHAFT PULLEY
-
INSTALL TIMING BELT NO.1 COVER
-
INSTALL ENGINE WIRE
-
INSTALL ENGINE SERVICE HOLE SUB COVER SUB-ASSEMBLY (W/O TILT CAB CAB TYPE)
-
Install the front door scuff.
-
Install the floor mat.
-
Install the engine service hole sub-cover with the 7 bolts.
-
-
INSTALL PARKING BRAKE SHOE LEVER SUB-ASSEMBLY (W/O TILT CAB CAB TYPE)
-
INSTALL TRANSMISSION FLOOR SHIFT ASSEMBLY (W/O TILT CAB CAB TYPE)
-
INSTALL FLOOR SHIFT CABLE TRANSMISSION CONTROL SHIFT
-
Install the clip and nut, and then connect the shift cable to the transmission.
-
-
INSTALL FLOOR SHIFT CABLE TRANSMISSION CONTROL SELECT
-
Install the clip and nut, and then connect the select cable to the transmission.
-
-
INSTALL FRONT SEAT ASSEMBLY (DRIVER SEAT) (W/O TILT CAB CAB TYPE)
-
INSTALL FRONT SEAT ASSEMBLY RH (W/O TILT CAB CAB TYPE)
-
INSTALL BATTERY NEGATIVE TERMINAL
-
INSPECT FUEL LEAK
CAUTION:
-
During ACTIVE TEST mode, engine speed goes high and combustion noise becomes loud, so pay attention.
-
During ACTIVE TEST mode, fuel becomes high pressure, so take much care not to expose your eyes, hands, or body to the fuel.
-
Check that there are no leaks from any part of the fuel system when the engine stops.
If there is fuel leakage, replace those parts.
-
While cranking or starting the engine, check that there are no leaks from any part of the fuel system.
If there is fuel leakage, replace those parts.
-
Disconnect the return hose from the common rail.
-
While cranking the engine, check fuel leakage from the return pipe.
If there is fuel leakage, replace the common rail assembly Click here.
-

Text in Illustration *1 Intelligent Tester Connect the intelligent tester to the DLC3.
-
Start the engine and push the intelligent tester main switch ON.
-
Select the FUEL LEAK test of ACTIVE TEST mode on the intelligent tester.
-
If you have no intelligent tester, depress the accelerator pedal quickly and fully to increase the engine speed at maximum and keep it for 2 seconds. Repeat this operation several times.
-
Check that there are no leaks from any part of the fuel system.
Note
If the leakage from the return pipe is less than 10 cc (0.6 cu in.) in a minute, it is acceptable.
If there is fuel leakage, replace those parts.
-
Reconnect the return hose to the common rail.
-