WINDSHIELD GLASS REMOVAL
PROCEDURE
-
REMOVE WINDSHIELD WIPER MOTOR AND LINK
-
REMOVE RAIN SENSOR (w/ Rain Sensor)
-
REMOVE INNER REAR VIEW MIRROR ASSEMBLY (for TMC Made)
-
REMOVE INNER REAR VIEW MIRROR ASSEMBLY (for TMMF Made)
-
REMOVE ROOF HEADLINING ASSEMBLY (for TMC Made 5 Door)
Tech Tips
It is not necessary to remove the roof headlining completely. Slightly lower the front section of the roof headlining.
-
REMOVE ROOF HEADLINING ASSEMBLY (for TMMF Made 3 Door)
Tech Tips
It is not necessary to remove the roof headlining completely. Slightly lower the front section of the roof headlining.
-
REMOVE ROOF HEADLINING ASSEMBLY (for TMMF Made 5 Door)
Tech Tips
It is not necessary to remove the roof headlining completely. Slightly lower the front section of the roof headlining.
-
REMOVE WINDSHIELD OUTSIDE MOULDING
-
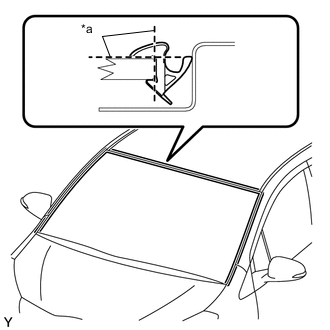
Text in Illustration *a Cut Using a knife, cut off the windshield outside moulding, as shown in the illustration.
Note
Do not damage the vehicle body with the knife.
-
-
REMOVE WINDSHIELD GLASS
-
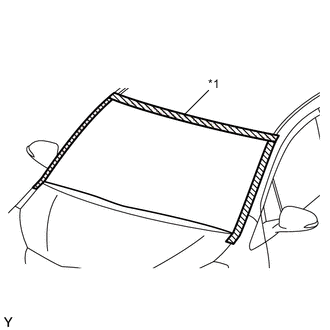
Text in Illustration *1 Protective Tape Apply protective tape to the installation area on the windshield glass on the vehicle body.
-

Text in Illustration *a Mark Place matchmarks on the windshield glass and vehicle body on the locations indicated in the illustration.
Tech Tips
Matchmarks do not need to be placed if the windshield glass is not going to be reused.
-
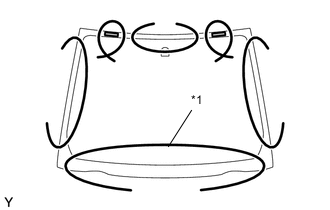
Text in Illustration *1 Piano Wire Pass a piano wire between the vehicle body and glass from the interior.
-
Tie both wire ends to wooden blocks or similar objects.
-
Cut off the adhesive by pulling the piano wire around the windshield glass.
Note
-
When separating the windshield glass, take care not to damage the paint or the interior and exterior ornaments.
-
To prevent the safety pad from being scratched when removing the windshield glass, place a plastic sheet between the piano wire and safety pad.
-
-
Using suction cups, disengage the windshield glass stopper and remove the windshield glass.
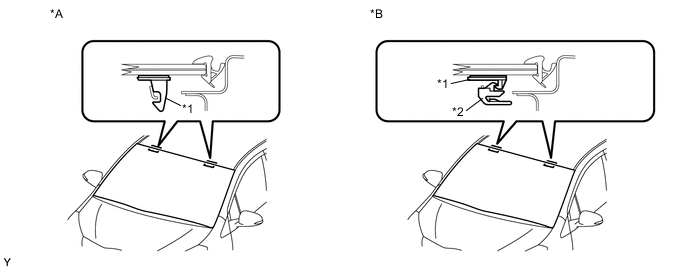
Text in Illustration *A for 1 - piece Type *B for 2 - piece Type *1 No. 1 Windshield Glass Stopper *2 No. 2 Windshield Glass Stopper Note
-
Be careful not to drop the windshield glass.
-
Leave as much adhesive on the vehicle body as possible when removing the windshield glass.
-
To prevent the windshield glass from dropping when performing this operation, be sure to hold the windshield glass using suction cups.
-
There are windshield glass stopper and No. 1 windshield glass stoppers on the windshield glass. Be careful not to damage the windshield glass when cutting off the adhesive.
Tech Tips
Depending on vehicles, 1-piece or 2-piece type stoppers are used.
-
-
-
REMOVE WINDOW GLASS ADHESIVE DAM
-
Using a scraper, remove the windshield glass adhesive dam.
Note
-
Be careful not to damage the windshield glass.
-
Be sure to replace the window glass adhesive dam with a new one.
-
-
-
REMOVE NO. 1 WINDSHIELD GLASS STOPPER (for 1-piece Type)
-
Using a scraper, remove the 2 No. 1 windshield glass stoppers.
Note
-
Be careful not to damage the windshield glass.
-
Be sure to replace the windshield glass stoppers with new ones.
-
-
-
REMOVE NO. 2 WINDSHIELD GLASS STOPPER (for 2-piece Type)
-
Using a scraper, remove the 2 No. 2 windshield glass stoppers.
Note
-
Be careful not to damage the windshield glass.
-
Be sure to replace the windshield glass stoppers with new ones.
-
-
-
REMOVE NO. 1 WINDSHIELD GLASS STOPPER (for 2-piece Type)
-

Text in Illustration *1 No. 1 Windshield Glass Stopper Remove the 2 No. 1 windshield glass stoppers.
Note
Be sure to replace the windshield glass stoppers with new ones.
-