REAR SEAT OUTER BELT ASSEMBLY(for 5 Door) INSTALLATION

CAUTION / NOTICE / HINT
Tech Tips
The procedure described below is for the RH side. Use the same procedure for both the RH and LH sides, unless otherwise specified.
PROCEDURE
-
INSTALL REAR SEAT 3 POINT TYPE OUTER BELT ASSEMBLY
-
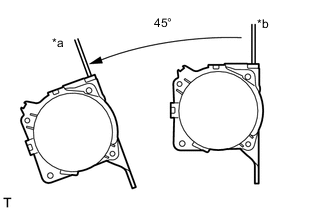
Text in Illustration *a Lock *b Unlock Check the angle of inclination required to lock the retractor.
-
Gently incline the retractor from its initial position. Check that the belt does not lock when the retractor is inclined 15° or less in any direction. Also, check that the belt locks when the inclination of the retractor is 45° or more.
Note
Do not disassemble the retractor.
If the operation is not as specified, replace the rear seat 3 point type outer belt assembly.
-
-
Engage the 2 hooks to install the rear seat 3 point type outer belt assembly.
-
Install the bolt.
- Torque:
- 42 N*m { 428 kgf*cm, 31 ft.*lbf }
-
Connect the shoulder anchor with the bolt.
- Torque:
- 42 N*m { 428 kgf*cm, 31 ft.*lbf }
-
Connect the floor anchor with the bolt.
- Torque:
- 42 N*m { 428 kgf*cm, 31 ft.*lbf }
-
Check that the ELR locks.
Note
Perform the check with the rear seat 3 point type outer belt assembly installed.
-
With the belt installed, check that the belt locks when it is pulled out quickly.
If the operation is not as specified, replace the rear seat 3 point type outer belt assembly.
-
-
Remove the bolt and floor anchor.
-
-
INSTALL ROOF SIDE INNER GARNISH
-
INSTALL DECK TRIM SIDE PANEL ASSEMBLY RH (for RH Side)
-
INSTALL DECK TRIM SIDE PANEL ASSEMBLY LH (for LH Side)
-
CONNECT REAR SEAT 3 POINT TYPE OUTER BELT ASSEMBLY
-
INSTALL REAR DOOR OPENING TRIM WEATHERSTRIP
-
INSTALL REAR DOOR SCUFF PLATE
-
INSTALL REAR FLOOR FINISH PLATE
-
INSTALL JACK HANDLE (for RH Side)
-
INSTALL NO. 2 ROOM LIGHT ASSEMBLY (for LH Side)
-
INSTALL SPARE WHEEL COVER (w/ Cover)
-
INSTALL DECK BOARD ASSEMBLY (w/ Deck Board)
-
INSTALL REAR SEAT ASSEMBLY (for RH Side)
-
INSTALL REAR SEAT ASSEMBLY (for LH Side)