ROOF HEADLINING(for TMMF Made 3 Door) INSTALLATION
PROCEDURE
-
INSTALL ROOF HEADLINING ASSEMBLY (for Glass Roof)
-
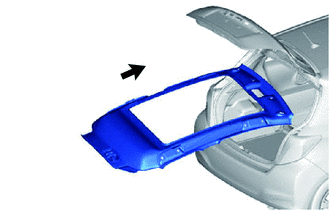
Pull the roof headlining back into the vehicle through the back door.
Note
Do not damage the roof headlining assembly or body interior.
-
Engage the 12 hook-and loop fasteners and install the roof headlining.
-
Install the clip.
-
Engage the 2 claws.
-
for front pillar RH side:
-
Engage the 4 clamps.
-
Connect the connector.
-
-
for front pillar LH side:
-
Engage the 4 clamps.
-
Connect the connector.
-
-
for rear pillar RH side:
-
Engage the clamp.
-
Connect the connector.
-
-
Connect the connectors.
-
-
INSTALL ROOF HEADLINING ASSEMBLY (except Glass Roof)
-
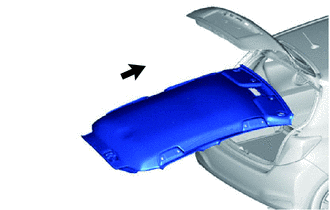
Pull the roof headlining back into the vehicle through the back door.
Note
Do not damage the roof headlining assembly or body interior.
-
Engage the 2 hooks and install the roof headlining.
-
Install the 3 clips.
-
Engage the 2 claws.
-
for front pillar RH side:
-
Engage the 4 clamps.
-
Connect the connector.
-
-
for front pillar LH side:
-
Engage the 4 clamps.
-
Connect the connector.
-
-
for rear pillar RH side:
-
Engage the 3 clamps.
-
Connect the connector.
-
-
Connect the connectors.
-
-
INSTALL REAR CENTER SEAT OUTER BELT ASSEMBLY
-
INSTALL RAIN SENSOR COVER (w/ Rain Sensor)
-
INSTALL INNER REAR VIEW MIRROR STAY HOLDER COVER (w/ EC Mirror)
-
INSTALL PRE-CRASH SAFETY CITY COVER (w/ Toyota Safety Sense)
-
INSTALL PRE-CRASH SAFETY 2ND CITY COVER (w/ Toyota Safety Sense)
-
INSTALL VANITY LIGHT ASSEMBLY (w/ Vanity Light)
-
INSTALL MAP LIGHT ASSEMBLY
-
INSTALL ROOF HEADLINING SERVICE HOLE COVER (for Driver Side without Assist Grip)
-
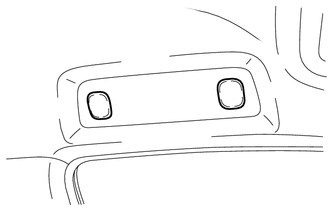
Install the 2 roof headlining service hole covers.
-
-
INSTALL ASSIST GRIP ASSEMBLY
-
INSTALL ASSIST GRIP ASSEMBLY (for Driver Side)
Tech Tips
Use the same procedure as for the assist grip assembly.
-
INSTALL VISOR HOLDER
-
INSTALL VISOR ASSEMBLY RH
-
Install the visor with the 2 screws.
-
Install the visor shaft into the visor holder.
-
-
INSTALL VISOR ASSEMBLY LH
Tech Tips
Use the same procedure as for the RH side.
-
INSTALL REAR ROOF SIDE RAIL GARNISH RH
-
Engage the 4 clips and install the roof side rail garnish.
-
-
INSTALL REAR ROOF SIDE RAIL GARNISH LH
Tech Tips
Use the same procedure as for the RH side.
-
INSTALL ROOF SIDE INNER GARNISH RH
-
Pass the rear seat 3 point type outer belt through the slit in the roof side inner garnish.
-
Engage the 5 clips and install the roof side inner garnish.
-
-
INSTALL ROOF SIDE INNER GARNISH LH
Tech Tips
Use the same procedure as for the RH side.
-
INSTALL DECK TRIM SIDE PANEL ASSEMBLY RH
-
Engage the 3 clips and the 3 claws and install the deck trim side panel.
-
Install the 3 screws.
-
-
INSTALL DECK TRIM SIDE PANEL ASSEMBLY LH
Tech Tips
Use the same procedure as for the RH side.
-
INSTALL REAR SEAT 3 POINT TYPE OUTER BELT ASSEMBLY RH
-
Engage the 2 claws and install the rear seat 3 point type outer belt.
-
Tighten the bolt.
- Torque:
- 41 N*m { 420 kgf*cm, 30 ft.*lbf }
-
-
INSTALL REAR SEAT 3 POINT TYPE OUTER BELT ASSEMBLY LH
Tech Tips
Use the same procedure as for the RH side.
-
INSTALL REAR FLOOR FINISH PLATE
-
INSTALL JACK HANDLE
-
INSTALL NO. 2 ROOM LIGHT ASSEMBLY
-
INSTALL FRONT PILLAR GARNISH RH (w/ Curtain Shield Airbag)
-
INSTALL FRONT PILLAR GARNISH LH (w/ Curtain Shield Airbag)
Tech Tips
Use the same procedure as for the RH side.
-
INSTALL FRONT PILLAR GARNISH RH (w/o Curtain Shield Airbag)
-
for 6 speakers:
-
Disconnect the connector.
-
-
Engage the 2 guides and the 2 clips and install the front pillar garnish.
-
-
INSTALL FRONT PILLAR GARNISH LH (w/o Curtain Shield Airbag)
Tech Tips
Use the same procedure as for the RH side.
-
INSTALL CENTER PILLAR UPPER GARNISH RH
-
Pass the front seat outer belt through the slit in the center pillar upper garnish.
-
Engage the clip and install the center pillar upper garnish with 2 screws.
-
-
INSTALL CENTER PILLAR UPPER GARNISH LH
Tech Tips
Use the same procedure as for the RH side.
-
INSTALL FRONT QUARTER TRIM PANEL ASSEMBLY RH
-
Engage the 8 clips and the 10 claws.
-
Engage the 3 guides and install the quarter trim panel.
-
-
INSTALL FRONT QUARTER TRIM PANEL ASSEMBLY LH
Tech Tips
Use the same procedure as for the RH side.
-
INSTALL FRONT SEAT OUTER BELT BAR SUB-ASSEMBLY RH
-
INSTALL FRONT SEAT OUTER BELT BAR SUB-ASSEMBLY LH
Tech Tips
Use the same procedure as for the RH side.
-
INSTALL FRONT DOOR OPENING TRIM WEATHERSTRIP RH
-
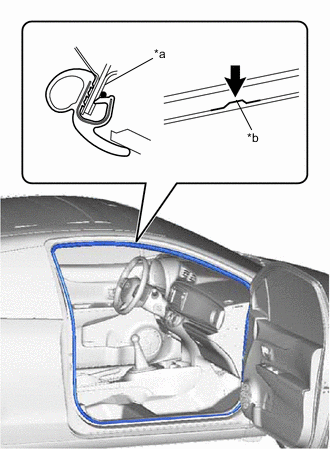
Text in Illustration *a Paint Mark *b Flange Position Align the paint mark on the front door opening trim weatherstrip with the flange position on the vehicle body and install the weatherstrip.
Paint Mark Area Color RH Side Blue LH Side Pink Note
After installation, check that the corners fit correctly.
-
-
INSTALL FRONT DOOR OPENING TRIM WEATHERSTRIP LH
Tech Tips
Use the same procedure as for the RH side.
-
INSTALL COWL SIDE TRIM BOARD RH
-
INSTALL COWL SIDE TRIM BOARD LH
Tech Tips
Use the same procedure as for the RH side.
-
INSTALL FRONT DOOR SCUFF PLATE RH
-
Engage the 8 claws and install the front door scuff plate.
-
-
INSTALL FRONT DOOR SCUFF PLATE LH
Tech Tips
Use the same procedure as for the RH side.
-
INSTALL REAR SEAT ASSEMBLY (for 60/40 Split Seat Type RH Side)
-
INSTALL REAR SEAT ASSEMBLY (for 60/40 Split Seat Type LH Side)
-
INSTALL SPARE WHEEL COVER
-
Install the spare wheel cover.
-
-
INSTALL DECK BOARD ASSEMBLY