HEADLIGHT CLEANER ACTUATOR INSTALLATION
PROCEDURE
-
INSTALL NO. 1 HEADLIGHT CLEANER HOSE
-
INSTALL NO. 2 WASHER BRACKET
-
Clean the No. 2 washer bracket installation surface.
-
When reusing the front bumper cover, remove the double-sided tape remaining on the front bumper cover installation surface.
Note
Make sure to use a cloth when removing. Using a screwdriver, etc., may cause damage and poor adhesion.
-
Using non-residue solvent, degrease the No. 2 washer bracket installation surface on the front bumper cover.
Note
Installing the No. 2 washer bracket with double-sided tape residue still remaining can cause poor adhesion. Remove the residue completely.
-
-
Cover the headlight cleaner installation hole with protective tape from the outside of the front bumper cover..
-
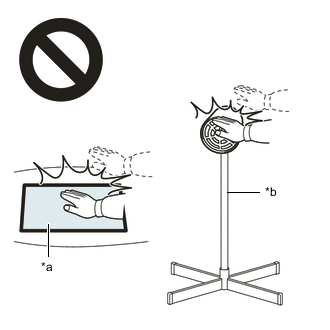
*a Heated Part *b Heat Light Using a heat light, heat the No. 2 washer bracket.
CAUTION:
-
Do not touch the heat light and heated parts.
-
Touching the heat light may result in burns.
-
Touching heated parts for a long time may result in burns.
Tech Tips
Front bumper cover side: 20 to 30°C for 3 to 5 minutes.
-
-
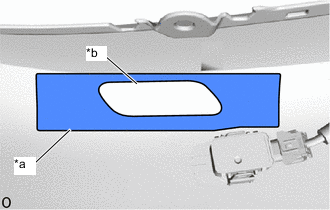
*a Mark-off Line *b Installation Hole of Headlight Washer Actuator Sub-assembly 
Area to Apply Primer Apply primer
-
Apply primer on the mark-off line using a brush or felt.
Note
-
Replace the brush or felt if it is dirty or has become hardened.
-
Keep any painted surface free from primer.
-
If the primer contacts a painted surface, it may leave light primer marks. Therefore, use protective tape when using liquid primer.
-
Do not touch surfaces to which primer has been applied.
-
-
-
Remove the peeling paper from the new No. 2 washer bracket while making sure not to touch the adhesional surface.
-
Align the No. 2 washer bracket with the mark-off line on the front bumper cover and install it with the double-sided tape.
Note
The application strength of the No. 2 washer bracket will weaken if reapplied. If reapplication is necessary, be sure to replace it with a new one.
Tech Tips
Apply pressure so that it does not lift up from the front bumper cover.
-
-
INSTALL WASHER BRACKET
Tech Tips
Use the same procedure described for the No. 2 washer bracket.
-
INSTALL HEADLIGHT WASHER ACTUATOR SUB-ASSEMBLY LH
-


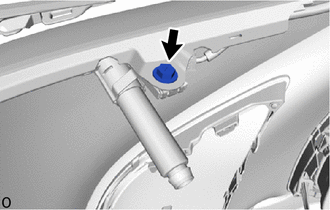
Install in the Direction Install the spring nut to the headlight washer actuator sub-assembly LH.
-
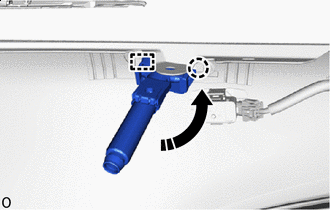
Install in the Direction Insert the guide, attach the claw and install the headlight washer actuator sub-assembly LH as shown in the illustration.
-
Install the screw.
-
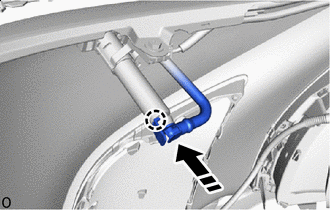
Install in the Direction Attach the claw and connect the No. 1 headlight cleaner hose.
-
-
INSTALL HEADLIGHT WASHER ACTUATOR SUB-ASSEMBLY RH
Tech Tips
Use the same procedure for the RH and LH sides.
-
INSTALL HEADLIGHT WASHER COVER LH
-
INSTALL HEADLIGHT WASHER COVER RH
Tech Tips
Use the same procedure for the RH and LH sides.
-
INSTALL FRONT BUMPER ASSEMBLY
-
except Sport Package
-
for Sport Package
-
-
ADJUST FRONT TELEVISION CAMERA ASSEMBLY
-
w/ Parking Assist Monitor System:
-
w/ Panoramic View Monitor System:
-