SEAT BELT CONTROL ECU REMOVAL
CAUTION / NOTICE / HINT
The necessary procedures (adjustment, calibration, initialization, or registration) that must be performed after parts are removed, installed, or replaced during the seat belt control ECU removal/installation are shown below.
| Replacement Part | Necessary Procedure | Effect/Inoperative Function When Necessary Procedures are not Performed | Link |
|---|---|---|---|
| When the luggage compartment door is opened using a mechanical key | Initialize luggage closer motor assembly | The power trunk lid does not operate |
PROCEDURE
-
REMOVE LUGGAGE COMPARTMENT FLOOR MAT
-
REMOVE LUGGAGE COMPARTMENT MAT SUB-ASSEMBLY
-
REMOVE LUGGAGE COMPARTMENT TRIM COVER LH
-
REMOVE LUGGAGE COMPARTMENT TRIM COVER RH
-
REMOVE TOOL BOX
-
REMOVE LOWER INNER LUGGAGE COMPARTMENT TRIM COVER
-
REMOVE FRONT LUGGAGE COMPARTMENT TRIM COVER
-
REMOVE NO. 1 LUGGAGE COMPARTMENT LIGHT ASSEMBLY
-
REMOVE REAR LUGGAGE COMPARTMENT TRIM COVER
-
REMOVE ROPE HOOK ASSEMBLY
-
REMOVE REAR FLOOR FINISH PLATE
-
REMOVE LUGGAGE COMPARTMENT TRIM COVER ASSEMBLY LH
-
REMOVE REAR LUGGAGE COMPARTMENT TRAY BRACKET LH
-
REMOVE SEAT BELT CONTROL ECU
-
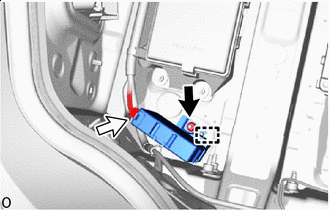

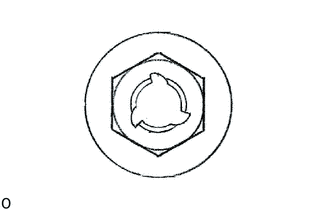
Nut 
Connector Remove the nut.
Note
If the removed nut is the same shape as that shown in the illustration, replace it the supplied replacement part.
-
Disconnect the connector.
Note
Do not pull the harness forcibly when disconnecting the connector.
-
Detach the guide and remove the seat belt control ECU.
Note
-
Do not apply excessive force.
-
If the seat belt control ECU has been struck or dropped, replace it with a new one.
-
-