CAUTION / NOTICE / HINT
-
Use the same procedure for the RH side and LH side.
-
The following procedure is for the LH side.
PROCEDURE
- Click here
INSTALL REAR ULTRASONIC SENSOR CLIP
Note:
-
Installing the rear ultrasonic sensor clip with some double-sided tape remaining may cause poor adhesion. Perform this procedure until sufficiently removed it.
-
Make sure to use a cloth when removing. Using a screwdriver, etc., may cause damage and poor adhesion.
Tip:Use the same procedure for all rear ultrasonic sensor clip.
-
Clean the rear bumper assembly surface.
-
Remove any remaining double-sided tape from the rear bumper assembly.
-
Wipe off any tape adhesive residue with cleaner.
-
-
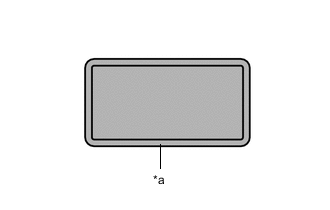
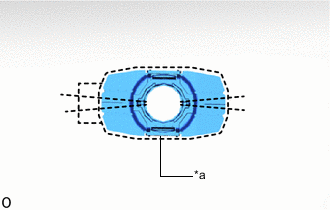
*a Scribed Line 
Primer Application Apply primer to rear bumper assembly on the installation area of the rear ultrasonic sensor clip using a brush or felt.
Note:
-
Replace the brush or felt if it is dirty or has become hardened.
-
Keep any painted surface free from primer.
-
If the primer contacts a painted surface, it may leave light primer marks. Therefore, use protective tape when using liquid primer.
-
Do not touch surfaces to which primer has been applied until the rear ultrasonic sensor clip has been attached.
-
-
Let the primer dry sufficiently.
Note:Do not touch applied surfaces until the primer is dry.
Recommended drying time 10 minutes or more (at 23 °C (73 °F)) -
Confirm that the primer has completely dried by touching the rear bumper assembly. Then remove the tape.
-
Remove the peeling paper of the new rear ultrasonic sensor clip trying not to touch the adhesional surface.
Note:After removing the peeling paper, do not touch the surface of the tape with your fingers or cotton work glove.
-
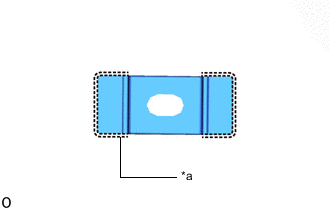
*a Scribed Line Align the rear ultrasonic sensor clip with the scribed line on the rear bumper assembly and install it as shown in the illustration.
Note:The application strength of the rear ultrasonic sensor clip will weaken if reapplied. If reapplication is necessary, be sure to replace it with a new one.
Tip:Apply pressure so that it does not lift up the rear bumper assembly.
-
- Click here
INSTALL REAR CORNER ULTRASONIC SENSOR RETAINER
Note:
-
Installing the rear corner ultrasonic sensor retainer with some double-sided tape remaining may cause poor adhesion. Perform this procedure until sufficiently removed it.
-
Make sure to use a cloth when removing. Using a screwdriver, etc., may cause damage and poor adhesion.
-
Clean the rear bumper assembly surface.
-
Remove any remaining double-sided tape from the rear bumper assembly.
-
Wipe off any tape adhesive residue with cleaner.
-
-
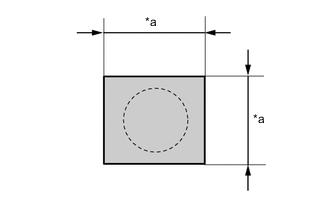
*a 30 mm (1.18 in.) Cover the sensor installation hole form the outside of the bumper cover with a 30 mm (1.18 in.) square piece of tape.
-
*a Scribed Line Primer Application Apply primer to rear bumper assembly on the installation area of the rear corner ultrasonic sensor retainer using a brush or felt.
Note:
-
Replace the brush or felt if it is dirty or has become hardened.
-
Keep any painted surface free from primer.
-
If the primer contacts a painted surface, it may leave light primer marks. Therefore, use protective tape when using liquid primer.
-
Do not touch surfaces to which primer has been applied until the rear corner ultrasonic sensor retainer has been attached.
-
-
Let the primer dry sufficiently.
Note:Do not touch applied surfaces until the primer is dry.
Recommended drying time 10 minutes or more (at 23 °C (73 °F)) -
Confirm that the primer has completely dried by touching the rear bumper assembly. Then remove the tape.
-
Remove the peeling paper of the new rear corner ultrasonic sensor retainer trying not to touch the adhesional surface.
Note:After removing the peeling paper, do not touch the surface of the tape with your fingers or cotton work glove.
-
*a Scribed Line Align the rear corner ultrasonic sensor retainer with the scribed line on the rear bumper assembly and install it as shown in the illustration.
Note:The application strength of the rear corner ultrasonic sensor retainer will weaken if reapplied. If reapplication is necessary, be sure to replace it with a new one.
Tip:
-
Apply pressure so that it does not lift up rear the rear bumper assembly.
-
Pushing force: 30 N (3.0 kgf) for 3 seconds
-
-
- Click here
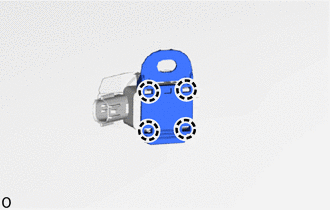
INSTALL REAR CORNER ULTRASONIC SENSOR
-
Attach the claw to install the rear corner ultrasonic sensor.
Note:
-
When reusing the sensor, make sure that each sensor is returned to its original position.
-
Check that the claw is securely fitted.
-
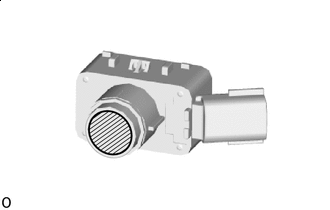

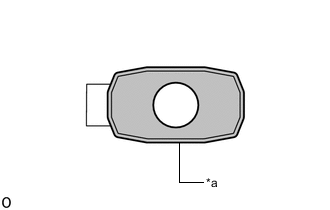
Microphone Surface Do not push microphone surface.
Tip:
*a Protrusion Of The Mark Align the connector with the protrusion of the mark when connecting it.
-
-
- Click here
INSTALL REAR CENTER ULTRASONIC SENSOR RETAINER
Tip:Use the same procedure described for the rear corner ultrasonic sensor retainer.
- Click here
INSTALL REAR CENTER ULTRASONIC SENSOR
Tip:Use the same procedure described for the rear corner ultrasonic sensor.
- Click here
INSTALL ULTRASONIC SENSOR CLIP
Tip:Use the same procedure for the other ultrasonic sensor clip.
-
Attach the claw to install the ultrasonic sensor clip.
-
- Click here
INSTALL NO. 3 LUGGAGE ROOM WIRE
- Click here
INSTALL REAR BUMPER ASSEMBLY
- Click here
CONNECT CABLE TO NEGATIVE AUXILIARY BATTERY TERMINAL (w/ Hands Free Power Trunk Lid)
Note:When disconnecting the cable, some systems need to be initialized after the cable is reconnected.
- Click here
INSTALL LUGGAGE COMPARTMENT MAT SUB-ASSEMBLY (w/ Hands Free Power Trunk Lid)
- Click here
INSPECT KICK DOOR CONTROL SENSOR (w/ Hands Free Power Trunk Lid)
- Click here
INITIALIZE POWER TRUNK LID CONTROL SYSTEM
- Click here
PERFORM CALIBRATION
-
w/ Parking Support Brake System:
-
w/o Parking Support Brake System:
-