NOISE FILTER INSTALLATION
CAUTION / NOTICE / HINT
PROCEDURE
-
INSTALL RADIO SETTING CONDENSER (for Window Defogger)
-

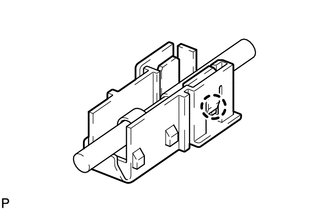
Attach the claw to install a new terminal cover to the wire harness.
Note
-
Make sure to hold the crimping side of the terminal when installing the wire harness to the terminal cover.
-
Make sure not to bend the exposed wire when installing the wire harness to the terminal cover.
-
Do not use excessive force when inserting the wire harness into the terminal cover.
-
If the terminal cover has been deformed during installation, replace the terminal and terminal cover with new ones.
-
-

Install in this Direction Attach the claws to install the new terminal cover with wire harness to a new condenser.
Note
-
Do not use excessive force when inserting the terminal cover into the condenser.
-
If the terminal cover has been deformed during installation, replace the terminal, terminal cover and condenser with new ones.
-
-

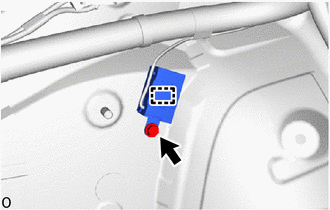
Attach the clamp to temporarily install a new radio setting condenser with wire harness.
-
Install the radio setting condenser with the bolt.
- Torque:
- 10 N*m { 102 kgf*cm, 7 ft.*lbf }
-
-
INSTALL INNER ROOF SIDE GARNISH ASSEMBLY LH
-
INSTALL ROOF SIDE RAIL GARNISH ASSEMBLY LH
-
INSTALL PACKAGE TRAY TRIM SIDE COVER LH
-
INSTALL PACKAGE TRAY TRIM GARNISH LH
-
INSTALL RADIO SETTING CONDENSER (for High Mounted Stop Light)
-
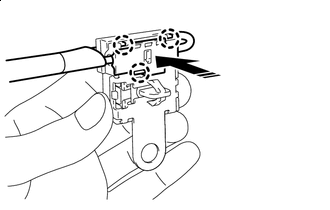
Attach the claw to install a new terminal cover to the wire harness.
Note
-
Make sure to hold the crimping side of the terminal when installing the wire harness to the terminal cover.
-
Make sure not to bend the exposed wire when installing the wire harness to the terminal cover.
-
Do not use excessive force when inserting the wire harness into the terminal cover.
-
If the terminal cover has been deformed during installation, replace the terminal and terminal cover with new ones.
-
-
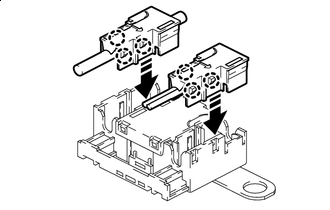
Install in this Direction Attach the claws to install 2 new terminal covers with wire harness to a new condenser.
Note
-
Do not use excessive force when inserting the terminal covers into the condenser.
-
If a terminal cover has been deformed during installation, replace the terminal, terminal covers and condenser with new ones.
-
-
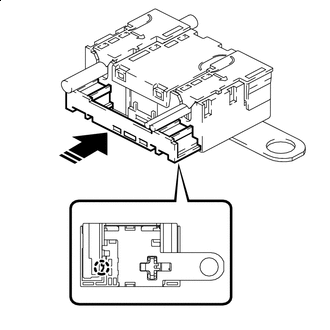
Install in this Direction Insert the cover as shown in the illustration and engage the claw.
-
Attach the clamp to temporarily install the new radio setting condenser with wire harness.
-
Install the radio setting condenser with the bolt.
- Torque:
- 8.5 N*m { 87 kgf*cm, 75 in.*lbf }
-
-
INSTALL REAR SEAT ASSEMBLY
-
for Fixed Seat Type:
-
for Power Seat:
-
-
CONNECT CABLE TO NEGATIVE AUXILIARY BATTERY TERMINAL
Note
When disconnecting the cable, some systems need to be initialized after the cable is reconnected.
-
INSTALL LUGGAGE COMPARTMENT MAT SUB-ASSEMBLY
-
PERFORM DIAGNOSTIC SYSTEM CHECK
-
INSPECT SRS WARNING LIGHT
-
INSPECT REAR SEAT ASSEMBLY (for Power Seat)
-
INSPECT SEAT HEATER SYSTEM (w/ Seat Heater System)
-
INSPECT CLIMATE CONTROL SEAT SYSTEM (w/ Climate Control Seat System)
-
INSPECT SEAT VIBRATION SYSTEM (w/ Refresh Seat)
-
INSPECT SEAT BELT WARNING SYSTEM
-
w/o Occupant Classification System:
-
w/ Occupant Classification System:
-