PROCEDURE
- Click here
INSTALL SPEAKER ASSEMBLY WITH BRACKET (for 24 Speakers)
Note:Do not touch the cone of the speaker assembly with bracket.
-
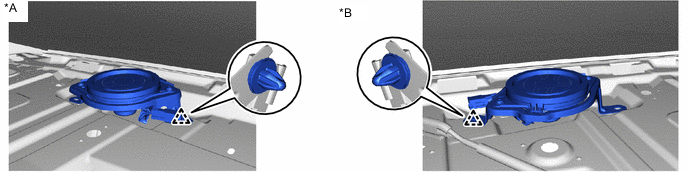
*A for LH Side *B for RH Side Attach the clip to the body and temporarily install the speaker assembly with bracket.
-
Install the speaker assembly with bracket with the bolt.
-
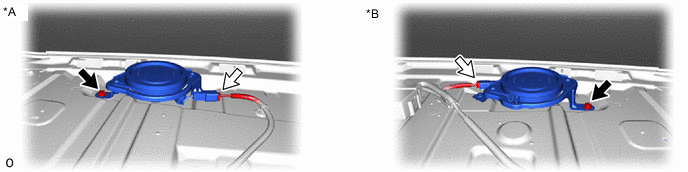
*A for LH Side *B for LH Side 
Bolt 
Connector Connect the connector.
-
- Click here
INSTALL REAR WINDOW SHADE ASSEMBLY (for 24 Speakers)
- Click here
INSTALL NO. 2 PACKAGE TRAY TRIM PANEL ASSEMBLY (for 24 Speakers)
- Click here
INSTALL INNER ROOF SIDE GARNISH ASSEMBLY RH (for 24 Speakers)
- Click here
INSTALL INNER ROOF SIDE GARNISH ASSEMBLY LH (for 24 Speakers)
- Click here
INSTALL REAR NO. 3 SPEAKER ASSEMBLY
Note:Do not touch the cone of the rear No. 3 speaker assembly.
-
Install the rear No. 3 speaker assembly with the 4 bolts in the order shown in the illustration.
10.5 N*m 107 kgf*cm 8 ft.*lbf -
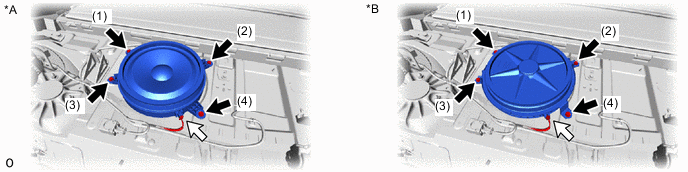
*A for 12 Speakers *B for 24 Speakers Bolt Connector Connect the connector.
-
- Click here
INSTALL PACKAGE TRAY TRIM PANEL ASSEMBLY
-
for Fixed Seat Type:
-
for Power Seat:
-
- Click here
CONNECT CABLE TO NEGATIVE AUXILIARY BATTERY TERMINAL
Note:When disconnecting the cable, some systems need to be initialized after the cable is reconnected.
- Click here
INSTALL LUGGAGE COMPARTMENT MAT SUB-ASSEMBLY
- Click here
PERFORM DIAGNOSTIC SYSTEM CHECK
- Click here
INSPECT SRS WARNING LIGHT
- Click here
INSPECT REAR SEAT ASSEMBLY (for Power Seat)
- Click here
INSPECT SEAT HEATER SYSTEM (w/ Seat Heater System)
- Click here
INSPECT CLIMATE CONTROL SEAT SYSTEM (w/ Climate Control Seat System)
- Click here
INSPECT SEAT VIBRATION SYSTEM (w/ Refresh Seat)
- Click here
INSPECT SEAT BELT WARNING SYSTEM
-
w/o Occupant Classification System:
-
w/ Occupant Classification System:
-