REAR SUNSHADE ASSEMBLY(for Package Tray) INSTALLATION
CAUTION / NOTICE / HINT
Tech Tips
-
Use the same procedure for RHD and LHD vehicles.
-
The procedure listed below is for LHD vehicles.
PROCEDURE
-
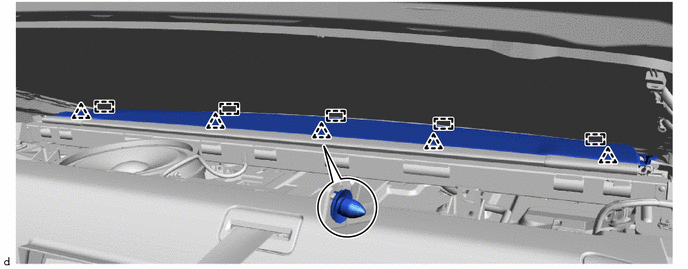
INSTALL REAR WINDOW SHADE ASSEMBLY
-
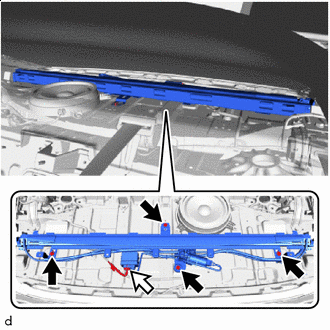

Bolt 
Connector Install the rear window sunshade assembly with the 4 bolts.
-
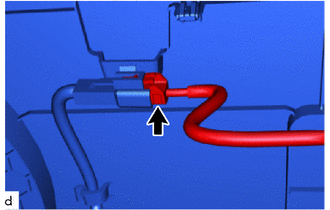
Connect the connector.
-
-
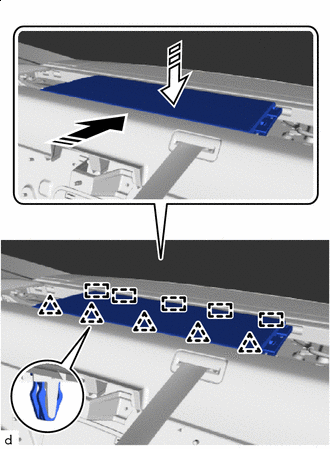
INSTALL NO. 2 PACKAGE TRAY TRIM PANEL ASSEMBLY
-
Attach the hook.
-
Attach the clip to install the No. 2 package tray trim panel assembly.
-
-
INSTALL NO. 1 CENTER SPEAKER GRILLE SUB-ASSEMEBLY
-
w/ Power Seat:
-
Connect the connector.
-
-

Install in this Direction (1) 
Install in this Direction (2) Insert the guide in the installation direction (1) shown in the illustration.
-
Attach the clip and install the No. 1 center speaker grille sub-assembly in the installation direction (2) shown in the illustration.
-
-
INSTALL INNER ROOF SIDE GARNISH ASSEMBLY LH
-
INSTALL INNER ROOF SIDE GARNISH ASSEMBLY RH
Tech Tips
Use the same procedure described for the LH side.
-
INSTALL PACKAGE TRAY TRIM SIDE COVER LH
-
INSTALL PACKAGE TRAY TRIM SIDE COVER RH
Tech Tips
Use the same procedure described for the LH side.
-
INSTALL PACKAGE TRAY TRIM GARNISH LH
-
INSTALL PACKAGE TRAY TRIM GARNISH RH
Tech Tips
Use the same procedure described for the LH side.
-
INSTALL ROOF SIDE RAIL GARNISH ASSEMBLY LH
-
INSTALL ROOF SIDE RAIL GARNISH ASSEMBLY RH
Tech Tips
Use the same procedure described for the LH side.
-
INSTALL REAR SEAT SIDE GARNISH LH
-
INSTALL REAR SEAT SIDE GARNISH RH
Tech Tips
Use the same procedure described for the LH side.
-
INSTALL REAR DOOR SCUFF PLATE LH
-
INSTALL REAR DOOR SCUFF PLATE RH
Tech Tips
Use the same procedure described for the LH side.
-
INSTALL REAR SEATBACK ASSEMBLY LH (for Power Seat)
-
INSTALL REAR SEATBACK ASSEMBLY RH (for Power Seat)
Tech Tips
Use the same procedure described for the LH side.
-
INSTALL REAR SEAT CUSHION LOCK HOOK (for Power Seat)
-
INSTALL REAR SEAT CUSHION ASSEMBLY LH (for Power Seat)
-
INSTALL REAR SEAT CUSHION ASSEMBLY RH (for Power Seat)
Tech Tips
Use the same procedure described for the LH side.
-
INSTALL REAR SEATBACK HOLDER (for Fixed Seat Type)
-
INSTALL REAR SEAT CUSHION LOCK HOOK (for Fixed Seat Type)
-
INSTALL REAR SEATBACK ASSEMBLY (for Fixed Seat Type)
-
INSTALL NO. 1 SEAT ARMREST CAP (for Fixed Seat Type)
-
INSTALL REAR SEAT CUSHION ASSEMBLY (for Fixed Seat Type)
-
CONNECT CABLE TO NEGATIVE AUXILIARY BATTERY TERMINAL
Note
When disconnecting the cable, some systems need to be initialized after the cable is reconnected.
-
INSTALL LUGGAGE COMPARTMENT MAT SUB-ASSEMBLY
-
PERFORM DIAGNOSTIC SYSTEM CHECK
-
CHECK SRS WARNING LIGHT
-
PERFORM SYSTEM CALIBRATION