REAR AIR CONDITIONING UNIT INSTALLATION
PROCEDURE
-
INSTALL REAR COOLING UNIT ASSEMBLY
-
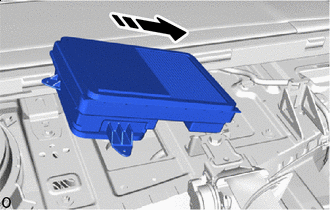
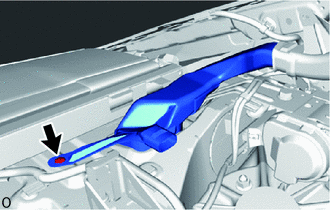
Load the rear cooling unit assembly onto the HV battery, and while moving it towards the rear, align it with the installation position for each stud bot.
-
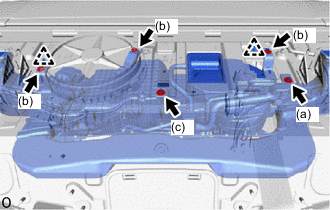
Attach the clip shown in the illustration to temporarily install the rear cooling unit assembly to the vehicle.
-
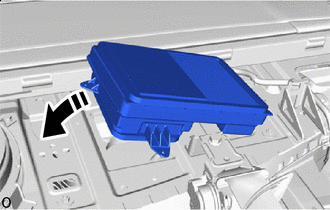
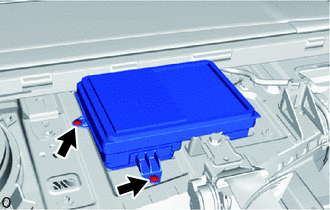
Install the rear cooling unit assembly with the 5 nuts.
- Torque:
- 9.8 N*m { 100 kgf*cm, 87 in.*lbf }
Tech Tips
Tighten the nuts in the order shown in the illustration.
-
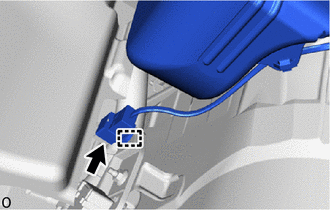
Connect the connector and attach the clamp.
-
-
INSTALL AIR CONDITIONING TUBE AND ACCESSORY ASSEMBLY
-
Remove the vinyl tape wrapped around the connection of the air conditioning tube and accessory assembly and unit.
-
Apply a sufficient amount of compressor oil (ND-OIL 8) to the 2 new O-rings and the fitting surface of the air conditioning tube and accessory assembly, and then install the 2 O-rings to the air conditioning tube and accessory assembly.
Note
Keep the O-ring and O-ring fitting surfaces free from dirt or foreign matter.
-
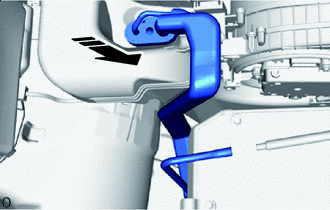

Install in this Direction Move the air conditioning tube and accessory assembly in the direction indicated by the arrow shown in the illustration and set it into place at the installation position.
Note
Make sure not to cut the O-ring while installing it. (Cut O-rings cannot be installed)
-
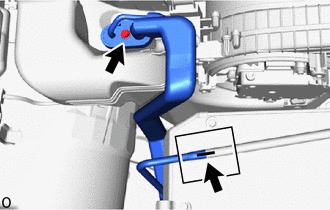
Connect the air conditioning tube and accessory assembly with the bolt.
- Torque:
- 9.8 N*m { 100 kgf*cm, 87 in.*lbf }
-
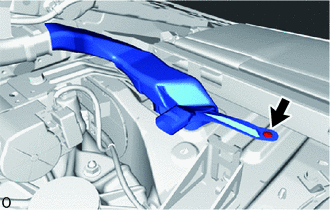
Align the drain hose matchmarks shown in the illustration and install the drain hose.
-
Install a new packing and secure the drain hose.
-
-
INSTALL LUGGAGE COMPARTMENT TRIM COVER ASSEMBLY RH
-
INSTALL LUGGAGE COMPARTMENT TRIM COVER ASSEMBLY LH
-
INSTALL SIDE TRIM BOX
-
INSTALL REAR LUGGAGE COMPARTMENT TRIM COVER
-
INSTALL NO. 1 LUGGAGE COMPARTMENT LIGHT ASSEMBLY
-
INSTALL FRONT LUGGAGE COMPARTMENT TRIM COVER
-
INSTALL REAR FLOOR FINISH PLATE
-
INSTALL ROPE HOOK ASSEMBLY
-
INSTALL LUGGAGE COMPARTMENT TRIM COVER LH
-
INSTALL LUGGAGE COMPARTMENT TRIM COVER RH
-
INSTALL INNER LOWER LUGGAGE COMPARTMENT TRIM COVER
-
INSTALL TOOL BOX
-
INSTALL LUGGAGE COMPARTMENT FLOOR MAT
-
INSTALL NO. 6 REAR AIR DUCT
-
Install in this Direction Slide the No. 6 rear air duct in the direction indicated by the arrow shown in the illustration.
-
Install in this Direction Move the No. 6 rear air duct to the installation position in the direction indicated by the arrow shown in the illustration.
-
Attach the clips.
-
-
INSTALL NO. 2 ROOF SIDE AIR DUCT RH
-
Insert the No. 2 roof side air duct RH into the duct on the vehicle side and install it with the clip.
-
-
INSTALL NO. 2 ROOF SIDE AIR DUCT LH
-
Insert the No. 2 roof side air duct LH into the duct on the vehicle side and install it with the clip.
-
-
INSTALL NO. 5 REAR AIR DUCT
-
Install the No. 5 rear air duct.
-
-
INSTALL NO. 4 REAR AIR DUCT
-
Install the No. 4 rear air duct.
-
-
INSTALL PACKAGE TRAY TRIM PANEL ASSEMBLY (for Power Seat)
-
INSTALL PACKAGE TRAY TRIM PANEL ASSEMBLY (for Fixed Seat Type)
-
INSTALL REAR SEAT ASSEMBLY
-
for Fixed Seat Type:
-
for Power Seat:
-
-
CONNECT CABLE TO NEGATIVE AUXILIARY BATTERY TERMINAL
Note
When disconnecting the cable, some systems need to be initialized after the cable is reconnected.
-
INSTALL LUGGAGE COMPARTMENT MAT SUB-ASSEMBLY
-
CHARGE AIR CONDITIONING SYSTEM WITH REFRIGERANT
for HFC-134a(R134a):
-
WARM UP ENGINE
for HFC-134a(R134a):
-
INSPECT FOR REFRIGERANT LEAK
for HFC-134a(R134a):
-
PERFORM DIAGNOSTIC SYSTEM CHECK
-
INITIALIZATION SERVO MOTOR
-
INITIALIZATION OF SEAT ECU
-
INSPECT SRS WARNING LIGHT
-
INSPECT REAR SEAT ASSEMBLY
-
INSPECT SEAT HEATER SYSTEM
-
INSPECT CLIMATE CONTROL SEAT SYSTEM
-
INSPECT SEAT VIBRATION SYSTEM (w/ Refresh Seat)
-
INSPECT SEAT BELT WARNING SYSTEM