PROCEDURE
- Click here
INSTALL RADIATOR ASSEMBLY (for Inverter Coolant)
-
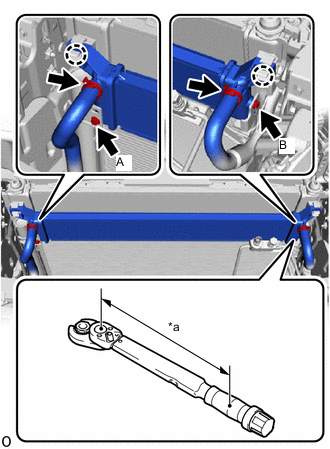
*a Torque Wrench Fulcrum Length Attach the 2 claws and install the radiator assembly.
-
Install the bolt A.
9.0 N*m 92 kgf*cm 80 in.*lbf -
Using a 10 mm union nut wrench, install the bolt B.
Specified tightening torque 9.0 N*m 92 kgf*cm 80 in.*lbf Tip:
-
Calculate the torque wrench reading when changing the fulcrum length of the torque wrench.
-
When using a union nut wrench (fulcrum length of 22 mm (0.866 in.)) + torque wrench (fulcrum length of 162 mm (6.378 in.)): 7.9 N*m (81 kgf*cm, 70 in.*lbf)
-
-
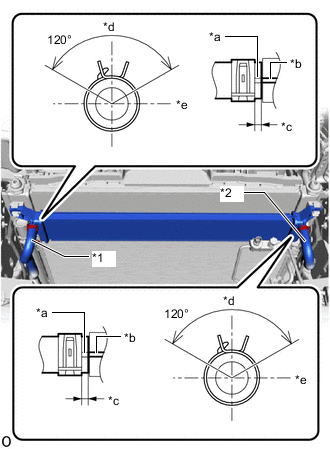
*1 No. 2 Inverter Cooling Hose *2 No. 3 Inverter Cooling Hose *a Alignment Mark (Yellow) *b Rib *c 2.0 to 7.0 mm (0.079 to 0.276 in.) *d Upper Side *e LH Side Connect the No. 2 inverter cooling hose and No. 3 inverter cooling hose to the radiator assembly and slide the 2 hose clips to secure them.
Note:To prevent foreign matter from entering the radiator assembly and inverter cooling system, do not remove the pieces of cloth from the pipes and disconnected hoses until installation.
Tip:
-
Make sure to align the alignment marks of the hoses with the ribs of the radiator assembly.
-
Make sure that the clips are positioned as shown in the illustration.
-
-
- Click here
INSTALL UPPER RADIATOR SUPPORT SUB-ASSEMBLY
- Click here
INSTALL HOOD LOCK CONTROL CABLE COVER RH
- Click here
INSTALL HOOD LOCK CONTROL CABLE COVER LH (for LHD)
- Click here
CONNECT ENGINE ROOM MAIN WIRE
- Click here
INSTALL HIGH PITCHED HORN ASSEMBLY
- Click here
INSTALL LOW PITCHED HORN ASSEMBLY
- Click here
INSTALL HOOD LOCK ASSEMBLY
- Click here
INSTALL HOOD LOCK RELEASE LEVER PROTECTOR
- Click here
INSTALL LOWER ARM BRACKET BRACE SUB-ASSEMBLY LH
- Click here
INSTALL LOWER ARM BRACKET BRACE SUB-ASSEMBLY RH
- Click here
INSTALL NO. 1 AIR CLEANER INLET
- Click here
INSTALL RADIATOR SUPPORT TO CROSSMEMBER BRACE SUB-ASSEMBLY RH
- Click here
INSTALL RADIATOR SUPPORT TO CROSSMEMBER BRACE SUB-ASSEMBLY LH
- Click here
INSTALL FRONT BUMPER
-
for Sport Package:
-
except Sport Package:
-
- Click here
ADD COOLANT (for Inverter)
- Click here
INSPECT FOR COOLANT LEAK (for Inverter)
- Click here
INSTALL LOWER RADIATOR AIR DEFLECTOR
- Click here
INSTALL RADIATOR COVER PLATE
- Click here
INSTALL UPPER RADIATOR SUPPORT SEAL