PROCEDURE
- Click here
AIR SUSPENSION CONTROL PROHIBITED (w/ Air Suspension)
- Click here
DRAIN COOLANT (for Inverter)
- Click here
REMOVE UPPER RADIATOR SUPPORT SEAL
- Click here
REMOVE RADIATOR COVER PLATE
- Click here
REMOVE LOWER RADIATOR AIR DEFLECTOR
- Click here
REMOVE RADIATOR SUPPORT TO CROSSMEMBER BRACE SUB-ASSEMBLY RH
- Click here
REMOVE NO. 1 AIR CLEANER INLET
- Click here
REMOVE AIR CLEANER ASSEMBLY
- Click here
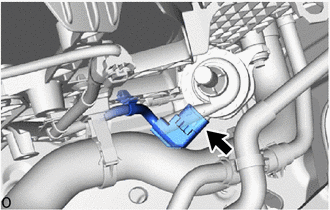
REMOVE INVERTER RESERVE TANK ASSEMBLY
-
for LHD:
-
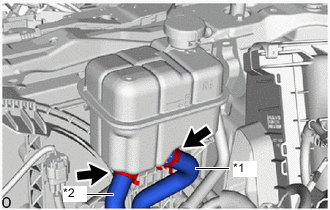
*1 No. 1 Inverter Cooling Hose *2 No. 6 Inverter Cooling Hose Slide the 2 hose clips and disconnect the No. 1 inverter cooling hose and No. 6 inverter cooling hose from the inverter reserve tank assembly.
Note:
-
During removal, make sure not to damage the port of the inverter reserve tank assembly or the inner surface of the hose.
-
Perform the work by hand. Do not use tools.
-
Put pieces of cloth into the pipes and disconnected hoses or cover the pipes and hoses with plastic bags to prevent foreign matter from entering the inverter water pump assembly and cooling system.
-
Do not apply excessive force to the No. 1 inverter cooling hose and No. 6 inverter cooling hose.
-
-
-
for RHD:
-
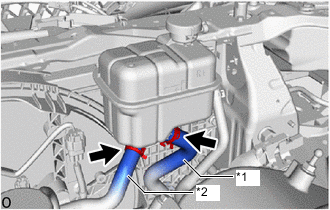
*1 No. 1 Inverter Cooling Hose *2 No. 2 Inverter Cooling Hose Assembly Slide the 2 hose clips and disconnect the No. 1 inverter cooling hose and No. 2 inverter cooling hose assembly from the inverter reserve tank assembly.
Note:
-
During removal, make sure not to damage the port of the inverter reserve tank assembly or the inner surface of the hose.
-
Perform the work by hand. Do not use tools.
-
Put pieces of cloth into the pipes and disconnected hoses or cover the pipes and hoses with plastic bags to prevent foreign matter from entering the inverter water pump assembly and cooling system.
-
Do not apply excessive force to the No. 1 inverter cooling hose and No. 2 inverter cooling hose assembly.
-
-
-
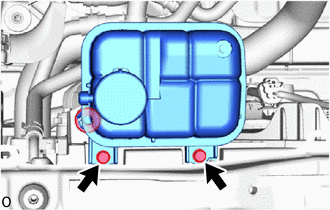
Remove the 2 bolts.
-
Disconnect the grommet and remove the inverter reserve tank assembly.
-
- Click here
REMOVE INVERTER WATER PUMP ASSEMBLY (WITH MOTOR)
-
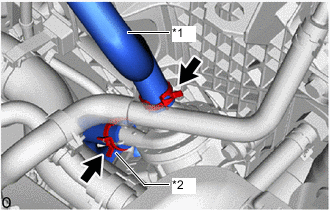
*1 No. 1 Inverter Cooling Hose *2 No. 2 Inverter Cooling Hose Slide the 2 hose clips and disconnect the No. 1 inverter cooling hose and No. 2 inverter cooling hose from the inverter water pump assembly (with motor).
Note:
-
During removal, make sure not to damage the port of the inverter water pump assembly (with motor) or the inner surface of the hose.
-
Perform the work by hand. Do not use tools.
-
Put pieces of cloth into the pipes and disconnected hoses or cover the pipes and hoses with plastic bags to prevent foreign matter from entering the inverter water pump assembly and cooling system.
-
Do not apply excessive force to the No. 1 inverter cooling hose and No. 2 inverter cooling hose.
-
-
Disconnect the connector.
Note:
- To prevent the coolant from entering the inverter water pump assembly connector, perform the following procedure.
-
Wipe off any coolant around the inverter water pump assembly (with motor) connector before disconnecting it.
-
Apply insulating tape to the connectors of the wire harness and inverter water pump assembly (with motor) to prevent the entry of coolant.
-
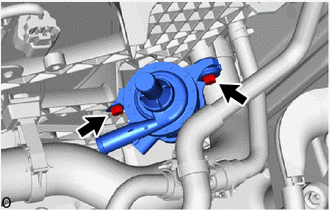
Remove the 2 bolts and inverter water pump assembly (with motor).
Note:If the inverter water pump assembly (with motor) has been struck or dropped, replace it.
-