FUEL PUMP(for High Pressure) REMOVAL
PROCEDURE
-
PRECAUTION
Note
After turning the power switch off, waiting time may be required before disconnecting the cable from the negative (-) auxiliary battery terminal. Therefore, make sure to read the disconnecting the cable from the negative (-) auxiliary battery terminal notices before proceeding with work.
-
DISCHARGE FUEL SYSTEM PRESSURE
-
REMOVE BATTERY SERVICE HOLE COVER LH
-
DISCONNECT CABLE FROM NEGATIVE AUXILIARY BATTERY TERMINAL
Note
When disconnecting the cable, some systems need to be initialized after the cable is reconnected.
-
REMOVE INTAKE MANIFOLD
-
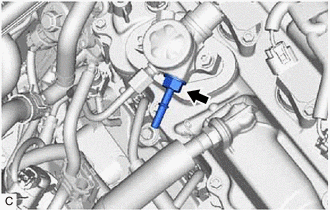
DISCONNECT FUEL TUBE SUB-ASSEMBLY
Note
Remove any foreign matter on the fuel tube connector and fuel pipe before performing this work.
-
Disconnect the fuel tube sub-assembly from the No. 1 fuel pipe.
-
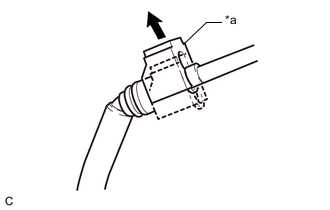
*a Fuel Tube Connector Cover 
Pull off Pull off the fuel tube connector cover.
-

*a Retainer *b Fuel Tube Connector *c Nylon Tube *d O-ring *e Fuel Pipe Pinch 
Pull off Pinch the retainer of the fuel tube connector, and then pull the fuel tube connector off of the fuel pipe.
Note
Be sure to disconnect the fuel tube connector by hand.
-
If the fuel tube connector and fuel pipe are stuck, push and pull the fuel tube connector to release it. Pull the fuel tube connector off of the fuel pipe carefully.
Note
-
Be sure to disconnect the fuel tube connector by hand.
-
Do not scratch or allow any foreign matter to get on the parts when disconnecting them as the fuel tube connector has O-rings that seal the pipe (fuel pipe).
-
Do not bend, twist, pinch or kink the nylon tube.
-
-
Check that there is no foreign matter on the sealing surfaces of the disconnected fuel lines. Clean them if necessary.
-
Cover the disconnected fuel pipe and fuel tube connector with plastic bags to prevent damage and contamination.
-
-
-
REMOVE NO. 1 FUEL PIPE
-
Remove the No. 1 fuel pipe and gasket from the fuel pump with seal sub-assembly.
-
-
REMOVE NO. 1 FUEL PIPE SUB-ASSEMBLY
-
Using a 17 mm union nut wrench, loosen the 2 union nuts of the No. 1 fuel pipe sub-assembly.
-
Loosen the 2 bolts of the fuel pump with seal sub-assembly.
-
Remove the No. 1 fuel pipe sub-assembly from the fuel delivery pipe sub-assembly and fuel pump with seal sub-assembly.
-
-
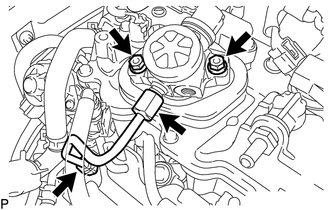
REMOVE FUEL PUMP WITH SEAL SUB-ASSEMBLY
-
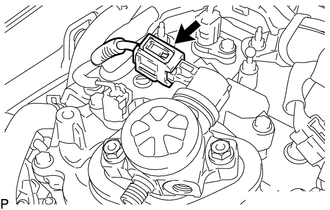
Disconnect the fuel pump with seal sub-assembly connector.
-
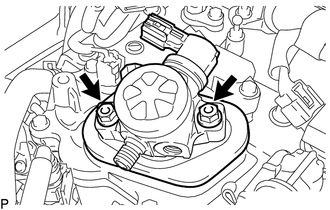
Remove the 2 bolts and fuel pump with seal sub-assembly.
-
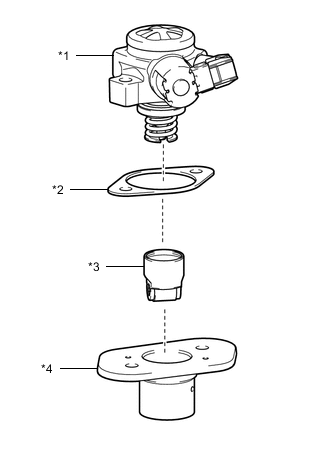
*1 Fuel Pump with Seal Sub-assembly *2 Fuel Pump Insulator *3 Fuel Pump Lifter Assembly *4 Fuel Pump Lifter Guide Remove the fuel pump lifter assembly, fuel pump lifter guide and fuel pump insulator from the fuel pump with seal sub-assembly.
-
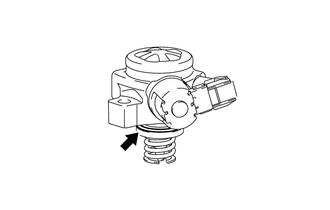
Remove the O-ring from the fuel pump sub-assembly.
-
*1 Fuel Pump Spacer Gasket *2 O-ring Remove the fuel pump spacer gasket from the cylinder head cover sub-assembly.
-
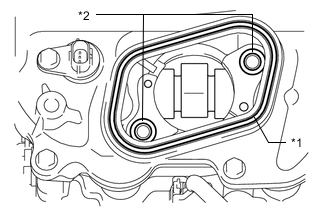
Remove the 2 O-rings from the No. 4 camshaft bearing cap.
-