DOOR CONTROL RECEIVER INSTALLATION
PROCEDURE
-
INSTALL SMART DOOR CONTROL RECEIVER ASSEMBLY (w/o Tire Pressure Warning System)
Note
-
Do not drop the smart door control receiver assembly, strike it with tools or subject it to impact.
-
If the smart door control receiver assembly is subjected to an impact, replace it with a new one.
-
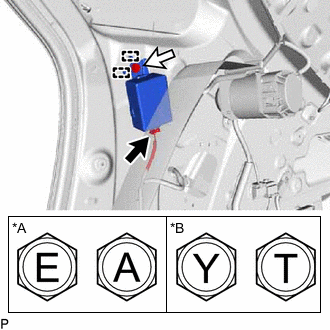
*A for Type A *B for Type B Connect the connector.
-
Engage the 2 guides and install the smart door control receiver assembly with the bolt.
- Torque:
- for Type A
- 8.3 N*m { 85 kgf*cm, 73 in.*lbf }
- for Type B
- 10 N*m { 102 kgf*cm, 7 ft.*lbf }
Note
There are four types of bolts and the tightening torque depends on the type of bolt used as shown in the illustration. Therefore, confirm the tightening torque before installing the bolt.
-
-
INSTALL ELECTRICAL KEY AND TIRE PRESSURE WARNING ECU AND RECEIVER (w/ Tire Pressure Warning System)
Note
-
Do not drop the electrical key and tire pressure warning ECU and receiver, strike it with tools or subject it to impact.
-
If the electrical key and tire pressure warning ECU and receiver is subjected to an impact, replace it with a new one.
-
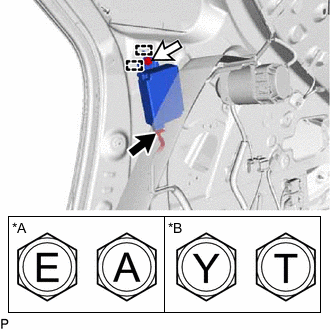
*A for Type A *B for Type B Connect the connector.
-
Engage the 2 guides and install the electrical key and tire pressure warning ECU and receiver with the bolt.
- Torque:
- for Type A
- 8.3 N*m { 85 kgf*cm, 73 in.*lbf }
- for Type B
- 10 N*m { 102 kgf*cm, 7 ft.*lbf }
Note
There are four types of bolts and the tightening torque depends on the type of bolt used as shown in the illustration. Therefore, confirm the tightening torque before installing the bolt.
-
-
INSTALL ROOF SIDE INNER GARNISH ASSEMBLY RH (w/o Rear No. 2 Seat)
-
INSTALL DECK TRIM SIDE PANEL ASSEMBLY RH (w/o Rear No. 2 Seat)
-
INSTALL RECLINING REMOTE CONTROL BEZEL RH (w/o Rear No. 2 Seat)
w/o Rear Power Seat System:
-
INSTALL FOLD SEAT SWITCH ASSEMBLY (w/o Rear No. 2 Seat)
w/ Rear Power Seat System:
-
INSTALL NO. 1 LUGGAGE COMPARTMENT LIGHT ASSEMBLY (w/o Rear No. 2 Seat)
-
INSTALL ROPE HOOK ASSEMBLY (w/o Rear No. 2 Seat)
-
INSTALL NO. 1 LUGGAGE COMPARTMENT TRIM HOOK (w/o Rear No. 2 Seat)
-
INSTALL REAR FLOOR FINISH SIDE PLATE RH (w/o Rear No. 2 Seat)
-
INSTALL REAR SEAT SIDE GARNISH RH (w/o Rear No. 2 Seat)
-
INSTALL UPPER QUARTER TRIM PAD RH (w/o Rear No. 2 Seat)
-
INSTALL REAR SEAT ASSEMBLY RH (w/o Rear No. 2 Seat)
-
INSTALL REAR DOOR SCUFF PLATE RH (w/o Rear No. 2 Seat)
-
INSTALL REAR FLOOR FINISH PLATE (w/o Rear No. 2 Seat)
-
INSTALL DECK SIDE TRIM BOX RH (w/o Rear No. 2 Seat)
except Full Size Spare Tire:
-
INSTALL DECK SIDE TRIM BOX RH (w/o Rear No. 2 Seat)
for Full Size Spare Tire:
-
INSTALL DECK FLOOR BOX RH (w/o Rear No. 2 Seat)
w/o Spare Tire:
-
INSTALL REAR NO. 4 FLOOR BOARD (w/o Rear No. 2 Seat)
except Full Size Spare Tire:
-
INSTALL REAR NO. 4 FLOOR BOARD (w/o Rear No. 2 Seat)
for Full Size Spare Tire:
-
INSTALL REAR DECK FLOOR BOX (w/o Rear No. 2 Seat)
w/ Spare Tire:
-
INSTALL SPARE WHEEL COVER (w/o Rear No. 2 Seat)
for Compact Spare Tire:
-
INSTALL REAR FLOOR CARPET (w/o Rear No. 2 Seat)
w/o Spare Tire:
-
INSTALL REAR NO. 3 FLOOR BOARD (w/o Rear No. 2 Seat)
-
INSTALL DECK BOARD ASSEMBLY (w/o Rear No. 2 Seat)
-
INSTALL TONNEAU COVER ASSEMBLY (w/o Rear No. 2 Seat)
-
INSTALL ROOF SIDE INNER GARNISH ASSEMBLY RH (w/ Rear No. 2 Seat)
-
CONNECT REAR NO. 2 SEAT OUTER BELT ASSEMBLY RH (w/ Rear No. 2 Seat)
-
INSTALL DECK TRIM SIDE PANEL ASSEMBLY RH (w/ Rear No. 2 Seat)
-
INSTALL NO. 1 LUGGAGE COMPARTMENT LIGHT ASSEMBLY (w/ Rear No. 2 Seat)
-
INSTALL ROPE HOOK ASSEMBLY (w/ Rear No. 2 Seat)
-
INSTALL NO. 1 LUGGAGE COMPARTMENT TRIM HOOK (w/ Rear No. 2 Seat)
-
INSTALL REAR SEAT SIDE GARNISH RH (w/ Rear No. 2 Seat)
-
INSTALL FRONT DECK SIDE TRIM COVER RH (w/ Rear No. 2 Seat)
-
INSTALL REAR SEAT OUTER TRACK BRACKET COVER RH (w/ Rear No. 2 Seat)
-
INSTALL REAR DOOR INSIDE SCUFF PLATE RH (w/ Rear No. 2 Seat)
-
INSTALL REAR DOOR SCUFF PLATE RH (w/ Rear No. 2 Seat)
-
INSTALL REAR NO. 2 SEAT ASSEMBLY (w/ Rear No. 2 Seat)
-
REGISTER TRANSMITTER ID (w/ Tire Pressure Warning System)
-
INSPECT TIRE PRESSURE WARNING SYSTEM (w/ Tire Pressure Warning System)
-
PERFORM INITIALIZATION (w/ Tire Pressure Warning System)