TIRE PRESSURE WARNING RECEIVER(for Quarter Panel) INSTALLATION
PROCEDURE
-
INSTALL TIRE PRESSURE WARNING ECU AND RECEIVER
Note
-
Do not drop the tire pressure warning ECU and receiver, strike it with tools or subject it to impact.
-
If the tire pressure warning ECU and receiver is subjected to an impact, replace it with a new one.
-
w/o Rear No. 2 Seat:
-
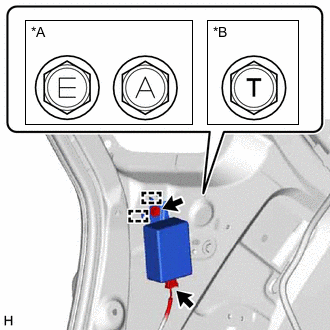
*A for Type A *B for Type B Connect the connector to the tire pressure warning ECU and receiver.
-
Engage the 2 guides and install the tire pressure warning ECU and receiver with the bolt.
- Torque:
- for Type A
- 8.3 N*m { 85 kgf*cm, 73 in.*lbf }
- for Type B
- 10 N*m { 102 kgf*cm, 7 ft.*lbf }
Note
There are 3 types of bolts and the tightening torque depends on the type of bolt used as shown in the illustration. Therefore, confirm the tightening torque before installing the bolt.
-
-
w/ Rear No. 2 Seat for Upper Side:
-
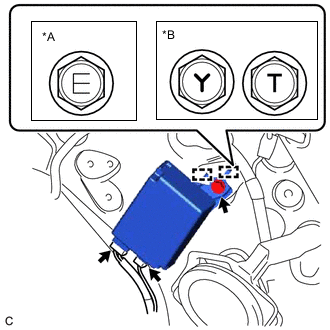
*A for Type A *B for Type B Connect the 2 connectors to the tire pressure warning ECU and receiver.
-
Engage the 2 guides and install the tire pressure warning ECU and receiver with the bolt.
- Torque:
- for Type A
- 5.0 N*m { 51 kgf*cm, 44 in.*lbf }
- for Type B
- 10 N*m { 102 kgf*cm, 7 ft.*lbf }
Note
There are 3 types of bolts and the tightening torque depends on the type of bolt used as shown in the illustration. Therefore, confirm the tightening torque before installing the bolt.
-
-
w/ Rear No. 2 Seat for Lower Side:
-
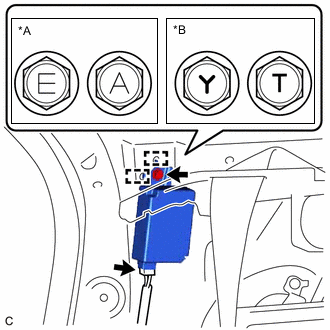
*A for Type A *B for Type B Connect the connector to the tire pressure warning ECU and receiver.
-
Engage the 2 guides and install the tire pressure warning ECU and receiver with the bolt.
- Torque:
- for Type A
- 8.3 N*m { 85 kgf*cm, 73 in.*lbf }
- for Type B
- 10 N*m { 102 kgf*cm, 7 ft.*lbf }
Note
There are 4 types of bolts and the tightening torque depends on the type of bolt used as shown in the illustration. Therefore, confirm the tightening torque before installing the bolt.
-
-
-
INSTALL ROOF SIDE INNER GARNISH ASSEMBLY RH (w/o Rear No. 2 Seat)
-
INSTALL DECK TRIM SIDE PANEL ASSEMBLY RH (w/o Rear No. 2 Seat)
-
INSTALL RECLINING REMOTE CONTROL BEZEL RH (w/o Rear No. 2 Seat)
w/o Rear Power Seat System:
-
INSTALL FOLD SEAT SWITCH ASSEMBLY (w/o Rear No. 2 Seat)
w/ Rear Power Seat System:
-
INSTALL NO. 1 LUGGAGE COMPARTMENT LIGHT ASSEMBLY (w/o Rear No. 2 Seat)
-
INSTALL ROPE HOOK ASSEMBLY (w/o Rear No. 2 Seat)
-
INSTALL NO. 1 LUGGAGE COMPARTMENT TRIM HOOK (w/o Rear No. 2 Seat)
-
INSTALL REAR FLOOR FINISH SIDE PLATE RH (w/o Rear No. 2 Seat)
-
INSTALL REAR SEAT SIDE GARNISH RH (w/o Rear No. 2 Seat)
-
INSTALL UPPER QUARTER TRIM PAD RH (w/o Rear No. 2 Seat)
-
INSTALL REAR SEAT ASSEMBLY RH (w/o Rear No. 2 Seat)
-
INSTALL REAR DOOR SCUFF PLATE RH (w/o Rear No. 2 Seat)
-
INSTALL REAR FLOOR FINISH PLATE (w/o Rear No. 2 Seat)
-
INSTALL DECK SIDE TRIM BOX RH (w/o Rear No. 2 Seat)
except Full Size Spare Tire:
-
INSTALL DECK SIDE TRIM BOX RH (w/o Rear No. 2 Seat)
for Full Size Spare Tire:
-
INSTALL DECK FLOOR BOX RH (w/o Rear No. 2 Seat)
w/o Spare Tire:
-
INSTALL REAR NO. 4 FLOOR BOARD (w/o Rear No. 2 Seat)
except Full Size Spare Tire:
-
INSTALL REAR NO. 4 FLOOR BOARD (w/o Rear No. 2 Seat)
for Full Size Spare Tire:
-
INSTALL REAR DECK FLOOR BOX (w/o Rear No. 2 Seat)
w/ Spare Tire:
-
INSTALL SPARE WHEEL COVER (w/o Rear No. 2 Seat)
for Compact Spare Tire:
-
INSTALL REAR FLOOR CARPET (w/o Rear No. 2 Seat)
w/o Spare Tire:
-
INSTALL REAR NO. 3 FLOOR BOARD (w/o Rear No. 2 Seat)
-
INSTALL DECK BOARD ASSEMBLY (w/o Rear No. 2 Seat)
-
INSTALL TONNEAU COVER ASSEMBLY (w/o Rear No. 2 Seat)
-
INSTALL ROOF SIDE INNER GARNISH ASSEMBLY RH (w/ Rear No. 2 Seat)
-
CONNECT REAR NO. 2 SEAT OUTER BELT ASSEMBLY RH (w/ Rear No. 2 Seat)
-
INSTALL DECK TRIM SIDE PANEL ASSEMBLY RH (w/ Rear No. 2 Seat)
-
INSTALL NO. 1 LUGGAGE COMPARTMENT LIGHT ASSEMBLY (w/ Rear No. 2 Seat)
for RH Side:
-
INSTALL ROPE HOOK ASSEMBLY (w/ Rear No. 2 Seat)
for RH Side:
-
INSTALL NO. 1 LUGGAGE COMPARTMENT TRIM HOOK (w/ Rear No. 2 Seat)
for RH Side:
-
INSTALL REAR SEAT SIDE GARNISH RH (w/ Rear No. 2 Seat)
-
INSTALL FRONT DECK SIDE TRIM COVER RH (w/ Rear No. 2 Seat)
-
INSTALL REAR SEAT OUTER TRACK BRACKET COVER RH (w/ Rear No. 2 Seat)
-
INSTALL REAR DOOR INSIDE SCUFF PLATE RH (w/ Rear No. 2 Seat)
-
INSTALL REAR DOOR SCUFF PLATE RH (w/ Rear No. 2 Seat)
-
INSTALL REAR NO. 2 SEAT ASSEMBLY (w/ Rear No. 2 Seat)
-
REGISTER TRANSMITTER ID
-
INSPECT TIRE PRESSURE WARNING SYSTEM
-
PERFORM INITIALIZATION