REAR DIFFERENTIAL CARRIER OIL SEAL REPLACEMENT

CAUTION / NOTICE / HINT
The necessary procedures (adjustment, calibration, initialization, or registration) that must be performed after parts are removed and installed, or replaced during diaphragm oil seal replacement are shown below.
| Replaced Part or Performed Procedure | Necessary Procedure | Effect/Inoperative Function when Necessary Procedure not Performed | Link |
|---|---|---|---|
| Rear wheel alignment adjustment |
|
|
|
| Suspension, tires, etc. (The vehicle height changes because of suspension or tire replacement) |
Rear television camera assembly optical axis (Back camera position setting) | Parking assist monitor system (w/ Parallel Parking Assist Function) | for Initialization: Click here for Calibration: Click here |
| Rear television camera assembly optical axis (Back camera position setting) | Parking assist monitor system (w/o Parallel Parking Assist Function) | for Initialization: Click here for Calibration: Click here |
|
|
Panoramic view monitor system | for Initialization: Click here for Calibration: Click here |
|
| Initialize headlight ECU sub-assembly LH |
|
||
|
|
||
| Gas leaks from exhaust system | Inspection after repair |
|
for 8AR-FTS: Click here for 2GR-FKS (w/ Canister Pump Module): Click here for 2GR-FKS (w/o Canister Pump Module): Click here |
PROCEDURE
-
REMOVE NO. 2 REAR DIFFERENTIAL SUPPORT
-
SEPARATE ELECTRO MAGNETIC CONTROL COUPLING WIRE HARNESS
-
REMOVE ELECTRO MAGNETIC CONTROL COUPLING SUB-ASSEMBLY
-
REMOVE TRANSMISSION COUPLING CONICAL SPRING WASHER
-
REMOVE TRANSMISSION COUPLING SPACER
-
REMOVE DIAPHRAGM OIL SEAL
-
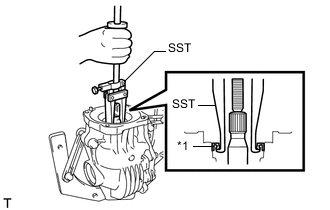
*1 Diaphragm Oil Seal Using SST, remove the diaphragm oil seal from the rear differential carrier assembly.
- SST
- 09308-00010
-
-
INSTALL DIAPHRAGM OIL SEAL
-
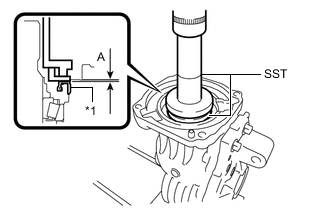
*1 Diaphragm Oil Seal Using SST and a press, install a new diaphragm oil seal into the rear differential carrier assembly.
- SST
- 09506-35010
Note
-
Install the diaphragm oil seal uniformly.
-
Press fit the diaphragm oil seal straight.
-
Do not damage the diaphragm oil seal.
-
Do not excessively press in the diaphragm oil seal.
-
Make sure to install the diaphragm oil seal as specified, otherwise a malfunction such as an oil leak may occur.
Standard Distance (A) 0.7 to 1.3 mm (0.0276 to 0.0511 in.) -
Apply a light coat of MP grease to the lip of the new diaphragm oil seal.
-
-
INSTALL TRANSMISSION COUPLING SPACER
-
INSTALL TRANSMISSION COUPLING CONICAL SPRING WASHER
-
INSTALL ELECTRO MAGNETIC CONTROL COUPLING SUB-ASSEMBLY
-
INSTALL ELECTRO MAGNETIC CONTROL COUPLING WIRE HARNESS
-
TEMPORARILY INSTALL NO. 2 REAR DIFFERENTIAL SUPPORT