CANISTER REMOVAL
Info Added 2017-10-06 ![]()
CAUTION / NOTICE / HINT
The necessary procedures (adjustment, calibration, initialization or registration) that must be performed after parts are removed and installed, or replaced during canister (charcoal canister assembly) removal/installation are shown below.
| Replaced Part or Performed Procedure | Necessary Procedure | Effect/Inoperative Function when Necessary Procedure not Performed | Link |
|---|---|---|---|
| Gas leak from exhaust system is repaired | Inspection After Repair |
|
PROCEDURE
-
REMOVE TAIL EXHAUST PIPE ASSEMBLY
-
REMOVE REAR FLOOR SIDE MEMBER COVER LH
-
REMOVE REAR FLOOR SIDE MEMBER COVER RH
-
REMOVE REAR NO. 1 STABILIZER BAR BRACKET
-
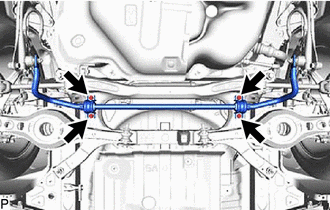
Remove the 4 bolts and 2 rear No. 1 stabilizer bar brackets from the vehicle body.
-
-
REMOVE CANISTER (CHARCOAL CANISTER ASSEMBLY)
-
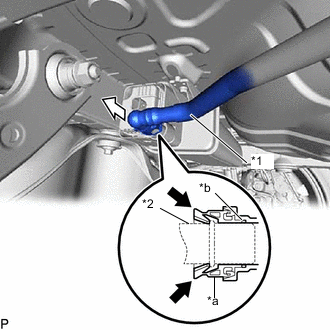
*1 Fuel Tank Vent Hose Sub-assembly *2 Pipe (canister (charcoal canister assembly)) *a Tube Connector *b O-ring 
Pinch 
Pull off Disconnect the fuel tank vent hose sub-assembly from the canister (charcoal canister assembly).
Note
-
Remove any dirt or foreign matter on the tube connector before performing this work.
-
Do not allow any scratches or foreign matter to get on the parts when disconnecting them as the tube connector has an O-ring that seals the pipe.
-
Perform this work by hand. Do not use any tools.
-
Do not forcibly bend, twist or turn the air line tube.
-
Protect the disconnected parts by covering them with plastic bags after disconnecting the air line tube.
-
If the tube connector and pipe are stuck, push and pull to release them.
-
Push the fuel tank vent hose sub-assembly firmly toward the canister (charcoal canister assembly).
-
Pinch the tube connector as shown in the illustration.
-
Pull off the fuel tank vent hose sub-assembly from the pipe (canister (charcoal canister assembly)).
-
-
Disconnect the fuel tank vent hose from the canister (charcoal canister assembly).
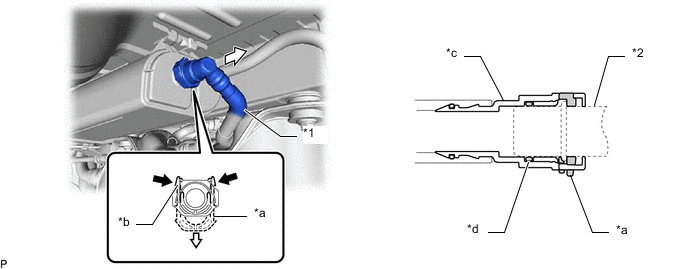
*1 Fuel Tank Vent Hose *2 Pipe (Canister (Charcoal Canister Assembly)) *a Retainer *b Tab *c Tube Connector *d O-ring Pinch Pull off Note
-
Remove any dirt or foreign matter on the tube connector before performing this work.
-
Do not allow any scratches or foreign matter to get on the parts when disconnecting them as the tube connector has an O-ring that seals the pipe (canister (charcoal canister assembly)).
-
Perform this work by hand. Do not use any tools.
-
Do not forcibly bend, twist or turn the fuel tank vent hose.
-
Protect the disconnected parts by covering them with plastic bags after disconnecting the fuel tank vent hose.
-
If the tube connector and pipe (canister (charcoal canister assembly)) are stuck, push and pull to release them.
Tech Tips
Do not remove the retainer.
-
Pinch the tabs of the retainer to disengage the lock claws and pull it down.
-
Pull off the fuel tank vent hose.
-
-
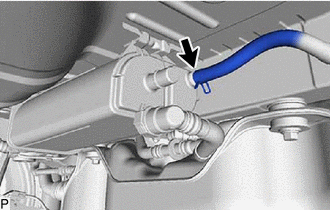
Slide the clip and disconnect the charcoal canister hose from the canister (charcoal canister assembly).
-
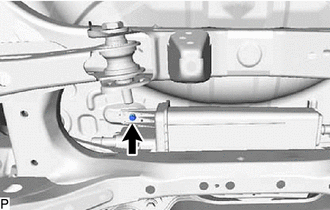
Remove the bolt.
-
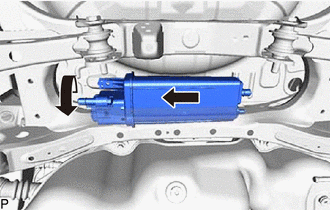
Remove the canister (charcoal canister assembly) from vehicle body as shown in the illustration.
-