FRONT DOOR BELT MOULDING REMOVAL
CAUTION / NOTICE / HINT
The necessary procedures (adjustment, calibration, initialization, or registration) that must be performed after parts are removed and installed, or replaced during front door belt moulding removal/installation are shown below.
| Replaced Part or Performed Procedure | Necessary Procedure | Effect/Inoperative Function when Necessary Procedure not Performed | Link |
|---|---|---|---|
| Disconnect cable from negative (-) battery terminal | Memorize steering angle neutral point | LKA/LDA System | |
| Pre-crash safety system | |||
| Lighting system (EXT)
|
|||
| Adaptive high beam system | |||
| Drive the vehicle until stop and start control is permitted (approximately 15 to 60 minutes) | Stop and start system | ||
| Memorize steering angle neutral point | Parking assist monitor system (w/ Parallel parking assist function) | ||
| Parking assist monitor system (w/o Parallel parking assist function) | |||
| Panoramic view monitor system | |||
| Initialize back door lock | Power door lock control system | ||
| Reset back door close position | Power back door system | ||
|
Initialize Power Window Control System |
|
Tech Tips
-
Use the same procedure for the RH side and LH side.
-
The following procedure is for the LH side.
PROCEDURE
-
DISCONNECT CABLE FROM NEGATIVE BATTERY TERMINAL
Note
When disconnecting the cable, some systems need to be initialized after the cable is reconnected.
-
REMOVE FRONT DOOR INSIDE HANDLE BEZEL PLUG
-
REMOVE MULTIPLEX NETWORK MASTER SWITCH ASSEMBLY WITH FRONT DOOR UPPER ARMREST BASE PANEL (for Driver Side)
-
REMOVE POWER WINDOW REGULATOR SWITCH ASSEMBLY WITH FRONT DOOR UPPER ARMREST BASE PANEL (for Front Passenger Side)
-
REMOVE DOOR ARMREST COVER
-
REMOVE COURTESY LIGHT ASSEMBLY
-
REMOVE FRONT DOOR NO. 1 STIFFENER CUSHION
-
REMOVE FRONT DOOR TRIM BOARD SUB-ASSEMBLY
-
REMOVE FRONT DOOR NO. 1 TRIM BRACKET
-
REMOVE FRONT DOOR SERVICE HOLE COVER
-
REMOVE FRONT DOOR GLASS SUB-ASSEMBLY
-
REMOVE FRONT DOOR GLASS RUN
-
REMOVE FRONT DOOR FRONT LOWER FRAME SUB-ASSEMBLY
-
REMOVE FRONT DOOR FIX WINDOW GLASS
-
REMOVE FRONT DOOR BELT MOULDING ASSEMBLY
-
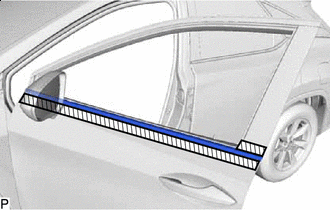

Protective Tape Apply protective tape around the front door belt moulding assembly.
-
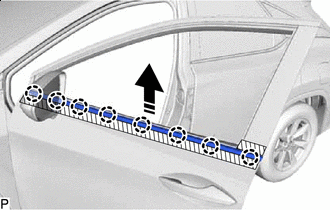

Remove in this Direction Disengage the 8 claws as shown in the illustration to remove the front door belt moulding assembly.
-