CAMSHAFT OIL CONTROL SOLENOID(for Bank 2) REMOVAL
CAUTION / NOTICE / HINT
Note
This procedure includes the removal of small-head bolts. Refer to Small-Head Bolts of Basic Repair Hint to identify the small-head bolts.
PROCEDURE
-
REMOVE V-BANK COVER SUB-ASSEMBLY
-
REMOVE RADIATOR COVER PLATE
-
REMOVE UPPER RADIATOR SUPPORT SEAL
-
REMOVE LOWER RADIATOR AIR DEFLECTOR
-
REMOVE THROTTLE BODY WITH MOTOR ASSEMBLY (for Bank 2)
-
REMOVE CAM TIMING OIL CONTROL SOLENOID ASSEMBLY LH
-
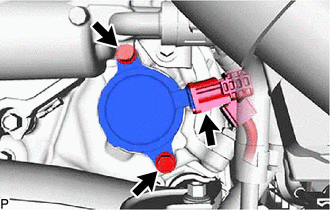
Disconnect the cam timing oil control solenoid assembly LH connector.
-
Remove the 2 bolts and cam timing oil control solenoid assembly LH from the No. 2 timing gear cover assembly.
Note
If the cam timing oil control solenoid assembly LH has been struck or dropped, replace it.
-

Remove the O-ring from the cam timing oil control solenoid assembly LH.
Note
-
When removing the O-ring, be careful not to damage the O-ring groove of the cam timing oil control solenoid assembly LH.
-
If the O-ring groove of the cam timing oil control solenoid assembly LH is damaged, replace the cam timing oil control solenoid assembly LH with a new one.
Tech Tips
Perform this procedure only when replacement of the O-ring is necessary.
-
-