EXHAUST PIPE(for Urea SCR System) REMOVAL
CAUTION / NOTICE / HINT
CAUTION:
-
To prevent burns, do not touch the engine, exhaust pipe or other high temperature components while the engine is hot.
-
Wear protective gloves when removing the exhaust pipe assembly.
-
The exhaust pipe assembly is extremely hot immediately after the engine has stopped.
-
Confirm that the exhaust pipe assembly has cooled down before removing it.
PROCEDURE
-
REMOVE TAILPIPE ASSEMBLY
-
Remove the 2 bolts and 2 nuts.
-
Disconnect the tailpipe assembly from the front exhaust pipe assembly and remove the gasket.
-
for TSAM Made:
Remove the tailpipe assembly from the 3 exhaust pipe supports.
-
for TMT Made:
Remove the tailpipe assembly from the 4 exhaust pipe supports.
-
-
REMOVE PROPELLER SHAFT GUARD
-
REMOVE NITROGEN OXIDES SENSOR ASSEMBLY
-
REMOVE NO. 4 EXHAUST GAS TEMPERATURE SENSOR
-
SUPPORT MANUAL TRANSMISSION ASSEMBLY (for Manual Transmission)
-
for 4WD:
-
for 2WD:
-
-
REMOVE NO. 3 FRAME CROSSMEMBER SUB-ASSEMBLY (for Manual Transmission)
-
for 4WD:
-
for 2WD:
-
-
SUPPORT AUTOMATIC TRANSMISSION ASSEMBLY (for Automatic Transmission)
-
REMOVE NO. 3 FRAME CROSSMEMBER SUB-ASSEMBLY (for Automatic Transmission)
-
REMOVE UREA INJECTOR SET
-
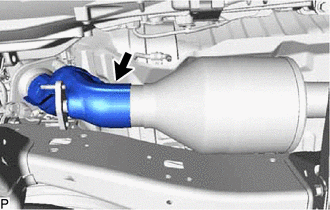
REMOVE FRONT EXHAUST PIPE ASSEMBLY
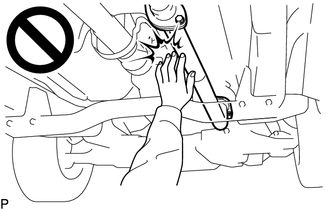
Note
Do not hold the front exhaust pipe assembly at the location shown in the illustration. Otherwise, it may become deformed or damaged, adversely affecting its thermal insulation capabilities.
-
Remove the No. 1 exhaust pipe support from the front exhaust pipe assembly.
-
Remove the 2 bolts and 2 compression springs.
-
Disconnect the front exhaust pipe assembly from the exhaust manifold converter sub-assembly and remove the gasket.
-