BRAKE ACTUATOR REASSEMBLY
PROCEDURE
-
INSTALL SKID CONTROL ECU
-
Install a new skid control ECU so that the coils of the skid control ECU and the brake actuator valves are aligned.
Note
-
Install the skid control ECU while keeping it level by holding at the corners to prevent deformation of the skid control ECU housing cover.
-
Check that there is no dirt or foreign matter on the installation surface.
-
-
Tighten the screws on the skid control ECU using the following procedure.
Note
As the screws are not reusable, be sure to use new screws.
-
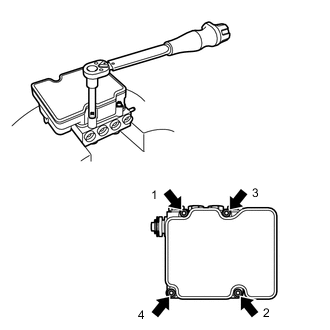
Using a TORX deep socket wrench E5, tighten new 4 screws in the order shown in the illustration.
- Torque:
- 1.5 N*m { 15 kgf*cm, 13 in.*lbf }
-
Check that there is no foreign matter caught between the skid control ECU and the brake actuator.
-
Tighten the 4 screws again in the order shown in the illustration.
- Torque:
- 3.0 N*m { 31 kgf*cm, 27 in.*lbf }
-
Check that there is no gap between the skid control ECU and the brake actuator.
-
-
-
INSTALL BRAKE ACTUATOR DAMPER
-
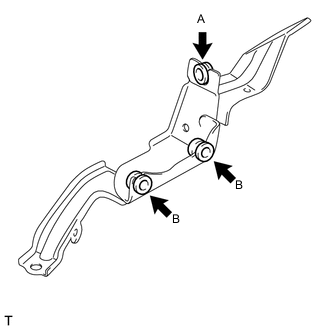
Install the 3 new brake actuator dampers (A and B) to the brake actuator bracket assembly.
-
-
INSTALL BRAKE ACTUATOR BRACKET ASSEMBLY
-
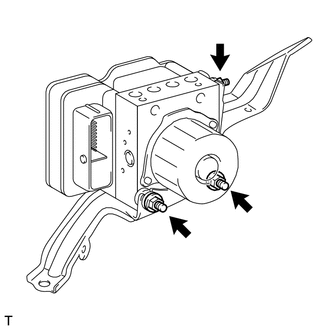
Install the brake actuator bracket assembly to the brake actuator assembly with the 3 new nuts and 3 new washers.
Note
Do not remove the hole plugs of a new brake actuator assembly before connecting the brake lines because the brake actuator assembly is filled with brake fluid.
- Torque:
- 7.5 N*m { 76 kgf*cm, 66 in.*lbf }
-