ENTRY AND START SYSTEM(for Entry Function) Room Oscillator does not Recognize Key
| DTC Code | DTC Name |
|---|---|
| Room Oscillator does not Recognize Key |
DESCRIPTION
If code verification cannot be performed in the vehicle interior, there may be problems with the communication between the vehicle (indoor electrical key antenna assembly [front floor], [rear floor] or [inside luggage]) and key, or the certification ECU may be malfunctioning. When the key is brought into the vehicle, verification of the key ID code transmitted from the key and the key ID code stored in the certification ECU is performed. If verification cannot be performed or the codes do not match, the engine switch cannot be turned on (IG) and the engine cannot be started.
When a door is unlocked and the key is brought into the vehicle, the certification ECU activates the indoor electrical key antenna assembly which transmits electric waves to detect the key. If the key recognizes that it is in the detection area, it responds with the key ID code. This information is received by the indoor electrical key antenna and then sent to the certification ECU.
WIRING DIAGRAM
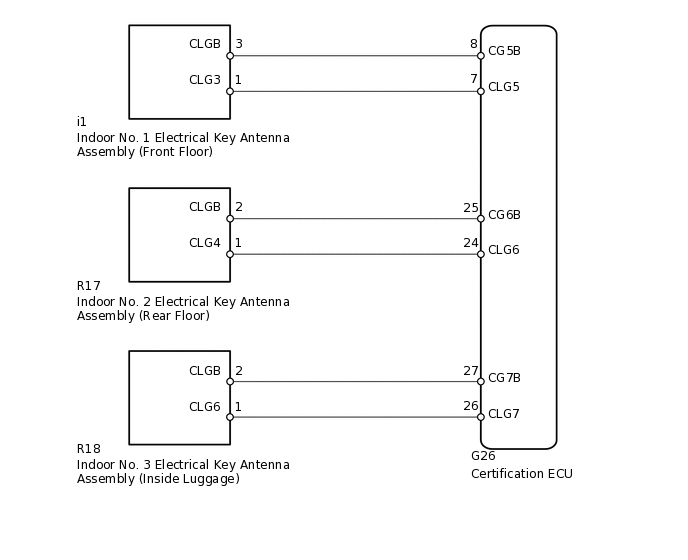
CAUTION / NOTICE / HINT
The entry and start system (for Entry Function) uses a multiplex communication system (LIN communication system) and the CAN communication system. Inspect the communication function by following How to Proceed with Troubleshooting (Click here). Troubleshoot the entry and start system (for Entry Function) after confirming that the communication systems are functioning properly.
When using the intelligent tester with the engine switch off to troubleshoot:
Connect the intelligent tester to the vehicle and turn a courtesy light switch on and off at 1.5-second intervals until communication between the intelligent tester and vehicle begins.
Before replacing the certification ECU, refer to the entry and start system (for Entry Function) (Click here).
After repair, confirm DTC not reoccur with performing the "DTC Output Confirmation Operation".
Indoor electrical key antenna assembly have an antenna coil between each two CLG terminals.
PROCEDURE
CHECK ENTRY AND START SYSTEM (FOR ENTRY FUNCTION)
Check that the entry lock and unlock functions operate for each door
Result
Result
OK
NG
CHECK ENTRY AND START SYSTEM (FOR START FUNCTION)
-
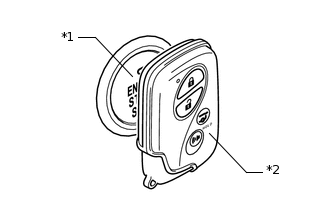
*1
Engine Switch
*2
Electrical Key Transmitter
Remove the battery of the electrical key transmitter
With the brake pedal depressed, touch the LEXUS mark of the key to the engine switch.
When operating the engine switch, check whether the engine starts.
Tip:When the key cannot be verified even though it is inside the detection area, the engine start check can be performed by removing the battery from the key and holding the key against the engine switch.
If the engine cannot be started when performing this inspection, the certification ECU, steering lock actuator assembly (steering lock ECU) or ID code box may be malfunctioning.
OK
Engine starts.
Result
Result
OK
NG
-
CHECK WAVE ENVIRONMENT
Install the battery to the electrical key transmitter
Bring the electrical key transmitter near the door control receiver and perform a entry and start system check
Tip:As the effect of electric wave interference decreases by moving the key close to the door control receiver, it may be possible to check whether electric wave interference is the cause of the problem.
Result
Result
Proceed to
System cannot be operated
A
System can be operated
B
Tip:If the problem only occurs in specific places or at specific times, electric wave interference may be the cause of the problem . Also, the vehicle may be have the effects of electric wave interference with the parts installed by the dealer. As a result, when parts have been installed by the dealer, it may be necessary to remove those parts before inspecting the vehicle.
There may be electric wave interference if the vehicle is near broadcasting antennas, large video displays, wireless garage door opener systems, wireless security cameras, home security systems, etc. In this case, move the vehicle to a different location and check if there is any improvement.
If a tool for checking electric waves, such as a signal strength meter, is available, move around the area while observing both the LF band (used by the vehicle antenna to form the key detection area) and RF band (used by the key for transmission) to check for locations where there is electric wave interference.
B AFFECTED BY WAVE INTERFERENCE
CHECK ELECTRICAL KEY ANTENNAS IN KEY DIAGNOSTIC MODE
Check the following antennas in the key diagnostic mode
-
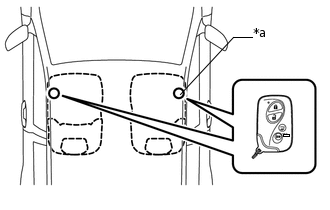
*a
Inspection Point
Check the indoor No. 1 electrical key antenna assembly (front floor).
When the electrical key transmitter is at the inspection point, check that the wireless door lock buzzer sounds.
-
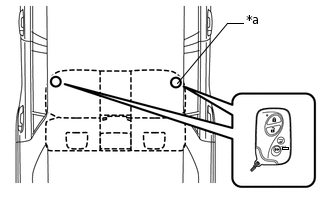
*a
Inspection Point
Check the indoor No. 2 electrical key antenna assembly (rear floor).
When the electrical key transmitter is at the inspection point, check that the wireless door lock buzzer sounds.
Check the indoor No. 3 electrical key antenna assembly (inside luggage).
When the electrical key transmitter is at the inspection point, check that the wireless door lock buzzer sounds.
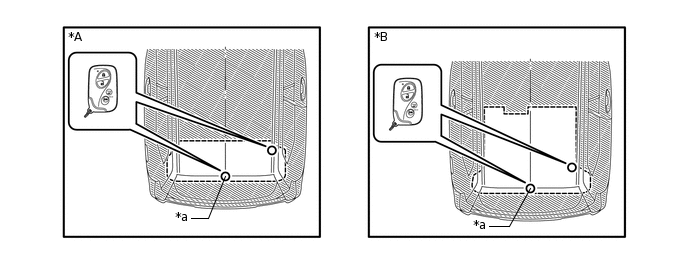
*A
w/ Rear No. 2 Seat Assembly
*B
w/o Rear No. 2 Seat Assembly
*a
Inspection Point
-
-
Tip:If the buzzer sounds, it can be determined that the vehicle interior transmitters are operating normally.
It is possible to check which indoor electrical key antenna assembly (front floor, rear floor or inside luggage) is operating by the sounding of the buzzer.
If the buzzer does not sound for any indoor electrical key antenna assemblies, the certification ECU circuit may have a malfunction.
OK
Wireless door lock buzzer sounds.
-
Result
Result
Proceed to
Front operation check fails
A
Rear operation check fails
B
Luggage operation check fails
C
Front, rear and luggage operation checks are normal
D
B CHECK HARNESS AND CONNECTOR (INDOOR NO. 2 ELECTRICAL KEY ANTENNA - CERTIFICATION ECU)Click here
C CHECK HARNESS AND CONNECTOR (INDOOR NO. 3 ELECTRICAL KEY ANTENNA - CERTIFICATION ECU)Click here
D REPLACE CERTIFICATION ECU
CHECK HARNESS AND CONNECTOR (INDOOR NO. 1 ELECTRICAL KEY ANTENNA - CERTIFICATION ECU)
Disconnect the i1 indoor No. 1 electrical key antenna assembly (front floor) connector.
Disconnect the G26 certification ECU connector.
Measure the resistance according to the value(s) in the table below.
Standard Resistance
Tester Connection
Condition
Specified Condition
i1-1 (CLG3) - G26-7 (CLG5)
Always
Below 1 Ω
i1-3 (CLGB) - G26-8 (CG5B)
Always
Below 1 Ω
i1-1 (CLG3) or G26-7 (CLG5) - Body ground
Always
10 kΩ or higher
i1-3 (CLGB) or G26-8 (CG5B) - Body ground
Always
10 kΩ or higher
Result
Result
OK
NG
NG REPAIR OR REPLACE HARNESS OR CONNECTOR
CHECK CERTIFICATION ECU (OUTPUT TO INDOOR NO. 1 ELECTRICAL KEY ANTENNA [FRONT FLOOR])
-
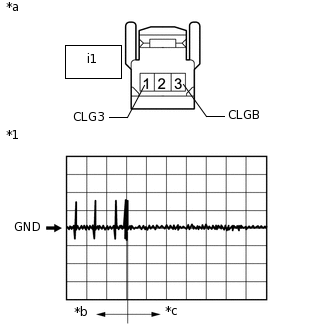
*1
Waveform
*a
Front view of wire harness connector
(to Indoor No. 1 Electrical Key Antenna [Front Floor])
*b
Door open
*c
After approximately 30 seconds from when the door is closed
Disconnect the i1 indoor No. 1 electrical key antenna assembly (front floor) connector.
Connect the G26 certification ECU connector.
Using an oscilloscope, check the waveform.
OK
Tester Connection
Switch Condition
Tool Setting
Specified Condition
i1-1 (CLG3) - i1-3 (CLGB)
Procedure:
Engine switch off
Door is open
Door is closed
30 seconds elapse
2 V/DIV., 500 ms/DIV.
Pulse generation (See waveform)
Result
Result
OK
NG
NG REPLACE CERTIFICATION ECU
-
REPLACE INDOOR NO. 1 ELECTRICAL KEY ANTENNA ASSEMBLY (FRONT FLOOR)
Temporarily replace the indoor No. 1 electrical key antenna assembly (front floor) with a new or normally functioning one
Result
Result
NEXT
CHECK ELECTRICAL KEY ANTENNA IN KEY DIAGNOSTIC MODE
Check the following antenna in the key diagnostic mode
-
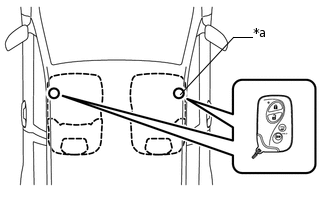
*a
Inspection Point
Check the indoor No. 1 electrical key antenna assembly (front floor).
When the electrical key transmitter is at the inspection point, check that the wireless door lock buzzer sounds.
OK
Wireless door lock buzzer sounds.
-
Result
Result
OK
NG
OK END (INDOOR NO. 1 ELECTRICAL KEY ANTENNA ASSEMBLY IS DEFECTIVE)
NG REPLACE CERTIFICATION ECU
CHECK HARNESS AND CONNECTOR (INDOOR NO. 2 ELECTRICAL KEY ANTENNA - CERTIFICATION ECU)
Disconnect the R17 indoor No. 2 electrical key antenna assembly (rear floor) connector.
Disconnect the G26 certification ECU connector.
Measure the resistance according to the value(s) in the table below.
Standard Resistance
Tester Connection
Condition
Specified Condition
R17-1 (CLG4) - G26-24 (CLG6)
Always
Below 1 Ω
R17-2 (CLGB) - G26-25 (CG6B)
Always
Below 1 Ω
R17-2 (CLGB) - G26-25 (CG6B)
Always
10 kΩ or higher
R17-2 (CLGB) or G26-25 (CG6B) - Body ground
Always
10 kΩ or higher
Result
Result
OK
NG
NG REPAIR OR REPLACE HARNESS OR CONNECTOR
CHECK CERTIFICATION ECU (OUTPUT TO INDOOR NO. 2 ELECTRICAL KEY ANTENNA [REAR FLOOR])
-
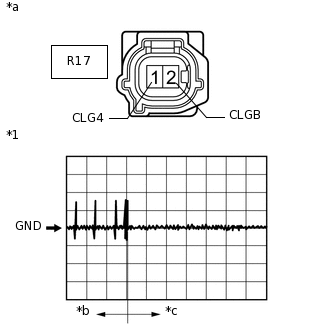
*1
Waveform
*a
Front view of wire harness connector
(to Indoor No. 2 Electrical Key Antenna [Rear Floor])
*b
Door open
*c
After approximately 30 seconds from when the door is closed
Disconnect the R17 indoor No. 2 electrical key antenna assembly (rear floor) connector.
Connect the G26 certification ECU connector.
Using an oscilloscope, check the waveform.
OK
Tester Connection
Switch Condition
Tool Setting
Specified Condition
R17-1 (CLG4) - R17-2 (CLGB)
Procedure:
Engine switch off
Door is open
Door is closed
30 seconds elapse
2 V/DIV., 500 ms/DIV.
Pulse generation (See waveform)
Result
Result
OK
NG
NG REPLACE CERTIFICATION ECU
-
REPLACE INDOOR NO. 2 ELECTRICAL KEY ANTENNA ASSEMBLY (REAR FLOOR)
Temporarily replace the indoor No. 2 electrical key antenna assembly (rear floor) with a new or normally functioning one
Result
Result
NEXT
CHECK ELECTRICAL KEY ANTENNA IN KEY DIAGNOSTIC MODE
Check the following antenna in the key diagnostic mode
-
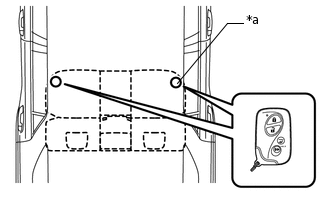
*a
Inspection Point
Check the indoor No. 2 electrical key antenna assembly (rear floor).
When the electrical key transmitter is at the inspection point, check that the wireless door lock buzzer sounds.
OK
Wireless door lock buzzer sounds.
-
Result
Result
OK
NG
OK END (INDOOR NO. 2 ELECTRICAL KEY ANTENNA ASSEMBLY IS DEFECTIVE)
NG REPLACE CERTIFICATION ECU
CHECK HARNESS AND CONNECTOR (INDOOR NO. 3 ELECTRICAL KEY ANTENNA - CERTIFICATION ECU)
Disconnect the R18 indoor No. 3 electrical key antenna assembly (inside luggage) connector.
Disconnect the G26 certification ECU connector.
Measure the resistance according to the value(s) in the table below.
Standard Resistance
Tester Connection
Condition
Specified Condition
R18-1 (CLG6) - G26-26 (CLG7)
Always
Below 1 Ω
R18-2 (CLGB) - G26-27 (CG7B)
Always
Below 1 Ω
R18-1 (CLG6) or G26-26 (CLG7) - Body ground
Always
10 kΩ or higher
R18-2 (CLGB) or G26-27 (CG7B) - Body ground
Always
10 kΩ or higher
Result
Result
OK
NG
NG REPAIR OR REPLACE HARNESS OR CONNECTOR
CHECK CERTIFICATION ECU (OUTPUT TO INDOOR NO. 3 ELECTRICAL KEY ANTENNA)
-
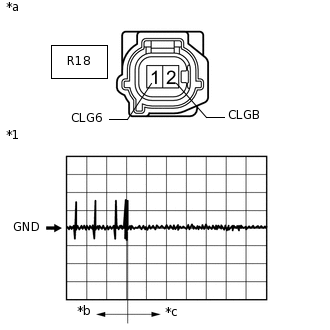
*1
Waveform
*a
Front view of wire harness connector
(to Indoor No. 3 Electrical Key Antenna [Rear Floor])
*b
Door open
*c
After approximately 30 seconds from when the door is closed
Disconnect the R18 indoor No. 3 electrical key antenna assembly (inside luggage) connector.
Connect the G26 certification ECU connector.
Using an oscilloscope, check the waveform.
OK
Tester Connection
Switch Condition
Tool Setting
Specified Condition
R18-1 (CLG6) - R18-2 (CLGB)
Procedure:
Engine switch off
Door is open
Door is closed
30 seconds elapse
2 V/DIV., 500 ms/DIV.
Pulse generation (See waveform)
Result
Result
OK
NG
NG REPLACE CERTIFICATION ECU
-
REPLACE INDOOR NO. 3 ELECTRICAL KEY ANTENNA ASSEMBLY (INSIDE LUGGAGE)
Temporarily replace the indoor No. 3 electrical key antenna assembly (inside luggage) with a new or normally functioning one
Result
Result
NEXT
CHECK ELECTRICAL KEY ANTENNA IN KEY DIAGNOSTIC MODE
Check the following antenna in the key diagnostic mode
Check the indoor No. 3 electrical key antenna assembly (inside luggage).
When the electrical key transmitter is at the inspection point, check that the wireless door lock buzzer sounds.
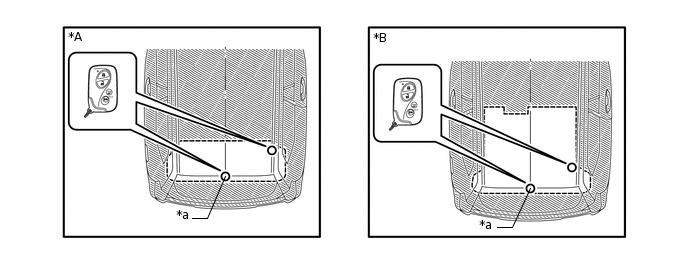
*A
w/ Rear No. 2 Seat Assembly
*B
w/o Rear No. 2 Seat Assembly
*a
Inspection Point
-
-
OK
Wireless door lock buzzer sounds.
Result
Result
OK
NG
OK END (INDOOR NO. 3 ELECTRICAL KEY ANTENNA ASSEMBLY IS DEFECTIVE)
NG REPLACE CERTIFICATION ECU