FRONT DOOR WINDOW FRAME MOULDING INSTALLATION
PROCEDURE
-
PRECAUTION
Note
After turning the power switch off, waiting time may be required before disconnecting the cable from the negative (-) auxiliary battery terminal. Therefore, make sure to read the disconnecting the cable from the negative (-) auxiliary battery terminal notices before proceeding with work Click here.
-
INSTALL FRONT DOOR REAR WINDOW FRAME MOULDING
Tech Tips
When installing the front door rear window frame moulding, heat the vehicle body and front door rear window frame moulding using a heat light.
Heating Temperature Item Temperature Vehicle Body 40 to 60°C (104 to 140°F) Moulding 20 to 30°C (68 to 86°F) Note
Do not heat the vehicle body or front door rear window frame moulding excessively.
-
Clean the vehicle body surface.
-
Using a heat light, heat the vehicle body surface.
-
Remove the double-sided tape from the vehicle body.
-
Wipe off any tape adhesive residue with cleaner.
-
-
Clean the front door rear window frame moulding (if reusing the front door rear window frame moulding).
-
Using a heat light, heat the front door rear window frame moulding.
-
Remove the double-sided tape from the front door rear window frame moulding.
-
Wipe off any tape adhesive residue with cleaner.
-
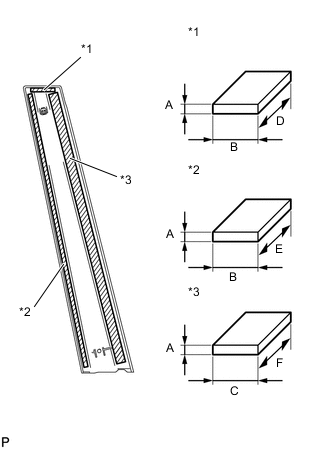
Text in Illustration *1 Double-sided Tape (A) *2 Double-sided Tape (B) *3 Double-sided Tape (C) Apply new double-sided tape to the front door rear window frame moulding.
Item Dimension A 0.8 mm (0.0315 in.) B 5.0 mm (0.197 in.) C 15.0 mm (0.591 in.) D 40.0 mm (1.57 in.) E 455.0 mm (1.49 ft.) F 450.0 mm (1.48 ft.)
-
-
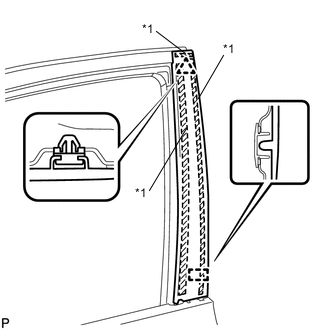
Text in Illustration *1 Double-sided Tape Install the front door rear window frame moulding.
-
Using a heat light, heat the vehicle body and front door rear window frame moulding.
-
Remove the release paper from the face of the front door rear window frame moulding.
Tech Tips
After removing the release paper, keep the exposed adhesive free from foreign matter.
-
Engage the clip and guide to install the front door rear window frame moulding.
-
-
-
INSTALL FRONT DOOR BELT MOULDING ASSEMBLY
-
INSTALL FRONT DOOR GLASS RUN
-
INSTALL FRONT DOOR GLASS SUB-ASSEMBLY
-
INSTALL FRONT DOOR SERVICE HOLE COVER
-
INSTALL FRONT DOOR TRIM BRACKET
-
INSTALL FRONT DOOR TRIM BOARD SUB-ASSEMBLY
-
INSTALL DOOR ARMREST COVER
-
INSTALL MULTIPLEX NETWORK MASTER SWITCH ASSEMBLY WITH FRONT DOOR ARMREST BASE PANEL (for Driver Side)
-
INSTALL POWER WINDOW REGULATOR SWITCH ASSEMBLY WITH FRONT DOOR ARMREST BASE PANEL (for Front Passenger Side)
-
INSTALL FRONT DOOR INSIDE HANDLE BEZEL PLUG
-
CONNECT CABLE TO NEGATIVE AUXILIARY BATTERY TERMINAL
Note
When disconnecting the cable, some systems need to be initialized after the cable is reconnected Click here.
-
INSTALL DECK FLOOR BOX RH
-
INSTALL REAR DECK FLOOR BOX
-
INSTALL NO. 1 DECK BOARD
-
INSTALL NO. 2 DECK BOARD
-
INSTALL DECK BOARD ASSEMBLY
-
INITIALIZE POWER WINDOW CONTROL SYSTEM
-
INSPECT POWER WINDOW OPERATION