HEADLIGHT ASSEMBLY(for LED Headlight) REASSEMBLY
CAUTION / NOTICE / HINT
Tech Tips
-
Use the same procedure for the RH and LH sides.
-
The procedure listed below is for the LH side.
PROCEDURE
-
INSTALL HEADLIGHT LEVELING MOTOR BASE PACKING
-
Install a new headlight leveling motor base packing to the headlight unit.
-
-
INSTALL HEADLIGHT LEVELING MOTOR LH
-
Set the tip of the aiming screw of the headlight leveling motor LH onto the headlight unit.
-
Tighten the aiming screw of the headlight leveling motor LH the same number of rotations recorded when removing it to connect the headlight leveling motor LH.
-
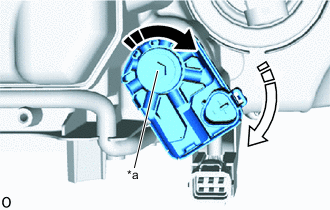
*a Aiming Screw 
Tighten in this Direction 
Clockwise Insert the headlight leveling motor LH.
-
Turn the headlight leveling motor LH clockwise to install it.
Tech Tips
For the headlight assembly RH, turn the headlight leveling motor RH counterclockwise to install it.
-
Tighten the aiming screw 20 rotations.
-
-
INSTALL FRONT TURN SIGNAL LIGHT BULB
-

*a Protrusion 
Cutout Align the 2 protrusions on the front turn signal light bulb with the 2 cutouts of the front turn signal light socket and insert the bulb.
-
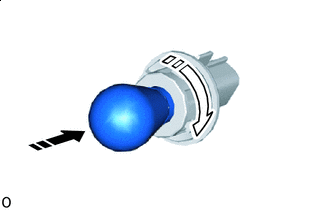
Push in this Direction Clockwise While pushing the front turn signal light bulb, turn the bulb clockwise to install the bulb.
-
-
INSTALL FRONT TURN SIGNAL LIGHT SOCKET
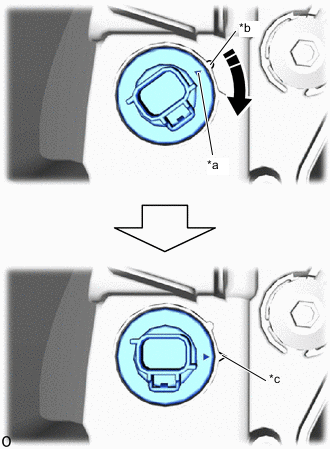
*a Matchmark *b Unlock Position Mark *c Lock Position Mark Clockwise
-
Align the matchmark of the front turn signal light socket with the unlock position mark of the headlight unit, and then rotate the front turn signal light socket clockwise until the lock position mark to install the front turn signal light socket.
-
-
INSTALL NO. 1 HEADLIGHT BULB
-
Insert the No. 1 headlight bulb into the headlight unit.
Note
Do not touch the glass part of the No. 1 headlight bulb.
-
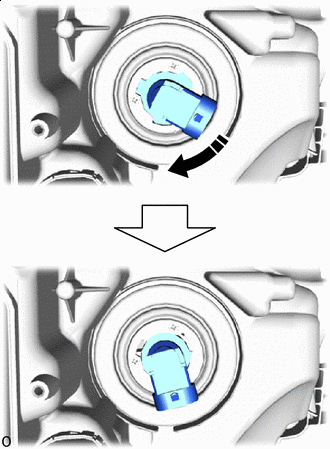
Clockwise Turn the No. 1 headlight bulb clockwise until the bulb stops to install it.
-