POWER WINDOW REGULATOR MOTOR(for Rear Door) INSTALLATION
CAUTION / NOTICE / HINT
Use the same procedure for the RH and LH sides.
The procedure listed below is for the LH side.
A bolt without a torque specification is shown in the standard bolt chart.
PROCEDURE
INSTALL POWER WINDOW REGULATOR MOTOR ASSEMBLY LH
Apply MP grease to the sliding and rotating areas of the power window regulator motor assembly LH.
-
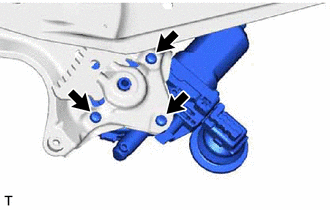
Using a T25 "TORX" socket wrench, install the power window regulator motor assembly LH with the 3 screws.
5.4 N*m
55 kgf*cm
48 in.*lbf
Tip:A new window regulator motor uses self-tapping screws to thread new installation holes when the self-tapping screws are inserted.
INSTALL REAR DOOR WINDOW REGULATOR SUB-ASSEMBLY LH
INSTALL REAR DOOR GLASS SUB-ASSEMBLY LH
INSTALL REAR DOOR QUARTER WINDOW GLASS LH
INSTALL REAR DOOR WINDOW DIVISION BAR SUB-ASSEMBLY LH
INSTALL REAR DOOR SERVICE HOLE COVER LH
INSTALL REAR DOOR TRIM BOARD SUB-ASSEMBLY LH
INSTALL DOOR ASSIST GRIP COVER LH
INSTALL REAR DOOR INSIDE HANDLE BEZEL PLUG LH
INSTALL REAR POWER WINDOW REGULATOR SWITCH ASSEMBLY WITH REAR DOOR UPPER ARMREST BASE PANEL LH
CONNECT CABLE TO NEGATIVE AUXILIARY BATTERY TERMINAL
Note:When disconnecting the cable, some systems need to be initialized after the cable is reconnected.
CHECK POWER WINDOW
INSTALL BATTERY SERVICE COVER
INSTALL DECK BOARD ASSEMBLY