ДАТЧИК ТЕМПЕРАТУРЫ ОХЛАЖДАЮЩЕЙ ЖИДКОСТИ УСТАНОВКА
-
INSTALL ENGINE COOLANT TEMPERATURE SENSOR
-
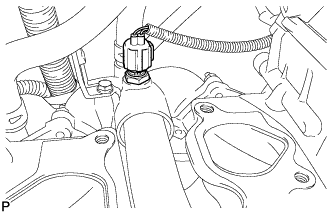
Install a new gasket to the sensor.
-
Install the sensor.
- Torque:
- 20 N*m { 204 kgf*cm, 15 ft.*lbf }
-
Connect the sensor connector.
-
-
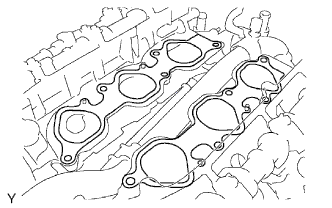
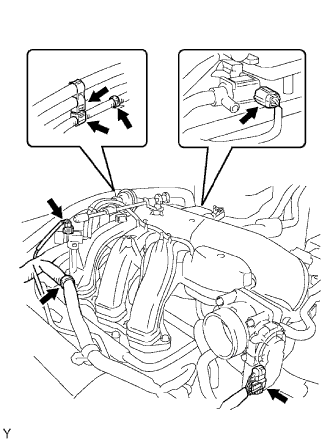
INSTALL INTAKE MANIFOLD
-
На каждую головку блока цилиндров установите новую прокладку.
Note
-
Совместите отверстия в прокладке и головке блока цилиндров.
-
Соблюдайте направление установки.
-
-
Установите впускной коллектор на головки блока цилиндров.
-
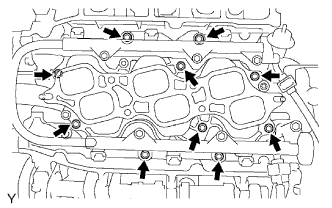
Вверните 10 болтов и равномерно затяните их в несколько этапов.
- Torque:
- 26 Н*м { 265 кгс*см, 19 фунт-сила-футов }
-
Подсоедините 6 разъемов топливных форсунок.
-
-
INSTALL INTAKE AIR SURGE TANK
-

Установите новую прокладку в уравнительный бачок на впуске воздуха.
-
Установите расширительный бачок на впуске воздуха и закрепите его 4 болтами с помощью шестигранной торцевой головки на 8 мм. Заверните 2 гайки.
- Torque:
- 28 Н*м { 286 кгс*см, 21 фунт-сила-фут }
-
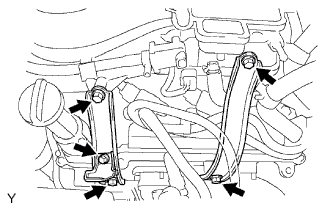
Установите 2 стойки уравнительного бачка и закрепите их 4 болтами.
- Torque:
- 21 Н*м { 214 кгс*см, 15 фунт-сила-футов }
-
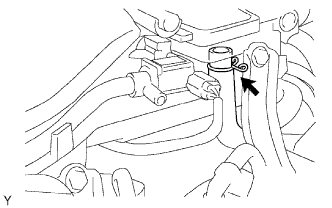
Установите отражатель масляного поддона и закрепите его болтом.
- Torque:
- 9,0 Н*м { 92 кгс*см, 80 фунт-сила-дюймов }
-
Установите корпус дроссельной заслонки и закрепите его 2 болтами.
- Torque:
- 21 Н*м { 214 кгс*см, 15 фунт-сила-футов }
-
Установите 3 зажима жгута проводов и хомут шланга.
-
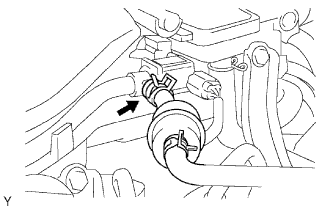
Подсоедините разъем корпуса дроссельной заслонки с электродвигателем.
-
Подсоедините 2 разъема VSV.
-
Подключите вентиляционный шланг.
-
Подсоедините шланг продувочного трубопровода.
-
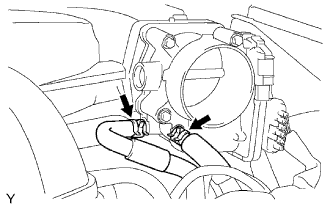
Подсоедините два перепускных шланга охлаждающей жидкости.
-
-
INSTALL THROTTLE BODY
-
Установите новую прокладку в уравнительный бачок на впуске воздуха.
-
Установите разъем электродвигателя привода дроссельной заслонки.
- Torque:
- 11 Н*м { 112 кгс*см, 9 фунт-сила-футов }
-
-
INSTALL AIR CLEANER ASSEMBLY
- Torque:
- 8,0 Н*м { 82 кгс*см, 71 фунт-сила-дюйм }
-
CONNECT NO. 2 VENTILATION HOSE
-
INSTALL V-BANK COVER
- Torque:
- 7,5 Н*м { 76 кгс*см, 66 фунт-сила-дюймов }
-
ADD ENGINE COOLANT
-
Tighten all the plugs and fill the radiator with TOYOTA Super Long Life Coolant (SLLC).
- Torque:
- 13 N*m { 130 kgf*cm, 9 ft.*lbf, for cylinder block drain cock plug }
Standard capacity Item Specified Condition A/T 9.8 liters (10.4 US qts, 8.6 Imp. qts) M/T 8.5 liters (9.0 US qts, 7.5 Imp. qts) Tech Tips
-
TOYOTA vehicles are filled with TOYOTA SLLC at the factory. In order to avoid damage to the engine cooling system and other technical problems, only use TOYOTA SLLC or similar high quality ethylene glycol based non-silicate, non-amine, non-nitrite, non-borate coolant with long-life hybrid organic acid technology (coolant with long-life hybrid organic and technology consists of a combination of low phosphates and organic acids).
-
Please contact your TOYOTA dealer for further details.
Note
Never use water as a substitute for engine coolant.
-
Press the inlet and outlet radiator hoses several times by hand, and then check the level of the coolant.
-
Install the radiator cap.
-
Bleed air from the cooling system.
-
Warm up the engine until the thermostat opens. While the thermostat is open, circulate the coolant for several minutes.
-
Maintain the engine speed at 2,000 to 2,500 rpm.
-
Press the inlet and outlet radiator hoses several times by hand to bleed air.
CAUTION:
When pressing the radiator hoses:
-
Wear protective gloves.
-
Be careful as the radiator hoses are hot.
-
Keep your hands away from the radiator fan.
-
-
-
Stop the engine and wait until the coolant cools down to ambient temperature.
CAUTION:
Do not remove the radiator cap while the engine and radiator are still hot. Pressurized, hot engine coolant and steam may be released and cause serious burns.
-
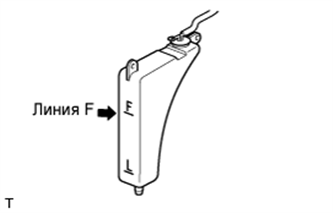
Check the coolant level in the radiator reservoir.
If the coolant level is low, add SLLC to the reservoir F line.
-
-
CONNECT CABLE TO NEGATIVE BATTERY TERMINAL
-
CHECK FOR ENGINE COOLANT LEAKS
-
Check for engine coolant leaks Click here.
-
-
PERFORM INITIALIZATION
-
Perform initialization Click here.
Note
Certain systems need to be initialized after disconnecting and reconnecting the cable from the negative (-) battery terminal.
-