EXHAUST PIPE REMOVAL
CAUTION / NOTICE / HINT
CAUTION:
-
Wear protective gloves when removing the exhaust pipe assembly.
-
The exhaust pipe assembly is extremely hot immediately after the engine has stopped.
-
Confirm that the exhaust pipe assembly has cooled down before removing it.
PROCEDURE
-
REMOVE TAIL EXHAUST PIPE ASSEMBLY
-
Remove the 2 bolts and 2 compression springs.
-
Disconnect the 3 exhaust pipe supports and remove the tail exhaust pipe assembly.
-
Remove the gasket from the center exhaust pipe assembly.
-
-
REMOVE CENTER EXHAUST PIPE ASSEMBLY
-
Remove the 2 bolts.
-
Disconnect the 4 exhaust pipe supports and remove the center exhaust pipe assembly.
-
Remove the gasket from the front No. 2 exhaust pipe sub-assembly.
-
-
REMOVE FRONT NO. 2 EXHAUST PIPE SUB-ASSEMBLY
-
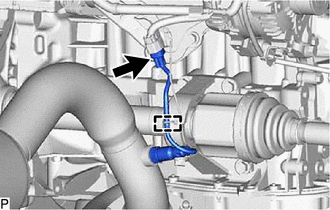
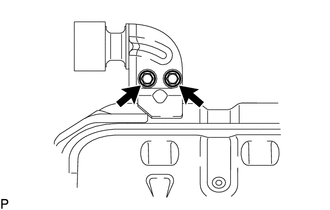
Disconnect the heated oxygen sensor connector.
-
Detach the wire harness clamp.
-
Remove the 2 bolts, 2 nuts and front No. 2 exhaust pipe sub-assembly.
-
Remove the gasket from the front exhaust pipe sub-assembly.
-
-
REMOVE HEATED OXYGEN SENSOR
-
REMOVE FRONT EXHAUST PIPE SUB-ASSEMBLY
-
Remove the 2 bolts, 2 compression springs and front exhaust pipe sub-assembly.
-
Remove the gasket from the exhaust manifold converter sub-assembly.
-
-
REMOVE EXHAUST PIPE DAMPER
-
Remove the 2 bolts and exhaust pipe damper from the tail exhaust pipe assembly.
-
-
REMOVE TAIL EXHAUST PIPE BAFFLE SUB-ASSEMBLY
-
Remove the 4 nuts and 2 tail exhaust pipe baffle sub-assemblies from the tail exhaust pipe assembly.
-