FRONT CONSOLE BOX INSTALLATION
PROCEDURE
-
INSTALL CONSOLE BOX ASSEMBLY
-
Connect the connector.
-
Install the console box assembly with the 4 screws and 2 bolts.
- Torque:
- Bolt
- 6.5 N*m { 66 kgf*cm, 58 in.*lbf }
-
-
INSTALL INSTRUMENT PANEL FINISH PANEL END LH
-
Engage the 4 claws to install the instrument panel finish panel end LH.
-
-
INSTALL INSTRUMENT PANEL FINISH PANEL END RH
Tech Tips
Use the same procedure as for the LH side.
-
INSTALL PARKING BRAKE HOLE COVER
-
Engage the 5 claws to install the parking brake hole cover.
-
-
INSTALL CUP HOLDER CUSHION
-
Install the cup holder cushion.
-
-
INSTALL INSTRUMENT PANEL CUP HOLDER
-
Install the instrument panel cup holder.
-
-
INSTALL NO. 1 ASH RECEPTACLE SUB-ASSEMBLY (w/ Ashtray)
-
Install the No. 1 ash receptacle sub-assembly.
-
-
INSTALL PATTERN SELECT SWITCH ASSEMBLY (for Manual Transmission)
-
INSTALL SHIFTING HOLE COVER SUB-ASSEMBLY (for Manual Transmission)
-
Install the shifting hole cover sub-assembly with the 4 screws.
-
-
INSTALL UPPER CONSOLE PANEL SUB-ASSEMBLY (for Manual Transmission)
-
Connect the connector.
-
Engage the 2 clips and 4 claws to install the upper console panel sub-assembly.
-
-
INSTALL SHIFT LEVER KNOB SUB-ASSEMBLY (for Manual Transmission)
-
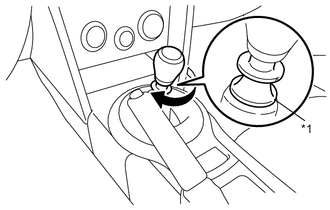
Text in Illustration *1 Pull collar Turn the knob clockwise to install the shift lever knob sub-assembly.
Note
-
Tighten the shift lever knob until the tightening on the shift lever knob stiffens.
-
Check that the transmission moves into reverse when the pull collar is pulled.
-
-
-
INSTALL PATTERN SELECT SWITCH ASSEMBLY (for Automatic Transmission)
-
INSTALL SHIFTING HOLE COVER SUB-ASSEMBLY (for Automatic Transmission)
-
Engage the claw.
-
Install the shifting hole cover sub-assembly with the 2 screws.
-
-
INSTALL SHIFT POSITION INDICATOR (for Automatic Transmission)
-
Engage the clamp.
-
Install the shift position indicator with the 2 screws.
-
-
INSTALL UPPER CONSOLE PANEL SUB-ASSEMBLY (for Automatic Transmission)
-
Connect the connector.
-
Engage the 2 clips and 4 claws to install the upper console panel sub-assembly.
-
-
INSTALL SHIFT LEVER KNOB SUB-ASSEMBLY (for Automatic Transmission)
-

Turn the knob clockwise to install the shift lever knob sub-assembly.
Note
-
Tighten the shift lever knob until the tightening on the shift lever knob stiffens.
-
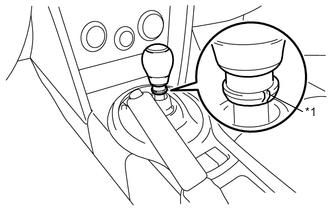
Face the groove on the shift lever knob toward the rear of the vehicle.
Text in Illustration *1 Groove
-
-
-
INSTALL NO. 1 STEREO JACK ADAPTER ASSEMBLY (w/ Stereo Jack Adapter)
-
INSTALL FRONT CONSOLE BOX COVER (w/o Entry and Start System)
-
Engage the 6 claws to install the front console box cover.
-
-
INSTALL INDOOR ELECTRICAL KEY OSCILLATOR (w/ Entry and Start System)
-
INSTALL PUSH START SWITCH (w/ Entry and Start System)
-
INSTALL FRONT CONSOLE BOX COVER (w/ Entry and Start System)
-
Connect the connector.
-
Engage the 6 claws to install the front console box cover.
-