НАСОС СИСТЕМЫ ОХЛАЖДЕНИЯ УСТАНОВКА
-
INSTALL WATER PUMP ASSEMBLY

-
Install a new gasket and the water pump with the 17 bolts.
- Torque:
- 9.0 N*m { 92 kgf*cm, 80 in.*lbf, for 10 mm head }
- Torque:
- 23 N*m { 235 kgf*cm, 17 ft.*lbf, for 12 mm head }
-
-
INSTALL V-RIBBED BELT TENSIONER ASSEMBLY
-
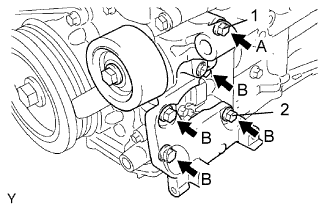
Временно установите натяжитель поликлинового ремня и закрепите его 5 болтами.
-
Установите натяжитель поликлинового ремня и закрепите его болтом 1, а затем болтом 2.
- Torque:
- 36 Н*м { 367 кгс*см, 27 фунт-сила-футов }
-
Затяните остальные болты.
- Torque:
- 36 Н*м { 367 кгс*см, 27 фунт-сила-футов }
Tech Tips
Ниже указана длина каждого болта.
A = 70 мм (2,76 дюйма)
B = 33 мм (1,30 дюйма)
-
-
INSTALL GENERATOR ASSEMBLY
-
for DENSO Made:
-
for BOSCH Made:
-
-
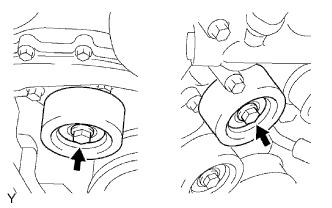
INSTALL NO. 2 IDLER PULLEY
Note
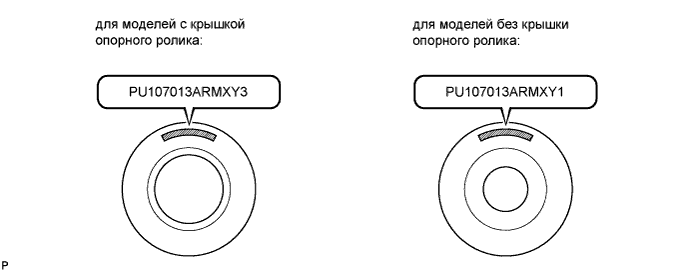
Для опорных роликов со съемными крышками:
Установка опорных роликов № 2 зависит от нанесенной на них маркировки, показанной на рисунке.
Tech Tips
Выполните эту же операцию для обоих опорных роликов № 2.
-
Для опорных роликов с крышкой (PU107013ARMXY3):
-
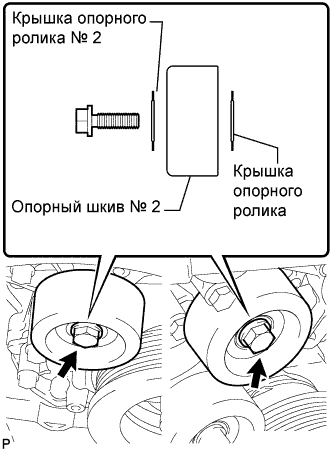
Установите крышку опорного ролика, опорный ролик и крышку опорного ролика № 2 и закрепите их болтом.
- Torque:
- 54 Н*м { 551 кгс*см, 40 фунт-сила-футов }
Note
-
Если необходимо заменить ролик или любую крышку, замените крышку опорного ролика № 2, опорный ролик № 2 и крышку опорного ролика комплектом новых деталей.
-
Заменяя детали, проследите, чтобы новый опорный ролик № 2 имел маркировку "PU107013ARMXY3".
-
-
Для опорных роликов без крышки (PU107013ARMXY1):
-
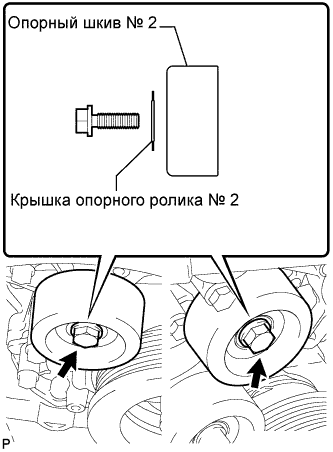
Установите опорный ролик и закрепите крышку опорного ролика № 2 болтом.
- Torque:
- 54 Н*м { 551 кгс*см, 40 фунт-сила-футов }
Note
-
Если необходимо заменить ролик или крышку, замените ролик вместе с крышкой на комплект новых деталей, состоящий из крышки опорного ролика № 2, опорного ролика № 2 и крышки опорного ролика.
-
Заменяя детали, проследите, чтобы новый опорный ролик № 2 имел маркировку "PU107013ARMXY3".
-
-
Для интегрированного типа:
Установите 2 опорных ролика № 2 и закрепите их 2 болтами.
- Torque:
- 54 Н*м { 551 кгс*см, 40 фунт-сила-футов }
-
-
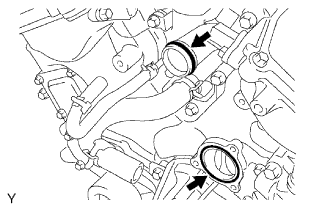
INSTALL WATER INLET HOUSING
-
Install a new O-ring to the water outlet pipe.
-
Install a new gasket to the water pump.
-
Apply soapy water to the O-ring.
-
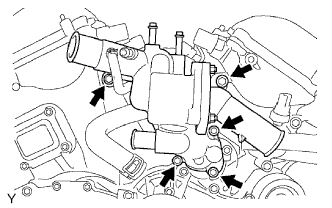
Install the water inlet to the 5 bolts.
- Torque:
- 9.0 N*m { 92 kgf*cm, 80 in.*lbf }
-
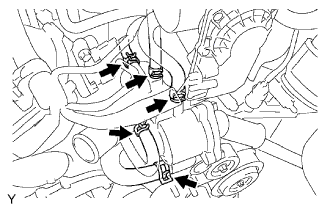
Connect the 5 water by-pass hoses.
-
-
CONNECT RADIATOR HOSE INLET
-
CONNECT RADIATOR HOSE OUTLET
-
INSTALL AIR CLEANER ASSEMBLY
- Torque:
- 8,0 Н*м { 82 кгс*см, 71 фунт-сила-дюйм }
-
CONNECT NO. 2 VENTILATION HOSE
-
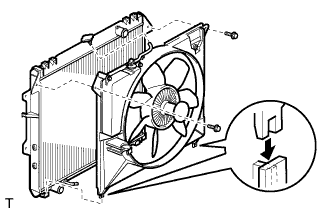
INSTALL FAN SHROUD
-
Install the fan pulley to the water pump.
-
Place the shroud together with the fluid coupling fan between the radiator and engine.
Note
Be careful not to damage the radiator core.
-
Install the coupling fan to the water pump with 4 nuts. Tighten the nuts as much as possible by hand.
-
Attach the shroud's claws to the radiator as shown in the illustration.
-
Install the shroud with the 2 bolts.
- Torque:
- 5.0 N*m { 51 kgf*cm, 44 in.*lbf }
-
Connect the reservoir hose to the radiator tank upper.
-
Install the drive belt Click here.
-
Tighten the 4 nuts of the fluid coupling fan.
- Torque:
- 21 N*m { 214 kgf*cm, 15 ft.*lbf }
-
-
CONNECT CABLE TO NEGATIVE BATTERY TERMINAL
-
ADD ENGINE COOLANT
-
Tighten all the plugs and fill the radiator with TOYOTA Super Long Life Coolant (SLLC).
- Torque:
- 13 N*m { 130 kgf*cm, 9 ft.*lbf, for cylinder block drain cock plug }
Standard capacity Item Specified Condition A/T 9.8 liters (10.4 US qts, 8.6 Imp. qts) M/T 8.5 liters (9.0 US qts, 7.5 Imp. qts) Tech Tips
-
TOYOTA vehicles are filled with TOYOTA SLLC at the factory. In order to avoid damage to the engine cooling system and other technical problems, only use TOYOTA SLLC or similar high quality ethylene glycol based non-silicate, non-amine, non-nitrite, non-borate coolant with long-life hybrid organic acid technology (coolant with long-life hybrid organic and technology consists of a combination of low phosphates and organic acids).
-
Please contact your TOYOTA dealer for further details.
Note
Never use water as a substitute for engine coolant.
-
Press the inlet and outlet radiator hoses several times by hand, and then check the level of the coolant.
-
Install the radiator cap.
-
Bleed air from the cooling system.
-
Warm up the engine until the thermostat opens. While the thermostat is open, circulate the coolant for several minutes.
-
Maintain the engine speed at 2,000 to 2,500 rpm.
-
Press the inlet and outlet radiator hoses several times by hand to bleed air.
CAUTION:
When pressing the radiator hoses:
-
Wear protective gloves.
-
Be careful as the radiator hoses are hot.
-
Keep your hands away from the radiator fan.
-
-
-
Stop the engine and wait until the coolant cools down to ambient temperature.
CAUTION:
Do not remove the radiator cap while the engine and radiator are still hot. Pressurized, hot engine coolant and steam may be released and cause serious burns.
-
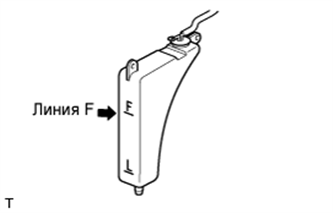
Check the coolant level in the radiator reservoir.
If the coolant level is low, add SLLC to the reservoir F line.
-
-
CHECK FOR ENGINE COOLANT LEAKS
-
Check for the engine coolant leaks Click here.
-
-
INSTALL V-BANK COVER
- Torque:
- 7,5 Н*м { 76 кгс*см, 66 фунт-сила-дюймов }
-
INSTALL NO. 1 ENGINE UNDER COVER
-
Install the under cover with the 4 bolts.
- Torque:
- 28 N*m { 286 kgf*cm, 21 ft.*lbf }
-
-
PERFORM INITIALIZATION
-
Perform initialization Click here.
Note
Certain systems need to be initialized after disconnecting and reconnecting the cable from the negative (-) battery terminal.
-