BRAKE FLUID BLEEDING
CAUTION / NOTICE / HINT
Note
-
Move the shift lever to P and apply the parking brake before bleeding the brakes (for automatic transmission).
-
Apply the parking brake before bleeding the brakes (for manual transmission).
-
Add brake fluid to keep the level between the MIN and MAX lines of the reservoir while bleeding the brakes.
-
If brake fluid leaks onto any painted surface, immediately wash it off.
-
Do not operate the brake actuator assembly while air is in the brake system or in the brake master cylinder sub-assembly. Doing so may cause air to enter the brake actuator assembly.
-
If bleeding the brake actuator assembly is difficult due to air in the brake actuator assembly, replace it with a new one.
Tech Tips
If any work is done on the brake system or if air in the brake lines is suspected, bleed the air from the system.
PROCEDURE
-
FILL RESERVOIR WITH BRAKE FLUID
-
BLEED BRAKE MASTER CYLINDER SUB-ASSEMBLY
Tech Tips
If the master cylinder has been disassembled or if the reservoir becomes empty, bleed the air from the master cylinder.
-
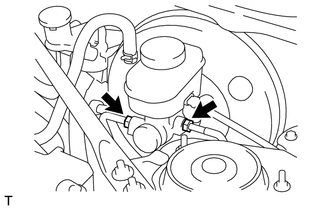
Using a union nut wrench 12 mm, separate the 2 brake tubes from the master cylinder.
-
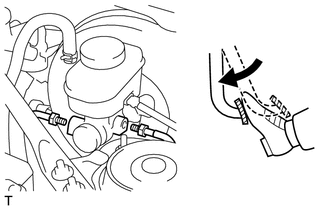
Slowly depress the brake pedal and hold it there (Step A).
-
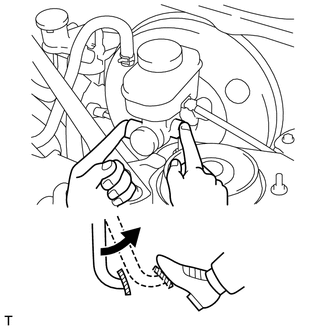
Block the outer holes with your fingers, and release the brake pedal (Step B).
-
Repeat Steps A and B 3 or 4 times.
-
Using a union nut wrench 12 mm, install the 2 brake tubes into the master cylinder.
- Torque:
- 19 N*m { 194 kgf*cm, 14 ft.*lbf }
Note
-
Do not bend or damage the brake lines.
-
Do not allow brake lines to twist and interfere with other parts or vehicle body during tightening.
-
Do not allow any foreign matter such as dirt or dust to enter the brake lines.
-
Use the formula to calculate special torque values for situations where a union nut wrench is combined with a torque wrench Click here.
-
-
BLEED BRAKE LINE
-
BLEED BRAKE ACTUATOR
Note
-
Air may be trapped in the brake line if the proper brake pedal height or pedal feel cannot be obtained after bleeding the brake line. In this case, perform air bleeding of the brake actuator assembly using the following procedure.
-
Performing air bleeding without using the GTS may cause an injury or accident. Make sure to use the GTS when bleeding the brake actuator.
-
Repeat the following steps until all air bubbles are expelled from the brake fluid.
-
Turn the ignition switch off.
-
Connect the GTS to the DLC3.
-
Perform ABS Function Check.
-
Install a foot pressure gauge to the brake pedal.
-
Start the engine.
-
Enter the following menus: Chassis / ABS/VSC/TRC / Utility / ABS Function Check
-
Bleed the brake actuator assembly by following the instructions on the GTS.
-
Turn the ignition switch off.
-
Remove the foot pressure gauge.
-
-
Bleed the brake line.
Note
Do not operate the GTS in the middle of the bleeding process. Otherwise, air may enter the brake actuator.
-
Perform VSC Function Check.
-
Start the engine.
-
Enter the following menus: Chassis / ABS/VSC/TRC / Utility / VSC Function Check
Note
Do not depress the brake pedal until VSC Function Check is complete.
-
Bleed the brake actuator assembly by following the instructions on the GTS.
-
Turn the ignition switch off.
-
-
Bleed the brake line again.
Note
-
Do not operate the GTS in the middle of the bleeding process. Otherwise, air may enter the brake actuator.
-
Repeat the above process on the other 3 wheels until all air bubbles are expelled from each brake line.
-
-
-
INSPECT FOR BRAKE FLUID LEAK
-
INSPECT FLUID LEVEL