МЕХАНИЧЕСКАЯ ТРАНСМИССИЯ В СБОРЕ СНЯТИЕ
-
DISCONNECT CABLE FROM NEGATIVE BATTERY TERMINAL
CAUTION:
Wait at least 90 seconds after disconnecting the cable from the negative (-) battery terminal to prevent airbag and seat belt pretensioner activation.
-
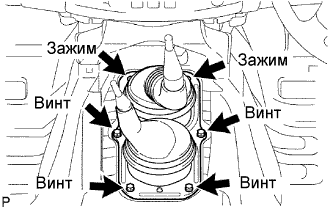
REMOVE CONSOLE BOX ASSEMBLY
-
REMOVE SHIFT LEVER BOOT ASSEMBLY
-
w/o Console Box:
Remove the front seat, front door scuff plate, etc. and fold back the floor carpet so that the shift lever can be removed.
-
Remove the 4 screws, 2 clips and shift lever boot.
-
-
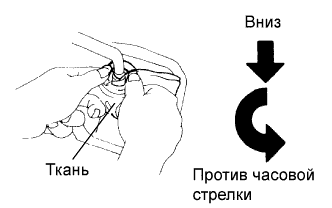
REMOVE FLOOR SHIFT SHIFT LEVER ASSEMBLY
-
Cover the shift lever cap with a cloth.
-
Press down on the shift lever cap and rotate it counterclockwise to remove it.
-
Pull out the shift lever.
-
-
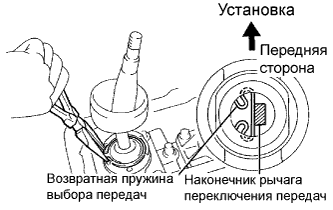
REMOVE TRANSFER HIGH AND LOW SHIFT LEVER ASSEMBLY
-
Using needle nose pliers, remove the snap ring and pull out the shift lever.
Tech Tips
Move the transfer shift lever to the H4 position.
-
-
REMOVE TRANSFER CASE LOWER PROTECTOR
-
Remove the 4 bolts and transfer case lower protector.
-
-
REMOVE NO. 1 ENGINE UNDER COVER
-
REMOVE NO. 2 ENGINE UNDER COVER
-
DRAIN MANUAL TRANSMISSION OIL
-
Remove the drain plug and gasket to drain the oil.
-
Install a new gasket and the drain plug.
- Torque:
- 37 N*m { 377 kgf*cm, 27 ft.*lbf }
-
-
REMOVE REAR PROPELLER SHAFT ASSEMBLY
-
REMOVE FRONT PROPELLER SHAFT ASSEMBLY
-
REMOVE FRONT EXHAUST PIPE ASSEMBLY
-
DISCONNECT WIRE HARNESS
-
Transmission side:
Disconnect the back-up light switch connector.
-
Transfer side:
Disconnect the No. 1, No. 2 and No. 3 transfer indicator switch connectors, and vehicle speed sensor connector.
-
-
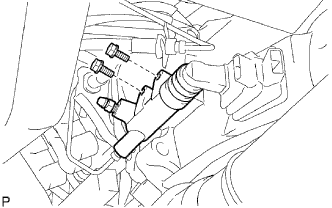
DISCONNECT CLUTCH RELEASE CYLINDER ASSEMBLY
-
Remove the 2 bolts and disconnect the release cylinder.
-
-
REMOVE STARTER ASSEMBLY
-
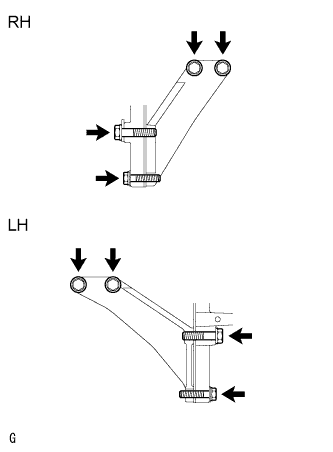
REMOVE NO. 3 FRAME CROSSMEMBER SUB-ASSEMBLY
-
Support the transmission rear side with a support stand.
-
Remove the 4 set bolts of the rear No. 1 engine mounting insulator.
-
Remove the 4 bolts, 4 nuts and frame crossmember.
-
-
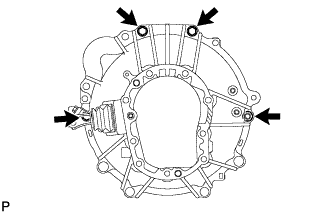
REMOVE REAR NO. 1 ENGINE MOUNTING INSULATOR
-
Remove the 4 bolts and engine mounting insulator.
-
-
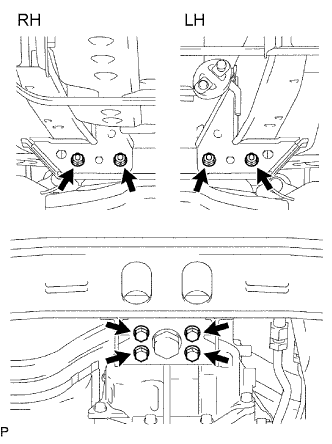
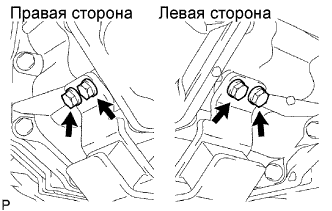
REMOVE STIFFENER PLATE
-
Remove the 4 bolts and stiffener plate RH.
-
Remove the 4 bolts and stiffener plate LH.
-
-
REMOVE MANUAL TRANSMISSION UNIT ASSEMBLY
-
Using a transmission jack, support the transmission.
-
Remove the support stand from the rear side.
-
Remove the 4 bolts and transmission.
-
-
REMOVE TRANSFER ASSEMBLY