REAR SEAT ASSEMBLY(for Seat Cushion 60/40 Split Type) REASSEMBLY
CAUTION / NOTICE / HINT
CAUTION:
Wear protective gloves. Sharp areas on the parts may injure your hands.
PROCEDURE
-
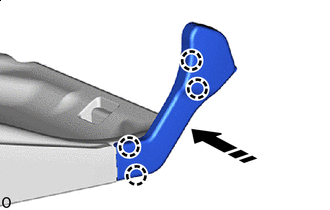
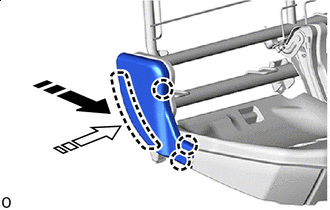
INSTALL REAR SEAT HINGE COVER RH
Note
-
Perform the following only when replacing the rear seat hinge cover RH.
-
Do not reuse the rear seat hinge cover RH after removing it.
-
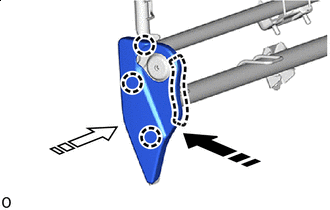

Install in this Direction (1) 
Install in this Direction (2) Push in installation direction (1) shown in the illustration to attach the guide.
-
Push in installation direction (2) shown in the illustration to attach the claw to install a new rear seat hinge cover RH.
-
-
INSTALL REAR SEAT HINGE COVER LH
Note
-
Perform the following only when replacing the rear seat hinge cover LH.
-
Do not reuse the rear seat hinge cover LH after removing it.
Tech Tips
Use the same procedure described for the RH side.
-
-
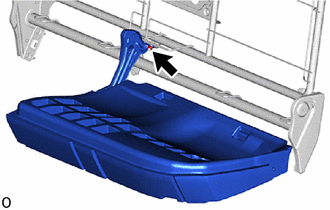
INSTALL NO. 1 FOLD SEAT STOPPER BAND ASSEMBLY
Tech Tips
Use the same procedure for the opposite side.
-
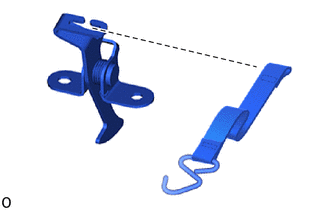
Install the No. 1 fold seat stopper band assembly to the rear No. 2 seat lock assembly.
-
-
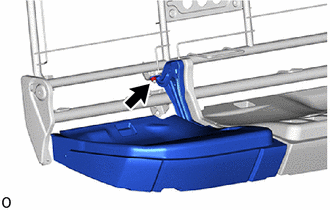
INSTALL REAR NO. 2 SEAT LOCK ASSEMBLY
Tech Tips
Use the same procedure for the opposite side.
-
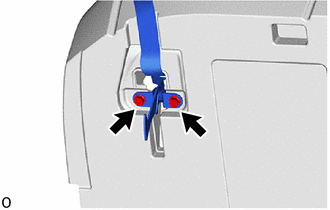
Install the rear No. 2 seat lock assembly together with the No. 1 fold seat stopper band assembly with the 2 bolts.
- Torque:
- 13 N*m { 133 kgf*cm, 10 ft.*lbf }
-
-
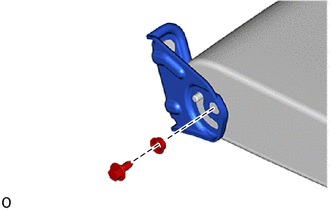
INSTALL REAR SEATBACK HINGE SUB-ASSEMBLY RH
-
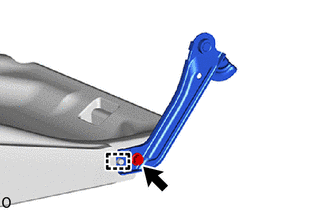
Attach the guide to install the rear seatback hinge sub-assembly RH with the bolt.
- Torque:
- 43 N*m { 438 kgf*cm, 32 ft.*lbf }
-
-
INSTALL REAR SEATBACK HINGE SUB-ASSEMBLY LH
Tech Tips
Use the same procedure described for the RH side.
-
INSTALL NO. 1 SEAT CUSHION COVER RH
-
Install in this Direction Attach the claw to install the No. 1 seat cushion cover RH.
-
-
INSTALL NO. 1 SEAT CUSHION COVER LH
Tech Tips
Use the same procedure described for the RH side.
-
INSTALL NO. 1 SEAT CUSHION FRAME SUB-ASSEMBLY LH
-
Install the No. 1 seat cushion frame sub-assembly LH together with the No. 1 seatback hinge sub-assembly LH with the nut.
- Torque:
- 13 N*m { 133 kgf*cm, 10 ft.*lbf }
-
-
INSTALL NO. 1 SEAT CUSHION FRAME SUB-ASSEMBLY RH
-
Install the No. 1 seat cushion frame sub-assembly RH together with the No. 1 seatback hinge sub-assembly RH with the nut.
- Torque:
- 13 N*m { 133 kgf*cm, 10 ft.*lbf }
-
-
INSTALL REAR SEAT CUSHION SIDE BRACKET RH
-
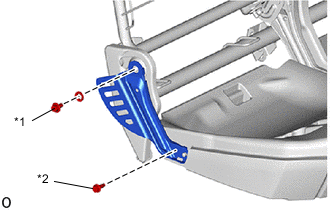
*1 Bolt A *2 Bolt B Install the rear seat cushion side bracket RH with the bush and 2 bolts.
- Torque:
- for Bolt A
- 13 N*m { 133 kgf*cm, 10 ft.*lbf }
- for Bolt B
- 43 N*m { 438 kgf*cm, 32 ft.*lbf }
-
-
INSTALL REAR SEAT CUSHION SIDE BRACKET LH
Tech Tips
Use the same procedure described for the RH side.
-
INSTALL REAR SEAT CUSHION COVER RH
-
Install in this Direction (1) Install in this Direction (2) Push in installation direction (1) shown in the illustration to attach the guide.
-
Push in installation direction (2) shown in the illustration to attach the claw to install the rear seat cushion cover RH.
-
-
INSTALL REAR SEAT CUSHION COVER LH
Tech Tips
Use the same procedure described for the RH side.
-
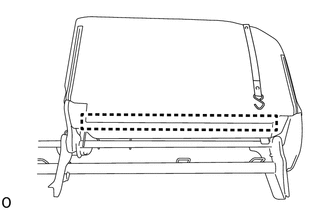
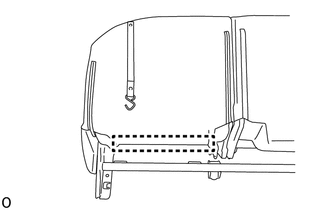
INSTALL SEAT COVER WIRE
-
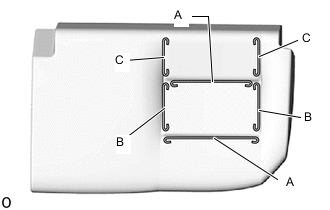
Install the seat cover wire.
Tech Tips
-
Wire 1000 mm (3.28 ft.) or longer and shaped wire are available as supplied parts.
-
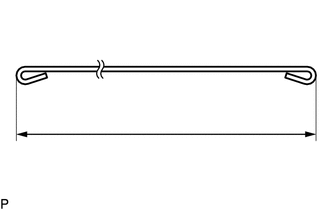
For wire 1000 mm (3.28 ft.) or less in length, cut or shape 1000 mm (3.28 ft.) wire into the dimensions shown in the illustration.
-
Make sure to read the precautions before preparing the wire.
Dimensions A 270 mm (10.63 in.) B 180 mm (7.09 in.) C 120 mm (4.72 in.) Tech Tips
The dimensions shown in the illustration are the lengths.
-
-
-
INSTALL NO. 1 SEAT CUSHION COVER SUB-ASSEMBLY LH
Tech Tips
-
When installing the seat cover, refer to the precautions in order to prevent wrinkles from forming.
-
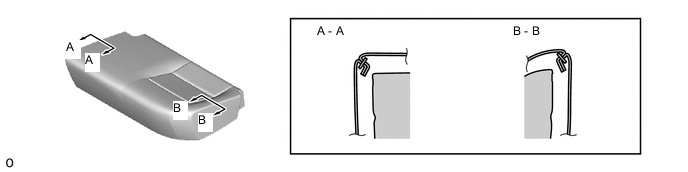
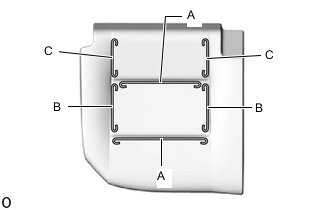
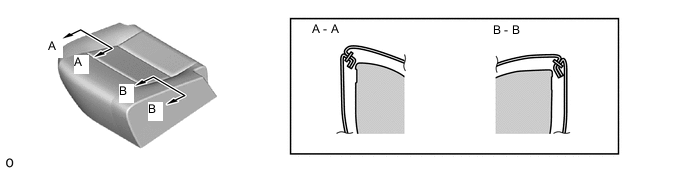
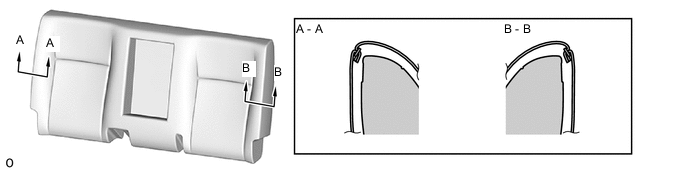
Align the seam allowance in a single direction as shown in the illustration.
-
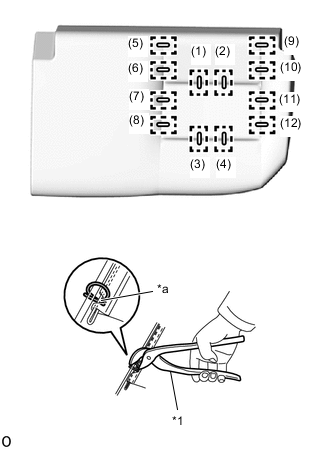
*1 Hog Ring Pliers *a Cutout Using hog ring pliers, install the No. 1 seat cushion cover sub-assembly LH to the No. 1 seat cushion pad LH with 12 new hog rings in the order indicated in the illustration.
Note
-
Be careful not to damage the No. 1 seat cushion cover sub-assembly LH.
-
Be sure to securely install the hog rings as shown in the illustration while preventing wrinkles from forming on the No. 1 seat cushion cover sub-assembly LH.
Tech Tips
Install the hog rings at the cutouts if they are there.
-
-
-
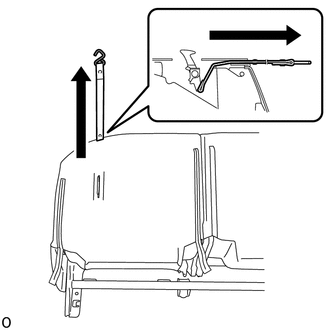
INSTALL REAR SEAT CUSHION COVER WITH PAD LH
-
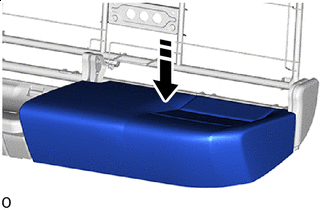
Install in this Direction Install the rear seat cushion cover with pad LH to the No. 1 seat cushion frame sub-assembly LH.
-
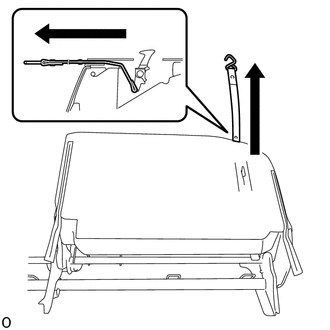
Pass the No. 1 fold seat stopper band assembly through the hole of the No. 1 seat cushion cover sub-assembly LH.
-

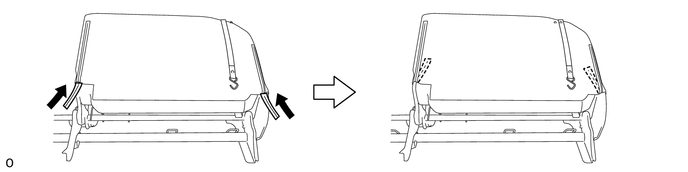
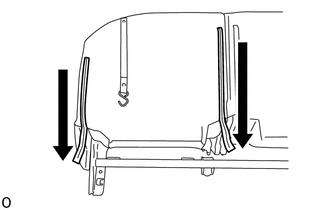
Close the 2 fasteners.
-
Store the 2 fasteners.
-
Attach the hook.
-
-
INSTALL SEAT COVER WIRE
-
Install the seat cover wire.
Tech Tips
-
Wire 1000 mm (3.28 ft.) or longer and shaped wire are available as supplied parts.
-
For wire 1000 mm (3.28 ft.) or less in length, cut or shape 1000 mm (3.28 ft.) wire into the dimensions shown in the illustration.
-
Make sure to read the precautions before preparing the wire.
Dimensions A 270 mm (10.63 in.) B 180 mm (7.09 in.) C 120 mm (4.72 in.) Tech Tips
The dimensions shown in the illustration are the lengths.
-
-
-
INSTALL NO. 1 SEAT CUSHION COVER SUB-ASSEMBLY RH
Tech Tips
-
When installing the seat cover, refer to the precautions in order to prevent wrinkles from forming.
-
Align the seam allowance in a single direction as shown in the illustration.
-
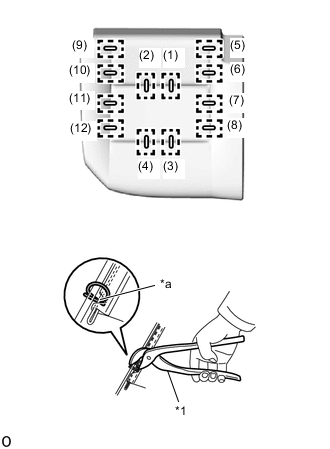
*1 Hog Ring Pliers *a Cutout Using hog ring pliers, install the No. 1 seat cushion cover sub-assembly RH to the No. 1 seat cushion pad RH with 12 new hog rings in the order indicated in the illustration.
Note
-
Be careful not to damage the No. 1 seat cushion cover sub-assembly RH.
-
Be sure to securely install the hog rings as shown in the illustration while preventing wrinkles from forming on the No. 1 seat cushion cover sub-assembly RH.
Tech Tips
Install the hog rings at the cutouts if they are there.
-
-
-
INSTALL REAR SEAT CUSHION COVER WITH PAD RH
-
Install in this Direction Install the rear seat cushion cover with pad RH to the No. 1 seat cushion frame sub-assembly RH.
-
Pass the No. 1 fold seat stopper band assembly through the hole of the No. 1 seat cushion cover sub-assembly RH.
-
Close the 2 fasteners.
-
Store the 2 fasteners.
-
Attach the hook.
-
-
INSTALL SEAT COVER WIRE
-
Install the seat cover wire.
Tech Tips
-
Wire 1000 mm (3.28 ft.) or longer and shaped wire are available as supplied parts.
-
For wire 1000 mm (3.28 ft.) or less in length, cut or shape 1000 mm (3.28 ft.) wire into the dimensions shown in the illustration.
-
Make sure to read the precautions before preparing the wire.

Dimensions A 270 mm (10.63 in.) B 300 mm (11.81 in.) Tech Tips
The dimensions shown in the illustration are the lengths.
-
-
-
INSTALL NO. 1 SEATBACK COVER SUB-ASSEMBLY
Tech Tips
-
When installing the seat cover, refer to the precautions in order to prevent wrinkles from forming.
-
Align the seam allowance in a single direction as shown in the illustration.
-
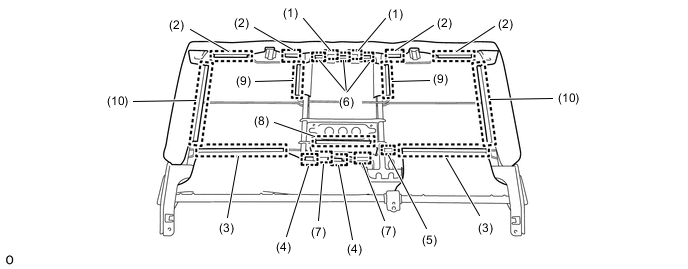
Using hog ring pliers, install the No. 1 seatback cover sub-assembly to the No. 1 seatback pad with 12 new hog rings in the order indicated in the illustration.

*1 Hog Ring Pliers - - *a Cutout - - Note
-
Be careful not to damage the No. 1 seatback cover sub-assembly.
-
Be sure to securely install the hog rings as shown in the illustration while preventing wrinkles from forming on the No. 1 seatback cover sub-assembly.
Tech Tips
Install the hog rings at the cutouts if they are there.
-
-
-
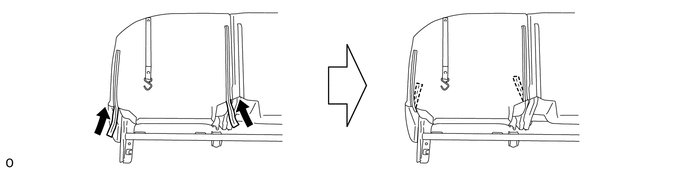
INSTALL REAR SEATBACK COVER WITH PAD
-
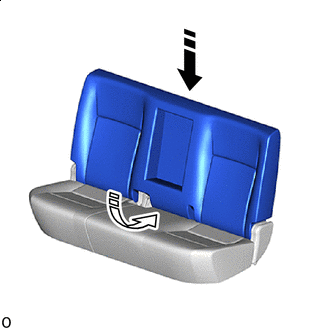
Install in this Direction (1) Install in this Direction (2) Push in installation direction (1) shown in the illustration to install the rear seatback cover with pad.
-
Push in the rear end of the rear seatback cover with pad in installation direction (2) shown in the illustration.
-
Attach the hooks in the order indicated in the illustration.
-
-
INSTALL REAR NO. 1 SEAT HEADREST SUPPORT ASSEMBLY
-
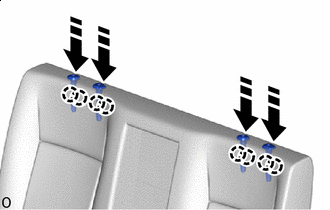
Install in this Direction w/o Center Headrest:
Attach the claw to install the 4 rear No. 1 seat headrest support assemblies.
-
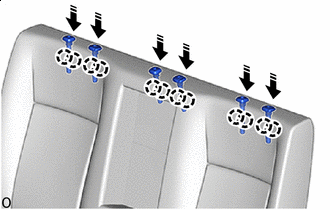
Install in this Direction w/ Center Headrest:
Attach the claw to install the 6 rear No. 1 seat headrest support assemblies.
-
-
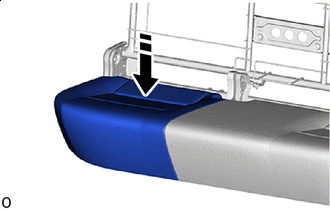
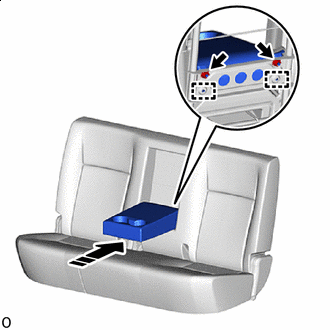
INSTALL REAR SEAT CENTER ARMREST CUP HOLDER SUB-ASSEMBLY
-
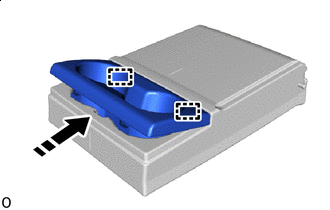
Install in this Direction Push as shown in the illustration to attach the guide.
-
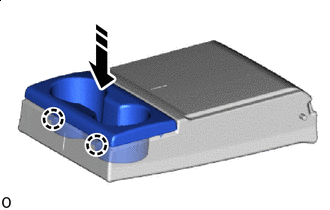
Install in this Direction Push as shown in the illustration to attach the claw and install the rear seat center armrest cup holder sub-assembly.
-
-
INSTALL REAR SEAT ARMREST ARM RH
-
Install the rear seat armrest arm RH with the bush and bolt.
- Torque:
- 13 N*m { 133 kgf*cm, 10 ft.*lbf }
-
-
INSTALL REAR SEAT ARMREST ARM LH
Tech Tips
Use the same procedure described for the RH side.
-
INSTALL REAR SEAT CENTER ARMREST ASSEMBLY
-
Install in this Direction Attach the guide to install the rear seat center armrest assembly with the 2 nuts.
- Torque:
- 13 N*m { 133 kgf*cm, 10 ft.*lbf }
-
-
INSTALL REAR SEAT CENTER HEADREST ASSEMBLY (w/ Center Headrest)
-
Install the rear seat center headrest assembly.
-
-
INSTALL REAR SEAT HEADREST ASSEMBLY
-
Install the 2 rear seat headrest assemblies.
-
Attach the 2 No. 1 fold seat stopper band assemblies to the stay of the rear seat headrest assembly and temporarily fix the 2 rear seat cushion assemblies in place.
-