FUEL PUMP ECU(for Hatchback) REMOVAL
PROCEDURE
PRECAUTION
Note:After turning the ignition switch off, waiting time may be required before disconnecting the cable from the negative (-) battery terminal. Therefore, make sure to read the disconnecting the cable from the negative (-) battery terminal notices before proceeding with work.
DISCONNECT CABLE FROM NEGATIVE BATTERY TERMINAL
Note:When disconnecting the cable, some systems need to be initialized after the cable is reconnected.
REMOVE DECK BOARD ASSEMBLY (w/ Deck Board)
REMOVE REAR FLOOR MAT ASSEMBLY
REMOVE REAR DECK FLOOR BOX (w/ Deck Floor Box)
REMOVE DECK FLOOR BOX LH (w/ Deck Floor Box)
REMOVE PACKAGE TRAY TRIM PANEL ASSEMBLY (w/ Package Tray Trim)
REMOVE REAR DECK TRIM COVER
REMOVE REAR SEAT ASSEMBLY
REMOVE REAR DOOR SCUFF PLATE LH
REMOVE REAR DOOR OPENING TRIM WEATHERSTRIP LH
REMOVE REAR SEATBACK HINGE SUB-ASSEMBLY LH
REMOVE REAR SEAT SIDE GARNISH LH
REMOVE NO. 2 DECK SIDE TRIM HOOK
REMOVE LOWER DECK TRIM SIDE BOARD LH (w/ Deck Board)
REMOVE DECK TRIM SIDE PANEL ASSEMBLY LH
REMOVE ROOF SIDE INNER GARNISH ASSEMBLY LH
REMOVE FUEL PUMP CONTROL ECU ASSEMBLY
-
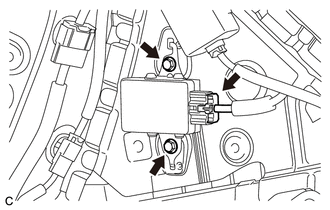
Disconnect the fuel pump control ECU assembly connector.
Remove the 2 bolts and fuel pump control ECU assembly.
Note:Do not reuse the fuel pump control ECU assembly if it has been dropped or subjected to a severe impact.
Tip:If a malfunction such as pump lock occurs and the fuel pump is damaged, excessive current may be continuously applied to the fuel pump control ECU assembly, damaging its internal parts. Make sure to replace the fuel pump control ECU assembly at the same time when replacing the fuel pump.
-