AHS ECU REMOVAL

PROCEDURE
-
PRECAUTION
Note
-
Be sure to read Precaution thoroughly before servicing.
-
Handle components indoors as much as possible to prevent foreign matter from entering and adhering to headlight assembly components.
-
Do not reuse parts which have reduced fastening ability due to thread damage.
-
When installing components, make sure that the wire harness is not pinched or pulled.
-
Do not use solvent to clean components. Only clean them with a dry cloth.
Tech Tips
-
Use the same procedure for the RH and LH sides.
-
The procedure listed below is for the LH side.
-
-
REMOVE HEADLIGHT ASSEMBLY LH
-
REMOVE HEADLIGHT LENS LH
-
REMOVE HEADLIGHT LENS GASKET
-
REMOVE LIGHT CONTROL LED ECU LH
Note
-
Prevention of static electricity is required during this procedure.
-
Use static electricity countermeasures SST (desktop anti-static mat set) and observe all precautions to prevent damage to the system by electrostatic discharge (ESD).
-
Perform work using clean rubber gloves.
-
Do not touch the headlight unit assembly LH with bare hands.
-
Do not allow metallic surfaces to become dirty, as such surfaces become damaged even if they are only lightly wiped with a soft cloth.
-
If there are fingerprints on the inner surface of the lens, lightly wiped with a soft cloth.
-
Do not use solvent to clean components. Only clean them with a dry cloth.
- SST
- 09890-47010 ( 09891-04010, 09891-04020, 09891-04030, 09891-04040 )
-
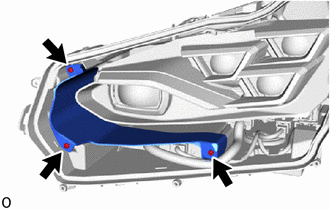
Remove the 3 screws and headlight bezel.
-
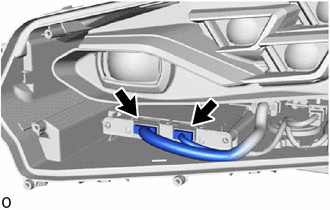
Disconnect the 2 connectors.
-
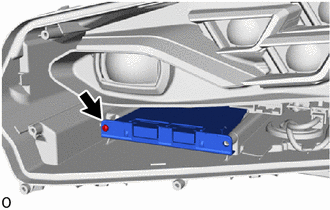
Remove the screw and light control LED ECU.
-