EXHAUST PIPE INSTALLATION
CAUTION / NOTICE / HINT
PROCEDURE
-
INSTALL EXHAUST TAILPIPE ASSEMBLY
-
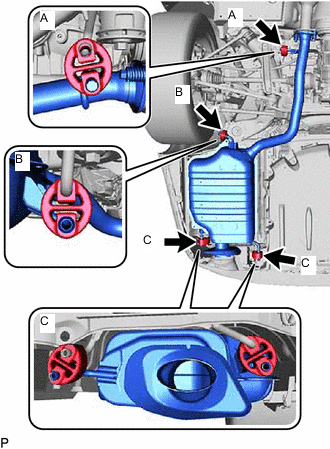
Install the 4 exhaust pipe supports to the exhaust tailpipe assembly as shown in the illustration.
Type of Exhaust Pipe Support Paint Mark A Purple B Blue C Yellow
-
-
INSTALL EXHAUST TAILPIPE LH
-
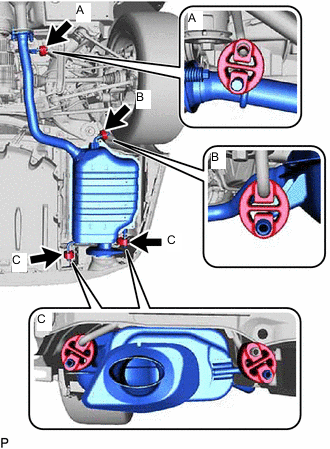
Install the 4 exhaust pipe supports to the exhaust tailpipe assembly as shown in the illustration.
Type of Exhaust Pipe Support Paint Mark A Purple B Blue C Yellow
-
-
INSTALL FRONT EXHAUST PIPE ASSEMBLY
-
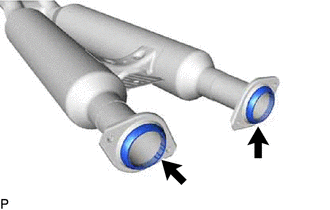
Install 2 new gaskets to the front exhaust pipe assembly of the rear side.
Note
Do not reuse the gasket.
-

Install 2 new gaskets to the exhaust manifold sub-assembly RH and the exhaust manifold sub-assembly LH.
Note
Do not reuse the gasket.
-
Install the front exhaust pipe assembly to the exhaust tailpipe assembly with 4 new nuts and 4 compression springs.
- Torque:
- 43 N*m { 438 kgf*cm, 32 ft.*lbf }
Note
Do not reuse the bolt and gasket.
-
Install the front exhaust pipe assembly to the exhaust manifold sub-assembly RH and the exhaust manifold sub-assembly LH with 4 new nuts and 4 new bolts.
- Torque:
- 39 N*m { 398 kgf*cm, 29 ft.*lbf }
Note
Do not reuse the bolt, nut and gasket.
-
-
INSTALL FRONT FLOOR BRACE SUB-ASSEMBLY CENTER
-
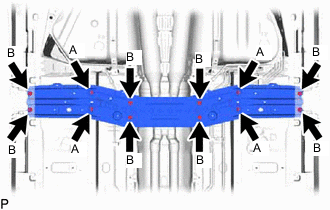
Install the front floor brace sub-assembly center with the 12 bolts.
- Torque:
- 20 N*m { 204 kgf*cm, 15 ft.*lbf }
Standard Bolt Length Item Specified Condition A 21 mm (0.83 in.) B 44 mm (1.73 in.)
-
-
INSTALL FLOOR BOARD SUB-ASSEMBLY
-
Install the floor board sub-assembly with the 10 clips, 7 grommets, 2 nuts and 2 bolts.
- Torque:
- 8.0 N*m { 82 kgf*cm, 71 in.*lbf }
-
-
INSTALL NO. 2 FLOOR BOARD SUB-ASSEMBLY
-
Install the No. 2 floor board sub-assembly with the 10 clips, 7 grommets, 2 nuts and 2 bolts.
- Torque:
- 8.0 N*m { 82 kgf*cm, 71 in.*lbf }
-
-
INSTALL REAR FLOOR SIDE MEMBER COVER RH
-
Install the rear floor side member cover RH with the 2 clips, 3 bolts, screw and nut.
- Torque:
- 8.0 N*m { 82 kgf*cm, 71 in.*lbf }
-
-
INSTALL REAR FLOOR SIDE MEMBER COVER LH
-
Install the rear floor side member cover LH with the 2 clips, 3 bolts, screw and nut.
- Torque:
- 8.0 N*m { 82 kgf*cm, 71 in.*lbf }
-
-
INSPECT FOR EXHAUST GAS LEAK
If gas is leaking, tighten the areas necessary to stop the leak. Replace damaged parts as necessary.