FUEL LID LOCK CONTROL (for Double Cab) INSTALLATION
Tech Tips
-
Use the same procedure for RHD and LHD vehicles.
-
The procedure listed below is for LHD vehicles.
-
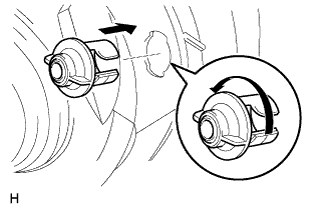
INSTALL FUEL FILLER OPENING LID LOCK RETAINER
-
Install the fuel filler opening lid lock retainer and turn it counterclockwise as shown in the illustration.
-
-
INSTALL FUEL LID LOCK CONTROL CABLE SUB-ASSEMBLY
-
for LHD:
-
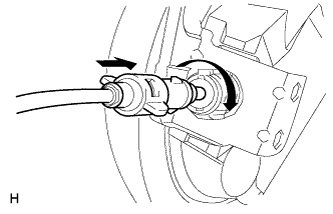
Install the fuel lid lock control cable and turn the fuel filler opening lid lock retainer clockwise as shown in the illustration.
-
Attach the cable to the clamps shown in the illustration.
-
Install the grommet to the vehicle body.
-
Install the fuel lid lock open lever.
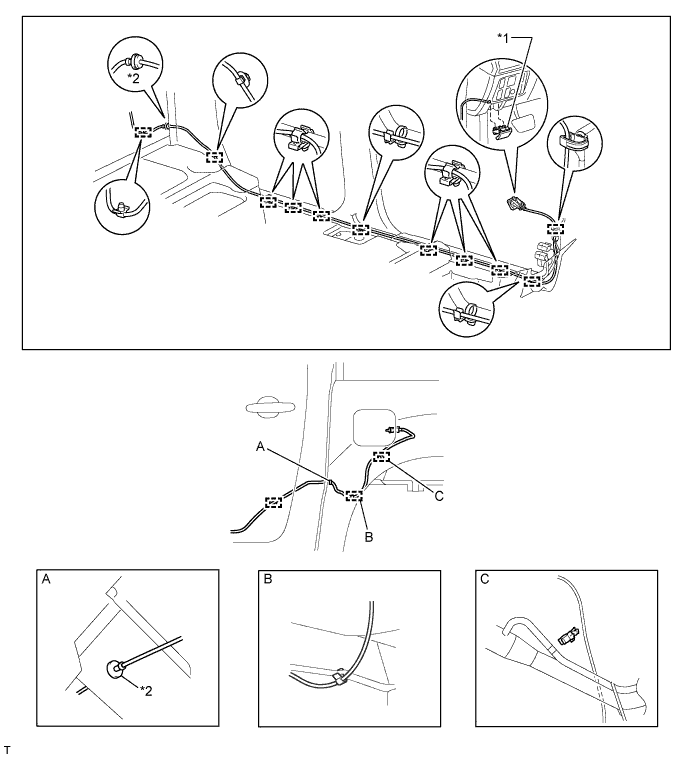
Text in Illustration *1 Fuel Lid Lock Open Lever *2 Grommet
-
-
for RHD:
-
Install the fuel lid lock control cable and turn the fuel filler opening lid lock retainer clockwise as shown in the illustration.
-
Attach the cable to the clamps shown in the illustration.
-
Install the grommet to the vehicle body.
-
Install the fuel lid lock open lever.

Text in Illustration *1 Fuel Lid Lock Open Lever *2 Grommet
-
-
-
INSTALL REAR WHEEL HOUSE LINER LH
-
Install the rear wheel house liner.
-
-
INSTALL REAR NO. 1 WHEEL OPENING EXTENSION SUB-ASSEMBLY LH (w/ Over Fender)
-
Install 11 new clips to the rear No. 1 wheel opening extension.
-
Attach the 11 clips to install the rear No. 1 wheel opening extension.
-
w/ Mudguard:
Install the 5 screws.
-
w/o Mudguard:
Install the 8 screws.
-
-
INSTALL FRONT FLOOR CARPET ASSEMBLY
-
Install the front floor carpet.
-
-
INSTALL LOWER QUARTER TRIM PANEL LH
-
Attach the 3 clips and claw to install the lower quarter trim panel.
-
Install the rear door opening trim.
-
-
INSTALL LOWER CENTER PILLAR GARNISH LH
-
Attach the 2 clips and 2 claws to install the lower center pillar garnish.
-
Install the front door opening trim and rear door opening trim.
-
Connect the front seat outer belt floor anchor with the bolt.
- Torque:
- 42 N*m { 428 kgf*cm, 31 ft.*lbf }
-
-
INSTALL COWL SIDE TRIM BOARD LH (for LHD)
-
Attach the 2 clips to install the cowl side trim board.
-
Install the clip.
-
Install the front door opening trim.
-
-
INSTALL COWL SIDE TRIM BOARD RH (for RHD)
Tech Tips
Use the same procedure described for the LH side.
-
INSTALL REAR DOOR SCUFF PLATE LH
-
Attach the 2 clips and 7 claws to install the rear door scuff plate LH.
-
-
INSTALL FRONT DOOR SCUFF PLATE LH
-
Attach the 3 clips and 7 claws to install the front door scuff plate LH.
-
-
INSTALL FRONT DOOR SCUFF PLATE RH (for RHD)
Tech Tips
Use the same procedure described for the LH side.
-
INSTALL UPPER BACK PANEL GARNISH (w/o Rear Center Seat Belt)
-
Attach the 5 clips and 4 claws to install the upper back panel garnish.
-
-
INSTALL BACK PANEL TRIM (for RHD, w/ Rear Center Seat Belt)
-
Attach the 2 claws and 9 clips to install the back panel trim.
-
Install the 4 clips.
-
Attach the 5 claws to connect the seat belt guide.
-
-
INSTALL CONSOLE BOX ASSEMBLY (w/ Console Box)
-
INSTALL REAR SEAT ASSEMBLY
-
INSTALL FRONT SEAT ASSEMBLY LH
-
w/ Front Seat Side Airbag:
-
for Power Seat:
-
for Separate Seat Type:
-
-
INSTALL FRONT SEAT ASSEMBLY RH
-
w/ Front Seat Side Airbag:
Tech Tips
Use the same procedure described for the LH side.
-
for Power Seat:
Tech Tips
Use the same procedure described for the LH side.
-
for Separate Seat Type:
Tech Tips
Use the same procedure described for the LH side.
-
for Bench Seat Type:
-