UREA INJECTOR REMOVAL
-
REMOVE NO. 2 ENGINE UNDER COVER
-
Remove the 6 bolts and No. 2 engine under cover from the body.
-
-
DISCONNECT UREA TUBE WITH HEATER ASSEMBLY
Note
-
Check for dirt or mud on the urea injector set and around the urea tube connector before disconnection. Clean if necessary.
-
In order to prevent the urea injector set interior portion from drying, perform installation and removal work as quickly as possible.
-
Disconnect the urea tube with heater assembly from the urea injector set.
-

Detach the lock claw by lifting up the cover.
Text in Illustration 
Lift Up -
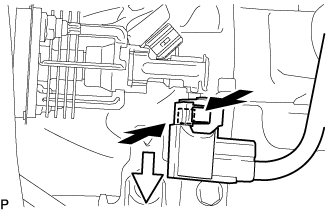
Pinch the retainer of the urea tube connector, and then pull the urea tube connector off of the urea tube with heater assembly.
Text in Illustration Pinch 
Pull Note
-
If there is any solidified urea solution (white solids) on the connection area, clean the solids off with a damp cloth, etc., before disconnecting the urea tube connector.
-
Be sure to disconnect the urea tube connector by hand.
-
Check for foreign matter in the urea injector set and around the urea tube connector. Clean if necessary. Foreign matter may damage the O-ring or cause leaks in the seal between the urea injector set and urea tube connector.
-
Put the urea injector set and urea tube connector ends in plastic bags to prevent damage and foreign matter contamination.
-
-
-
-
REMOVE UREA INJECTOR SET
-

Disconnect the connector from the urea injector set.
-

Remove the 2 nuts and urea injector set and gasket from the front exhaust pipe assembly.
-