DYNAMIC RADAR CRUISE CONTROL SYSTEM Distance Control Switch Circuit
DESCRIPTION
The distance control switch is used to set the distance for vehicle-to-vehicle distance control mode. The distance control switch is installed in the steering pad switch assembly RH. The vehicle-to-vehicle distance set value can be changed by operating the steering pad switch assembly RH (distance control switch) while the dynamic radar cruise control system is controlling vehicle speed in vehicle-to-vehicle distance control mode.
WIRING DIAGRAM
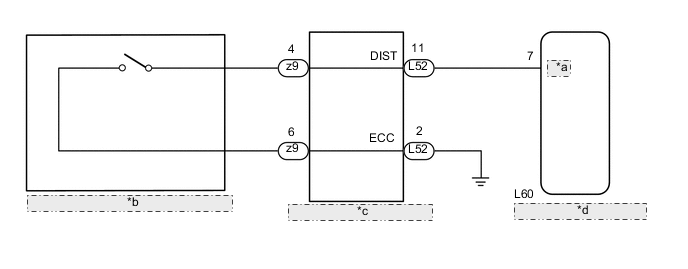
| *a | MODE |
| *b | Steering Pad Switch Assembly RH (Distance Control Switch) |
| *c | Spiral with Sensor Cable Sub-assembly |
| *d | Driving Support ECU Assembly |
PROCEDURE
-
READ VALUE USING GTS (DISTANCE CONTROL SWITCH)
-
Connect the GTS to the DLC3.
-
Turn the power switch on (IG).
-
Turn the GTS on.
-
Enter the following menus: Powertrain / Radar Cruise / Data List.
-
Check the Data List to confirm function of the distance control switch.
Radar Cruise Tester Display Measurement Item/Range Normal Condition Diagnostic Note Distance Control Switch Distance control switch signal / ON or OFF ON: Distance control switch on
OFF: Distance control switch off
- OK The display changes in accordance with switch operation.
OK 
PROCEED TO NEXT SUSPECTED AREA SHOWN IN PROBLEM SYMPTOMS TABLE Click here
NG 
-
-
INSPECT STEERING PAD SWITCH ASSEMBLY RH
-
Remove the steering RH Click here.
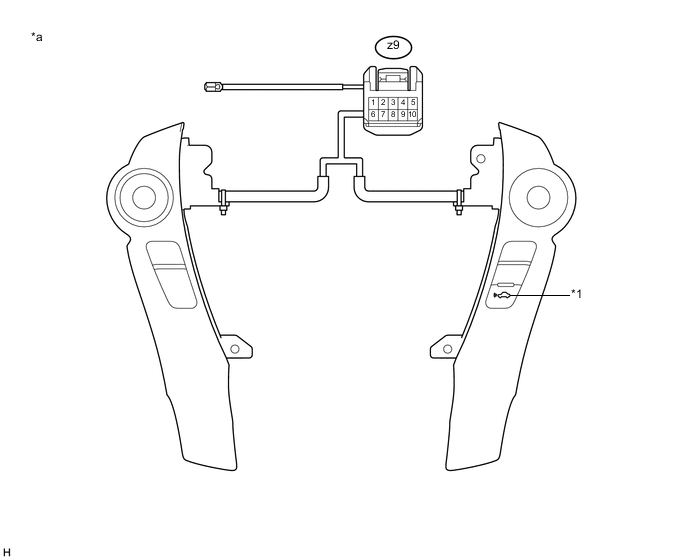
Text in Illustration *1 Distance Control Switch - - *a Component without harness connected
(Steering Pad Switch Assembly RH)
- - -
Measure the resistance according to the value(s) in the table below.
Standard Resistance Tester Connection Condition Specified Condition z9-4 - z9-6 Distance control switch ON Below 2.5 Ω z9-4 - z9-6 Distance control switch OFF 1 MΩ or higher -
Install the steering pad switch assembly RH Click here.
NG
REPLACE STEERING PAD SWITCH ASSEMBLY RH Click here
OK
-
-
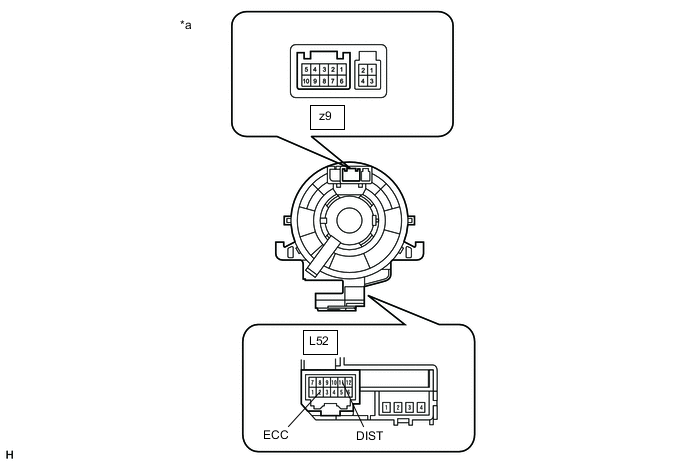
INSPECT SPIRAL WITH SENSOR CABLE SUB-ASSEMBLY
Note
The spiral with sensor cable sub-assembly is an important part of the SRS airbag system. Incorrect removal or installation of the spiral with sensor cable sub-assembly may cause airbag deployment. Be sure to read the page shown in the link/brackets.
-
Remove the spiral with sensor cable sub-assembly Click here.
-
Measure the resistance according to the value(s) in the table below.
Standard Resistance (Check for Open) Tester Connection Condition Specified Condition z9-4 - L52-11 (DIST) Always Below 1 Ω z9-6 - L52-2 (ECC) Always Below 1 Ω Text in Illustration *a Component without harness connected
(Spiral with Sensor Cable Sub-assembly)
Tech Tips
The spiral with sensor cable sub-assembly makes a maximum of approximately 5 rotations.
-
Reinstall the spiral with sensor cable sub-assembly Click here.
NG
REPLACE SPIRAL WITH SENSOR CABLE SUB-ASSEMBLY Click here
OK
-
-
CHECK HARNESS AND CONNECTOR (SPIRAL WITH SENSOR CABLE SUB-ASSEMBLY - DRIVING SUPPORT ECU)
-
Disconnect the driving support ECU assembly connector.
-
Disconnect the spiral with sensor cable sub-assembly connector.
-
Measure the resistance according to the value(s) in the table below.
Standard Resistance (Check for Open) Tester Connection Condition Specified Condition L60-7 (MODE) - L52-11 (DIST) Always Below 1 Ω Standard Resistance (Check for Short) Tester Connection Condition Specified Condition L60-7 (MODE) or L52-11 (DIST) - Body ground Always 10 kΩ or higher -
Reconnect the driving support ECU assembly connector.
-
Reconnect the spiral with sensor cable sub-assembly connector.
NG
REPAIR OR REPLACE HARNESS OR CONNECTOR (SPIRAL WITH SENSOR CABLE SUB-ASSEMBLY - DRIVING SUPPORT ECU)
OK
-
-
CHECK HARNESS AND CONNECTOR (SPIRAL WITH SENSOR CABLE SUB-ASSEMBLY - BODY GROUND)
-
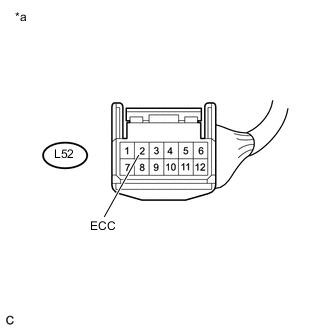
Text in Illustration *a Front view of wire harness connector
(to Spiral with Sensor Cable Sub-assembly)
Disconnect the spiral with sensor cable sub-assembly connector.
-
Measure the resistance according to the value(s) in the table below.
Standard Resistance (Check for Open) Tester Connection Condition Specified Condition L52-2 (ECC) - Body ground Always Below 1 Ω -
Reconnect the spiral with sensor cable sub-assembly connector.
OK
REPLACE DRIVING SUPPORT ECU ASSEMBLY Click here
NG
REPAIR OR REPLACE HARNESS OR CONNECTOR
-