OIL COOLER(for 8GR-FKS) REMOVAL
CAUTION / NOTICE / HINT
The necessary procedures (adjustment, initialization or registration) that must be performed after replacing the oil cooler assembly are shown below.
| Replacement Part or Procedure | Necessary Procedure | Effect/Inoperative when not Performed | Link |
|---|---|---|---|
| Automatic transmission fluid | ATF thermal degradation estimate reset | The value of the Data List item "ATF Thermal Degradation Estimate" is not estimated correctly. |
CAUTION:
-
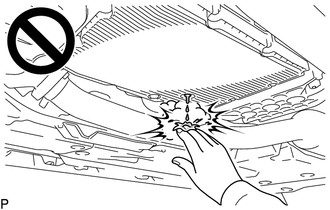
Be careful not to burn yourself when the automatic transmission fluid temperature is high.
-
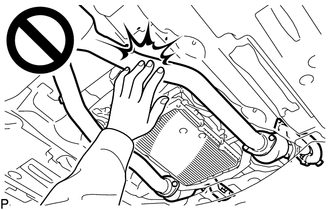
To prevent burns, do not touch the engine, exhaust pipe or other high temperature components while the engine is hot.
PROCEDURE
-
AIR SUSPENSION CONTROL PROHIBITED (w/ Air Suspension)
-
REMOVE NO. 1 ENGINE UNDER COVER ASSEMBLY
-
REMOVE TRANSMISSION UNDER COVER
-
REMOVE NO. 2 ENGINE UNDER COVER ASSEMBLY
-
REMOVE FRONT SUSPENSION MEMBER BRACE
-
REMOVE STRUT BAR BRACKET SUPPORT SUB-ASSEMBLY
-
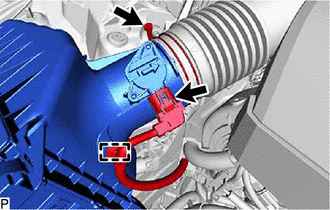
DRAIN AUTOMATIC TRANSMISSION FLUID
-
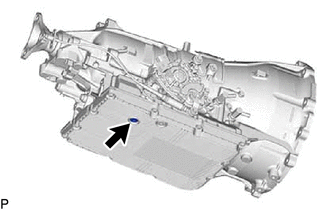
Using a 6 mm hexagon socket wrench, remove the drain plug from the automatic transmission oil pan sub-assembly and drain the automatic transmission fluid.
Note
The overflow plug and drain plug are located nearby one another. Make sure not to remove the incorrect plug.
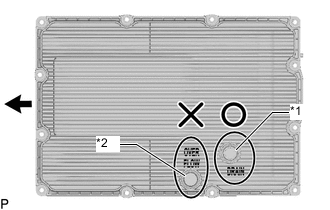
*1 Drain Plug *2 Overflow Plug 
Front of Vehicle -
Remove the O-ring from the drain plug.
-
Install a new O-ring to the drain plug.
-
Using a 6 mm hexagon socket wrench, install the drain plug to automatic transmission oil pan sub-assembly.
- Torque:
- 40 N*m { 408 kgf*cm, 30 ft.*lbf }
-
-
REMOVE V-BANK COVER SUB-ASSEMBLY
-
REMOVE RADIATOR COVER PLATE
-
REMOVE UPPER RADIATOR SUPPORT SEAL
-
REMOVE LOWER RADIATOR AIR DEFLECTOR
-
DRAIN ENGINE COOLANT
-
REMOVE RADIATOR SUPPORT TO CROSS MEMBER BRACE SUB-ASSEMBLY RH
-
REMOVE NO. 1 AIR CLEANER INLET
-
REMOVE AIR CLEANER ASSEMBLY
-
Detach the wire harness clamp.
-
Disconnect the intake mass air flow meter connector.
-
Loosen the hose clamp and disconnect the air cleaner hose assembly from the air cleaner assembly.
-
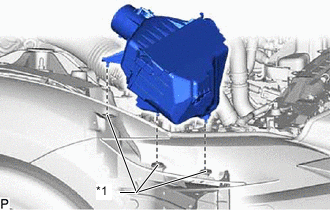
*1 Air Cleaner Support Remove the air cleaner assembly from the 3 air cleaner supports.
-
-
REMOVE RADIATOR RESERVE TANK ASSEMBLY
-
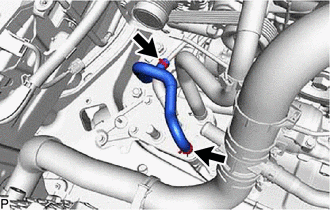
REMOVE NO. 1 OIL COOLER OUTLET HOSE (w/ In-tank Oil Cooler)
-
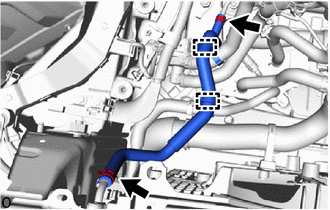
Detach the 2 clamps and disconnect the No. 1 oil cooler outlet hose from the No. 1 transmission oil cooler hose and water hose sub-assembly.
-
Slide the 2 hose clips and remove the No. 1 oil cooler outlet hose from the No. 1 oil cooler outlet tube and radiator assembly.
-
-
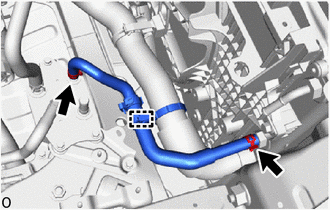
REMOVE WATER INLET HOSE (w/ In-tank Oil Cooler)
-
Slide the 2 hose clips and remove the water inlet hose from the oil cooler assembly and No. 3 radiator hose.
Note
Do not deform the oil cooler assembly.
-
-
REMOVE HEATER ACCESSORY ASSEMBLY (w/ In-tank Oil Cooler)
-
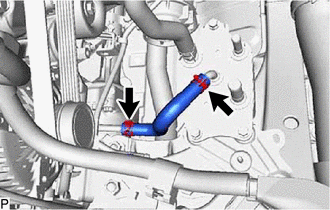
REMOVE NO. 1 TRANSMISSION OIL COOLER HOSE (w/ In-tank Oil Cooler)
-
Detach the clamp and disconnect the No. 1 transmission oil cooler hose from the No. 3 radiator hose.
-
Slide the 2 hose clips and remove the No. 1 transmission oil cooler hose from the radiator assembly and oil cooler assembly.
Note
Do not deform the oil cooler assembly.
-
-
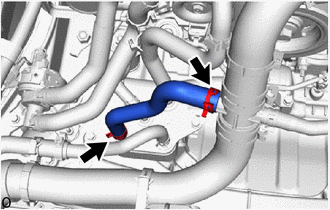
REMOVE NO. 1 OIL COOLER INLET HOSE (w/ In-tank Oil Cooler)
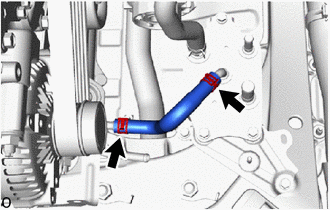
-
Slide the 2 hose clips and remove the No. 1 oil cooler inlet hose from the oil cooler assembly and No. 1 oil cooler inlet tube.
Note
Do not deform the oil cooler assembly.
-
-
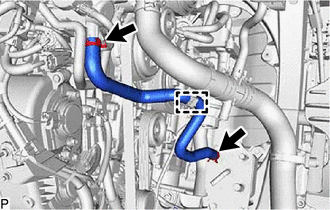
REMOVE NO. 1 WATER BY-PASS HOSE (w/ In-tank Oil Cooler)
-
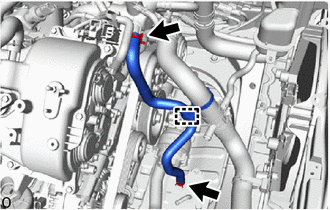
Detach the clamp and disconnect the No. 1 water by-pass hose from the No. 3 radiator hose.
-
Slide the 2 hose clips and remove No. 1 water by-pass hose from the oil cooler assembly and water outlet sub-assembly.
Note
Do not deform the oil cooler assembly.
-
-
REMOVE HEATER ACCESSORY ASSEMBLY (w/o In-tank Oil Cooler)
-
REMOVE WATER INLET HOSE (w/o In-tank Oil Cooler)
-
Slide the 2 hose clips and remove the water inlet hose from the oil cooler assembly and No. 3 radiator hose.
Note
Do not deform the oil cooler assembly.
-
-
REMOVE NO. 1 OIL COOLER OUTLET HOSE (w/o In-tank Oil Cooler)
-
Slide the 2 hose clips and remove the No. 1 oil cooler outlet hose from the oil cooler assembly and No. 1 oil cooler outlet tube.
Note
Do not deform the oil cooler assembly.
-
-
REMOVE NO. 1 OIL COOLER INLET HOSE (w/o In-tank Oil Cooler)
-
Slide the 2 hose clips and remove the No. 1 oil cooler inlet hose from the oil cooler assembly and No. 1 oil cooler inlet tube.
Note
Do not deform the oil cooler assembly.
-
-
REMOVE NO. 1 WATER BY-PASS HOSE (w/o In-tank Oil Cooler)
-
Detach the clamp and disconnect the No. 1 water by-pass hose from the No. 3 radiator hose.
-
Slide the 2 hose clips and remove No. 1 water by-pass hose from the oil cooler assembly and water outlet sub-assembly.
Note
Do not deform the oil cooler assembly.
-
-
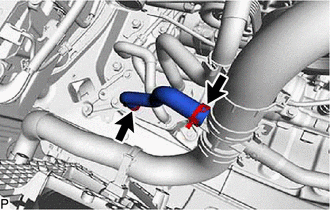
REMOVE OIL COOLER ASSEMBLY
-
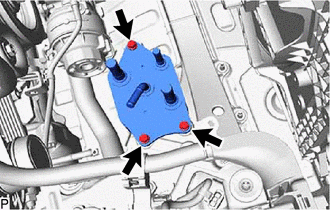
Remove the 3 bolts and oil cooler assembly.
-
-
REMOVE OIL COOLER BRACKET
-
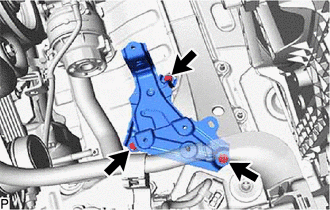
Remove the 3 bolts and oil cooler bracket.
-