COMBUSTION TYPE POWER HEATER SYSTEM, Diagnostic DTC:012,014,015 and 017
DTC Code
DTC Name
012
Overheating
014
Difference Evaluation Overheating
015
Operating Block caused by Overheating
017
Hardware Overheating
DESCRIPTION
DTC Code
DTC Detection Condition
Trouble Area
012
The surface sensor or temperature control sensor detects a temperature of 125°C (257°F) or higher.
Heater assembly (surface sensor)
Heater assembly (temperature control sensor)
Engine coolant circuit
014
When the engine coolant temperature is 80°C (176°F) and the heater assembly is operating, the difference in temperatures detected by the surface sensor and temperature control sensor is 25°C (77°F) or higher.
Heater assembly (surface sensor)
Heater assembly (temperature control sensor)
Engine coolant circuit
015
The temperature control sensor detects overheating of the engine coolant, and the ECU stops the operation of the heater assembly (one or both of DTCs 012 and 014 are detected 10 times in a row).
Engine coolant circuit
Heater assembly
017
When neither DTC 012 nor 014 is detected, the temperature control sensor or surface sensor detects a temperature of 130°C (266°F) or more.
Heater assembly (surface sensor)
Heater assembly (temperature control sensor)
Engine coolant circuit
CAUTION / NOTICE / HINT
Tip:
Output of DTC 015 indicates that the heater assembly has been locked by the ECU and cannot be operated. Clear the DTCs by pressing the memory clear buttons on the DTC tester to unlock the ECU (Click here).
PROCEDURE
INSPECT FOR ENGINE COOLANT LEAK
Note:
Before performing the inspection, turn the A/C switch off.
Remove the radiator reservoir cap.
CAUTION:
To avoid the danger of being burned, do not remove the radiator reservoir cap while the engine and radiator are still hot. Thermal expansion will cause hot engine coolant and steam to blow out from the radiator.
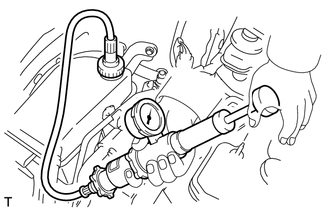
Fill the radiator with coolant, and then attach a radiator cap tester.
Warm up the engine.
Pump the radiator cap tester to 118 kPa (1.2 kgf/cm2, 17 psi), and then check that the pressure does not drop.
If the pressure drops, check the hoses, radiator and water pump for leakage.
If there are no signs of external coolant leaks, check the heater core, cylinder block and head.
OK
The pressure does not drop.
REPAIR ENGINE COOLANT LEAK
INSPECT ENGINE COOLANT QUALITY
Note:
Before performing the inspection, turn the A/C switch off.
Remove the radiator reservoir cap.
CAUTION:
To avoid the danger of being burned, do not remove the radiator reservoir cap while the engine and radiator are still hot. Thermal expansion will cause hot engine coolant and steam to blow out from the radiator.
Check for any excessive deposits of rust or scales around the radiator reservoir cap and radiator filler hole. The coolant should be free of oil.