FRONT AIR CONDITIONING UNIT DISASSEMBLY
CAUTION / NOTICE / HINT
Tech Tips
-
Use the same procedure for RHD and LHD vehicles.
-
The procedure listed below is for LHD vehicles.
PROCEDURE
-
REMOVE BLOWER ASSEMBLY
-
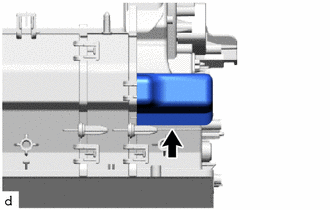
REMOVE ASPIRATOR
-
Detach the claw and remove the aspirator.
-
-
REMOVE COOLER THERMISTOR (ROOM TEMPERATURE SENSOR)
-
Remove the cooler thermistor (room temperature sensor) from the aspirator.
-
-
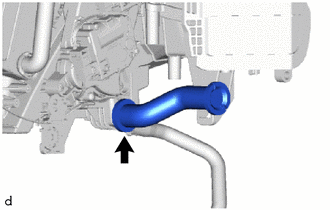
REMOVE NO. 3 COOLING UNIT PACKING
-
Remove the No. 3 cooling unit packing.
-
-
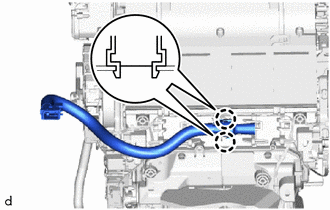
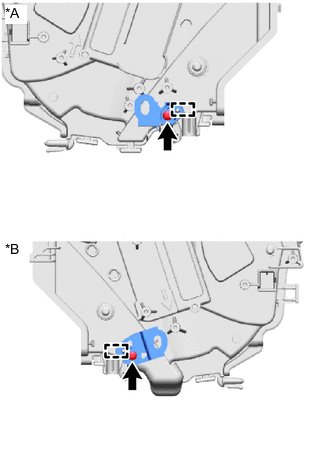
REMOVE NO. 2 COOLER UNIT DRAIN HOSE
-
Remove the No. 2 cooler unit drain hose.
-
-
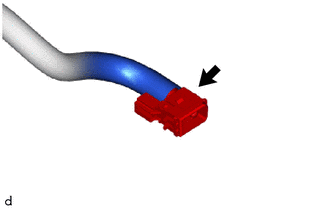
REMOVE DRAIN COOLER HOSE (for Front Passenger Side)
-
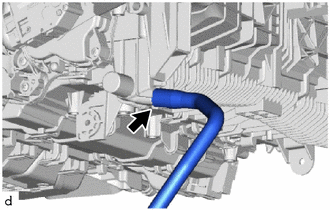
Remove the drain cooler hose (for front passenger side).
-
-
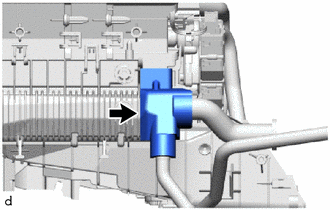
REMOVE DRAIN COOLER HOSE (for Driver's Side)
-
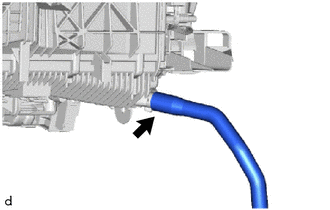
Remove the drain cooler hose (for front passenger side).
-
-
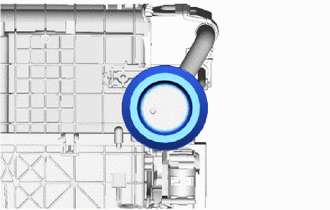
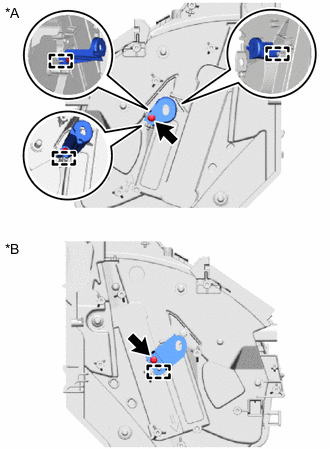
REMOVE HEATER GROMMET
-
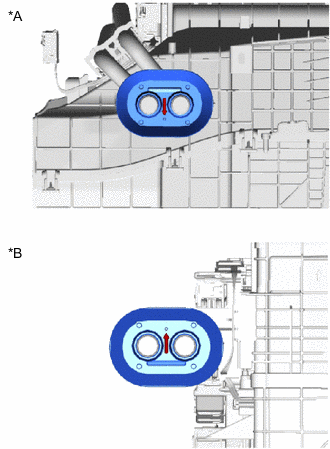
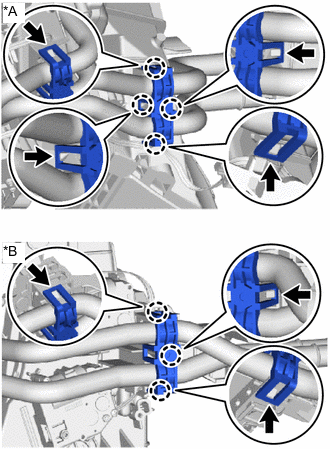
*A for LHD *B for RHD Remove the heater grommet.
-
-
REMOVE COOLING UNIT PARTS
-
Remove the cooling unit parts.
-
-
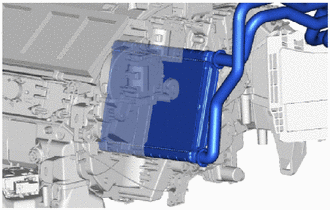
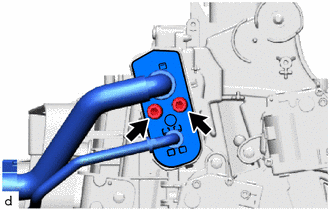
REMOVE QUICK HEATER ASSEMBLY (w/ PTC Heater)
-
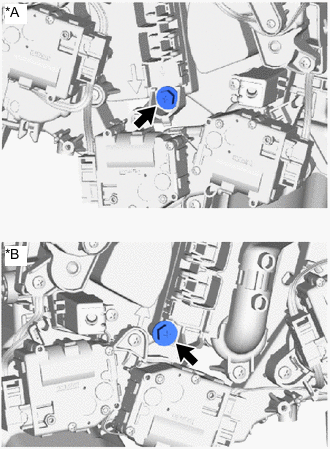
*A for LHD *B for RHD Remove the screw.
-
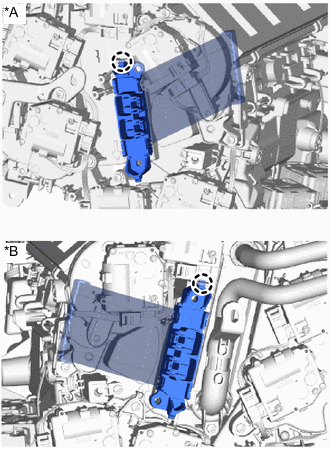
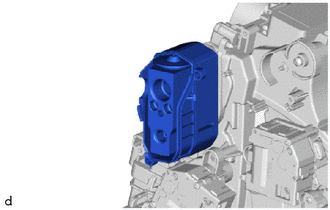
*A for LHD *B for RHD Detach the claw and remove the quick heater assembly.
Note
-
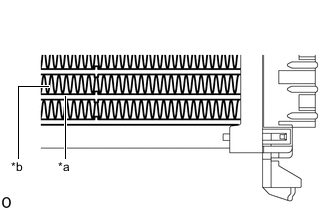
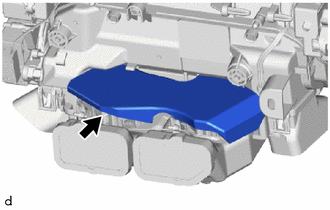
*a Element *b Fin Do not hold the quick heater assembly by the element or fin. Also, do not damage the quick heater assembly.
-
Foul odors may occur due to oil adhering to the quick heater assembly.
-
-
-
REMOVE HEATER COVER (w/o PTC Heater)
Tech Tips
Use the same procedure as for the quick heater assembly.
-
REMOVE NO. 3 COOLING UNIT BRACKET (for RHD)
-
Remove the screw and No. 3 cooling unit bracket.
-
-
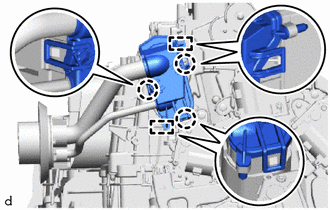
REMOVE HEATER RADIATOR UNIT SUB-ASSEMBLY
-
*A for LHD *B for RHD Detach the claw and remove the heater clamp.
-

*a Connector (A) *b Connector (B) for 4 Zone Type:
-
Disconnect the connector (A) and connector (B).
-
-
for Dual Type:
-
Disconnect the connector (A).
-
-
Detach the guide.
-
Remove the heater radiator unit sub-assembly from the heater case.
Note
Prepare a drain pan or cloth in case the coolant leaks.
-
-
REMOVE PACKING (for 4 Zone Type)
-
Remove the packing.
-
-
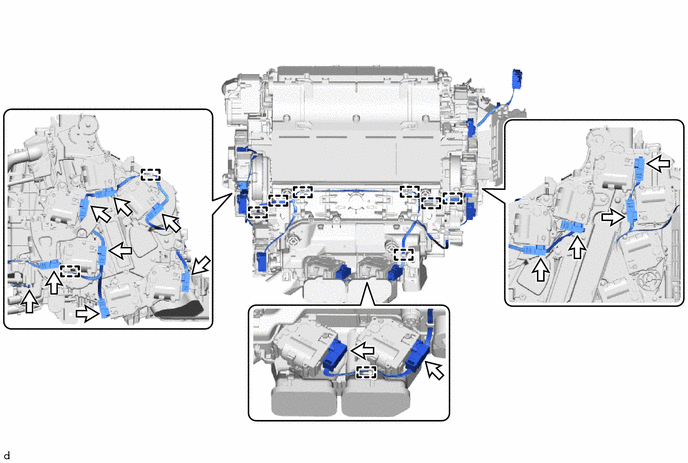
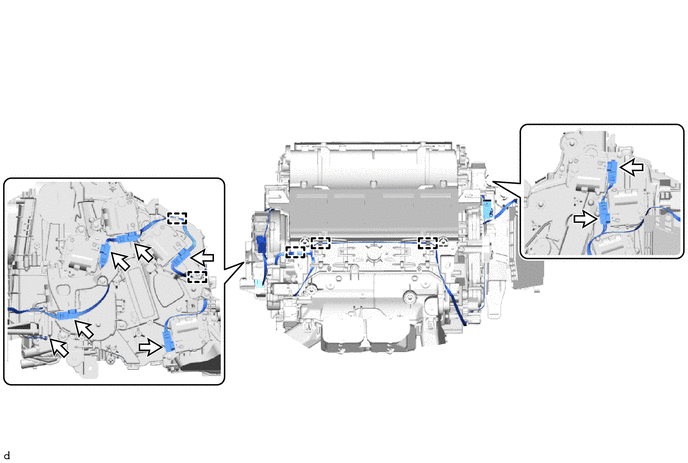
REMOVE AIR CONDITIONING HARNESS ASSEMBLY (for LHD)
-
for 4 Zone Type:
-
Disconnect the 14 connectors.
-
-
for Dual Type:
-
Disconnect the 8 connectors.
-
-
Detach the guide.
-
-
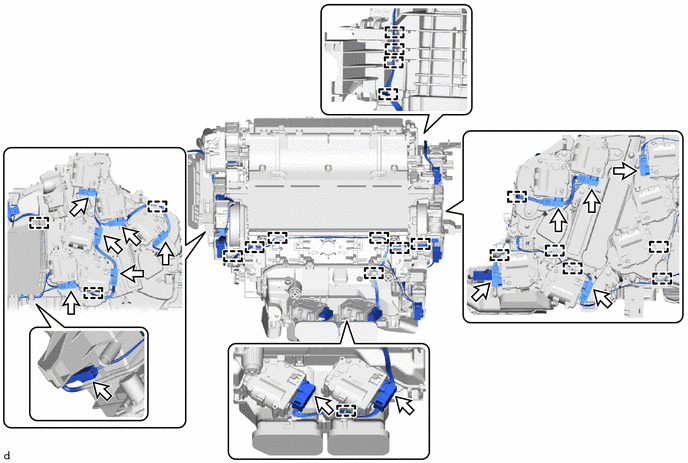
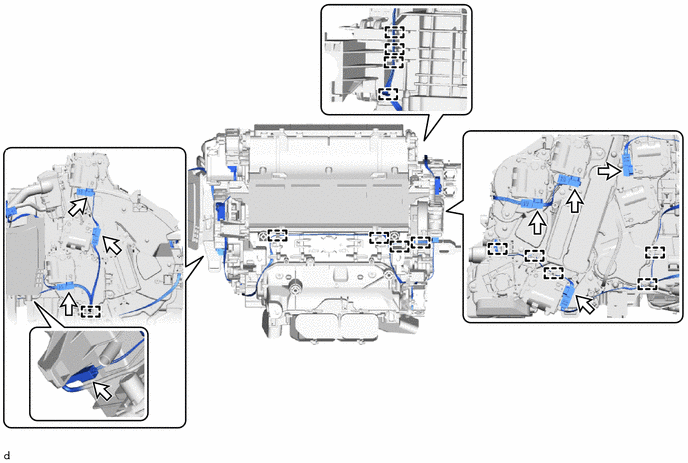
REMOVE AIR CONDITIONING HARNESS ASSEMBLY (for RHD)
-
for 4 Zone Type:
-
Disconnect the 14 connectors.
-
-
for Dual Type:
-
Disconnect the 8 connectors.
-
-
Detach the guide.
-
-
REMOVE NO. 2 COOLER COVER
-
Detach the claw and guide pin and remove the No. 2 cooler cover.
-
-
REMOVE AIR CONDITIONING TUBE ASSEMBLY
-
Using a 4 mm hexagon socket wrench, remove the 2 hexagon bolts and air conditioning tube assembly.
-
Remove the 2 O-rings from the air conditioning tube assembly.
Note
Seal the openings of the disconnected parts using vinyl tape to prevent the entry of moisture and foreign matter.
-
-
REMOVE COOLER EXPANSION VALVE
-
Remove the cooler expansion valve together with the No. 1 cooler cover.
-
Remove the 2 O-rings from the No. 1 cooler evaporator sub-assembly.
Note
Seal the openings of the disconnected parts using vinyl tape to prevent the entry of moisture and foreign matter.
-
-
REMOVE NO. 1 COOLER COVER
-


Remove in this Direction Remove the No. 1 cooler cover from the cooler expansion valve.
Note
Seal the openings of the disconnected parts using vinyl tape to prevent the entry of moisture and foreign matter.
-
-
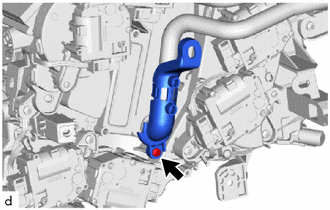
REMOVE NO. 3 COOLING UNIT BRACKET (for LHD)
-
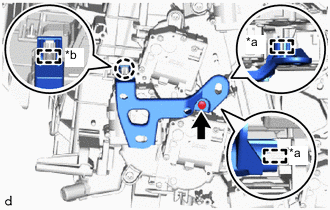
*a Guide *b Guide pin Remove the screw.
-
Detach the claw, guide and guide pin and remove the No. 3 cooling unit bracket.
-
-
REMOVE NO. 3 AIR CONDITIONING RADIATOR DAMPER SERVO SUB-ASSEMBLY (for RHD)
-
Remove the 2 screws and guide and remove the No. 3 air conditioning radiator damper servo sub-assembly.
-
-
REMOVE NO. 2 AIR CONDITIONING RADIATOR DAMPER SERVO SUB-ASSEMBLY
-
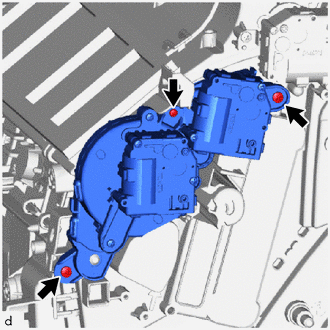
Remove the 3 screws and No. 2 air conditioning radiator damper servo sub-assembly.
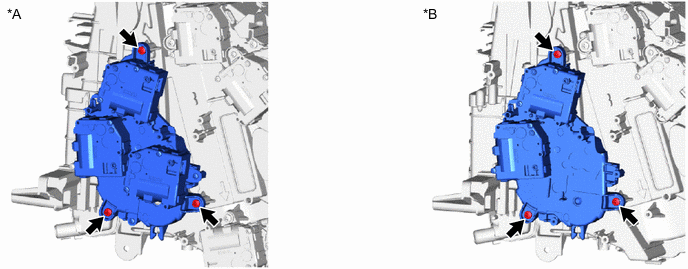
*A for 4 Zone Type *B for Dual Type
-
-
REMOVE NO. 1 AIR CONDITIONING RADIATOR DAMPER SERVO SUB-ASSEMBLY (for LHD)
-
Remove the 3 screws and No. 1 air conditioning radiator damper servo sub-assembly.
-
-
REMOVE NO. 6 AIR CONDITIONING RADIATOR DAMPER SERVO SUB-ASSEMBLY (for RHD, 4 Zone Type)
-
Remove the 3 screws and No. 6 air conditioning radiator damper servo sub-assembly.
-
-
REMOVE NO. 5 AIR CONDITIONING RADIATOR DAMPER SERVO SUB-ASSEMBLY (for LHD)
-
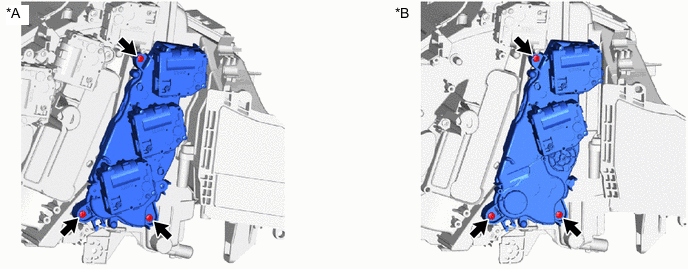
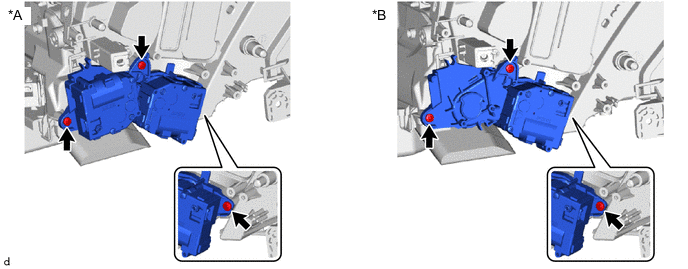
*A for 4 Zone Type *B for Dual Type for 4 Zone Type:
-
Remove the 3 screws and No. 5 air conditioning radiator damper servo sub-assembly.
-
-
for Dual Type:
-
Remove the 2 screws and No. 5 air conditioning radiator damper servo sub-assembly.
-
-
-
REMOVE NO. 4 AIR CONDITIONING RADIATOR DAMPER SERVO SUB-ASSEMBLY
-
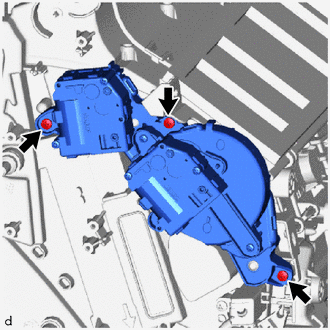
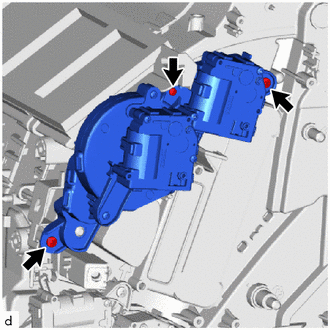
Remove the 3 screws and No. 4 air conditioning radiator damper servo sub-assembly.
*A for 4 Zone Type *B for Dual Type
-
-
REMOVE NO. 6 AIR CONDITIONING RADIATOR DAMPER SERVO SUB-ASSEMBLY (for LHD, 4 Zone Type)
-
Remove the 3 screws and No. 6 air conditioning radiator damper servo sub-assembly.
-
-
REMOVE NO. 1 AIR CONDITIONING RADIATOR DAMPER SERVO SUB-ASSEMBLY (for RHD)
-
Remove the 3 screws and No. 1 air conditioning radiator damper servo sub-assembly.
-
-
REMOVE NO. 3 AIR CONDITIONING RADIATOR DAMPER SERVO SUB-ASSEMBLY (for LHD)
-

Remove the 2 screws and guide and remove the No. 3 air conditioning radiator damper servo sub-assembly.
-
-
REMOVE NO. 5 AIR CONDITIONING RADIATOR DAMPER SERVO SUB-ASSEMBLY (for RHD)
-
Remove the 3 screws and No. 5 air conditioning radiator damper servo sub-assembly.
*A for 4 Zone Type *B for Dual Type
-
-
REMOVE HEATER AIR DAMPER ASSEMBLY (for 4 Zone Type)
-
Remove the screw.
-
Detach the claw and guide pin and remove the heater air damper assembly.
-
-
-
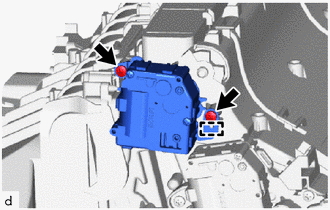
REMOVE NO. 1 COOLER EVAPORATOR SUB-ASSEMBLY
-
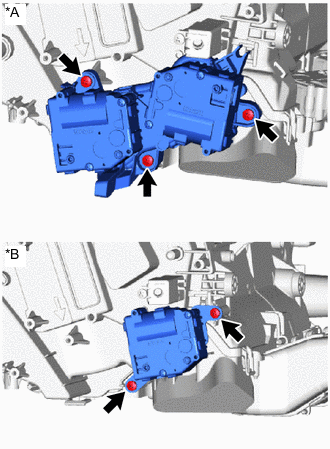
for LHD:
-
Detach the clamp.

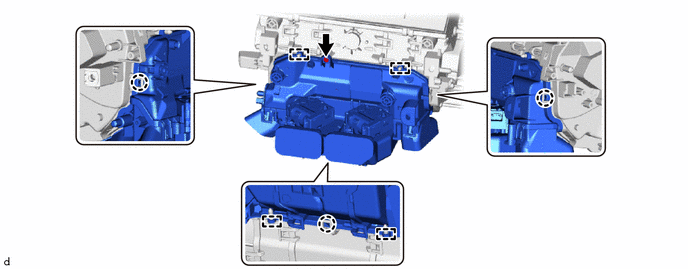
*a Clamp *b Guide *c Guide Pin *d No. 1 Cooler Thermistor Lead Wire Detach lead wire from guide - - -
Remove the 2 screws.
-
Detach the claw and guide pin and while detaching the lead wire of the No. 1 cooler thermistor from the guide, separate the heater case as shown in the illustration.
-
-
for RHD:
-
Detach the clamp.
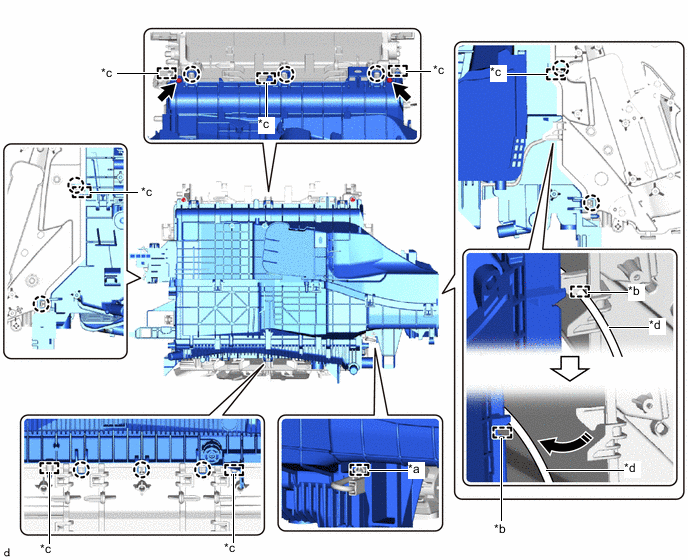
*a Clamp *b Guide *c Guide Pin *d No. 1 Cooler Thermistor Lead Wire Detach lead wire from guide - - -
Remove the 2 screws.
-
Detach the claw and guide pin and while detaching the lead wire of the No. 1 cooler thermistor from the guide, separate the heater case as shown in the illustration.
-
-

Remove the No. 1 cooler evaporator sub-assembly.
-
-
REMOVE NO. 1 COOLER THERMISTOR
-
REMOVE NO. 1 COOLING UNIT BRACKET
-
*A for LHD *B for RHD Remove the screw, detach the guide and remove the No. 1 cooling unit bracket.
-
-
REMOVE NO. 2 COOLING UNIT BRACKET
-
*A for LHD *B for RHD Remove the screw, detach the guide and remove the No. 2 cooling unit bracket.
-
-
REMOVE NO. 4 COOLING UNIT PACKING
-
Remove the No. 4 cooling unit packing.
-