FUEL INJECTOR INSTALLATION
CAUTION / NOTICE / HINT
Always be sure to check the tightening torque.
If the pressure lines are leaking after installation, they must be replaced.
Do not overtighten the pressure lines.
PROCEDURE
INSTALL INJECTOR ASSEMBLY
Note:Before installing the injector assembly, check for carbon, foreign matter, etc. on the sealing surfaces of the cylinder head sub-assembly and injector assembly. Clean if necessary.
-
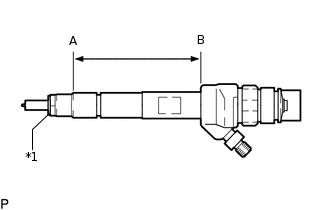
*1
Copper Sealing Ring
Make sure to replace the copper sealing ring on the injector assembly.
Before installing the injector assemblies to the injector assembly slots, apply a light coat of highly heat-resistant grease to the area between (A) and (B) shown in the illustration.
Check the installation position of the high pressure connection.
Make sure to read the adjustment values each time new injector assemblies are installed.
Tip:Perform "Injector Compensation" after replacing an injector assembly.
Retighten the clamping claw rest (cylinder head cover mounting).
Torque
10 N*m (102 kgf*cm, 7 ft.*lbf)
Install the 4 injector assemblies to the cylinder head cover sub-assembly.
Step 1:
Using an E10 "TORX" socket wrench, install the 4 clamping claws to the 4 injector assemblies with the 4 centering rings and 4 bolts.
8.0 N*m
82 kgf*cm
71 in.*lbf
Note:Make sure the screw centering ring is correctly positioned in order to align the clamping claw.
Step 2:
Using an E10 "TORX" socket wrench, tighten the 4 bolts.
26 N*m
265 kgf*cm
19 ft.*lbf
Connect the 4 injector assembly connectors.
CONNECT NOZZLE LEAKAGE PIPE ASSEMBLY
Install 4 new sealing rings to the nozzle leakage pipe assembly.
-
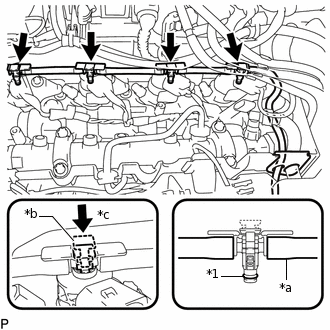
*1
Sealing Ring
*a
Leakage Line
*b
Clip
*c
Push down
Connect the nozzle leakage pipe assembly to the 4 injector assemblies and push down the 4 clips to install the nozzle leakage pipe assembly.
Engage the 2 clamps to connect the wire harness.
INSTALL CAMSHAFT POSITION SENSOR
INSTALL INJECTION PIPE SUB-ASSEMBLY
Note:If the pressure lines are leaking after installation, they must be replaced.
Do not overtighten the pressure lines.
Temporarily install the 2 No. 1 injection pipe sub-assemblies and 2 No. 2 injection pipe sub-assemblies at the common rail assembly end by hand.
-
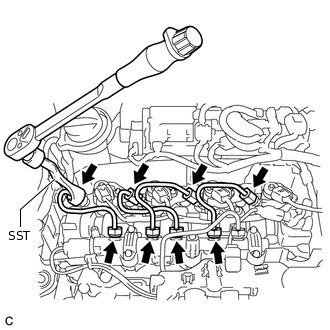
Using SST, tighten the 4 union nuts at the common rail assembly end of the 2 No. 1 injection pipe sub-assemblies and 2 No. 2 injection pipe sub-assemblies shown in the illustration.
SST
PZ4TB-04959-10
24 N*m
245 kgf*cm
18 ft.*lbf
Note:Be careful not to bend the pressure line with SST.
Always reposition SST before it contacts the pressure line.
Using SST, tighten the 4 union nuts at the 4 injector assembly ends of the 2 No. 1 injection pipe sub-assemblies and 2 No. 2 injection pipe sub-assemblies.
SST
PZ4TB-04959-10
24 N*m
245 kgf*cm
18 ft.*lbf
Note:Be careful not to bend the pressure line with SST.
Always reposition SST before it contacts the pressure line.
Check all components of the common rail system for tightness.
CONNECT CABLE TO NEGATIVE BATTERY TERMINAL
Note:When disconnecting the cable, some systems need to be initialized after the cable is reconnected.
INSPECT FOR FUEL LEAK
INSTALL ENGINE COVER
Install the engine cover.
INSTALL NO. 1 ENGINE COVER
PERFORM REGISTRATION
Perform "Injector Compensation" after replacing an injector assembly.