REAR BUMPER (for Flat Type) REASSEMBLY
-
INSTALL REAR BUMPER BAR PLATE
Tech Tips
When installing the rear bumper bar plate, heat the rear bumper and rear bumper bar plate using a heat light.
Standard Item Temperature Rear Bumper 20 to 30°C (68 to 86°F) Rear Bumper Bar Plate 20 to 30°C (68 to 86°F) Note
Do not heat the rear bumper or rear bumper bar plate excessively.
-
When using a new rear bumper bar plate:
-
Clean the rear bumper surface.
-
Using a heat light, heat the rear bumper surface.
-
-
When reusing the rear bumper bar plate:
-
Using a heat light, heat the rear bumper surface and rear bumper bar plate surface.
-
Remove the double-sided tape from the rear bumper and rear bumper bar plate.
-
Wipe off any tape adhesive residue with cleaner.
-
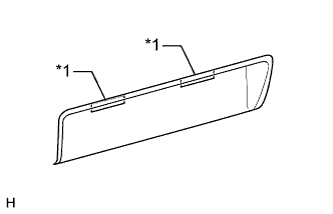
Text in Illustration *1 Double-sided Tape Install a new double-sided tape in the position shown in the illustration.
-
-
Install the rear bumper bar plate.
-
Remove the peeling paper from the face of the rear bumper bar plate.
Tech Tips
After removing the peeling paper, keep the exposed adhesive free from foreign matter.
-
Attach the 7 claws to install the rear bumper bar plate.
-
-
-
INSTALL REAR BUMPER PLATE LH
-
Attach the 2 claws to install the rear bumper plate.
-
-
INSTALL REAR BUMPER PLATE RH
Tech Tips
Use the same procedure described for the LH side.
-
INSTALL REAR BUMPER PLATE
-
Attach the 13 claws to install the rear bumper plate.
-
-
INSTALL REAR BUMPER ARM LH
-
Install the rear bumper arm with the 2 bolts.
- Torque:
- 45 N*m { 459 kgf*cm, 33 ft.*lbf }
-
-
INSTALL REAR BUMPER ARM RH
Tech Tips
Use the same procedure described for the LH side.
-
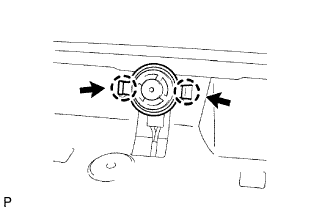
INSTALL LICENSE PLATE LIGHT ASSEMBLY
-
Attach the license plate light with the 2 claws.
-
Connect the connector.
-