REAR AXLE CARRIER(for AWD) INSTALLATION

CAUTION / NOTICE / HINT
Tech Tips
-
Use the same procedure for the RH side and LH side.
-
The following procedure is for the LH side.
PROCEDURE
-
TEMPORARILY INSTALL REAR AXLE CARRIER SUB-ASSEMBLY
-
Temporarily install the rear axle carrier sub-assembly to the rear upper control arm assembly with the bolt and nut.
Note
-
Insert the bolt with the threaded end facing the rear of the vehicle.
-
Because the nut has its own stopper, do not turn the nut. Tighten the bolt with the nut secured.
-
-
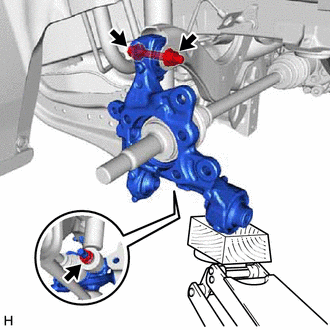
Temporarily install the rear shock absorber assembly to the rear axle carrier sub-assembly with the nut.
Note
Hold the rear axle carrier pin while rotating the nut.
-
Install the rear trailing arm assembly to the rear axle carrier sub-assembly with the 2 bolts.
- Torque:
- 135 N*m { 1377 kgf*cm, 100 ft.*lbf }
-
-
INSTALL FLEXIBLE HOSE BRACKET
-
Install the flexible hose bracket to the rear axle carrier sub-assembly with the bolt.
- Torque:
- 29 N*m { 296 kgf*cm, 21 ft.*lbf }
-
-
TEMPORARILY INSTALL REAR NO. 1 SUSPENSION ARM ASSEMBLY
-
INSTALL REAR LOWER COIL SPRING INSULATOR
-
INSTALL REAR COIL SPRING
-
STABILIZE SUSPENSION
-
INSTALL REAR UPPER CONTROL ARM ASSEMBLY
-
Install the rear upper control arm assembly to the rear axle carrier sub-assembly with the bolt.
- Torque:
- 73 N*m { 744 kgf*cm, 54 ft.*lbf }
Note
Because the nut has its own stopper, do not turn the nut. Tighten the bolt with the nut secured.
-
-
INSTALL REAR NO. 1 SUSPENSION ARM ASSEMBLY
-
INSTALL REAR NO. 2 SUSPENSION ARM ASSEMBLY
-
Install the rear No. 2 suspension arm assembly (rear axle carrier sub-assembly side) with the bolt.
-
-
INSTALL REAR SHOCK ABSORBER ASSEMBLY
-
INSTALL REAR STABILIZER LINK ASSEMBLY
-
INSTALL REAR AXLE HUB AND BEARING ASSEMBLY
-
INSTALL REAR SPEED SENSOR
-
INSTALL REAR DISC
-
INSTALL REAR DISC BRAKE CALIPER ASSEMBLY
-
INSTALL REAR AXLE SHAFT NUT
-
Clean the threaded parts on the rear drive shaft assembly and a new rear axle shaft nut using non-residue solvent.
Note
-
Be sure to perform this work even when using a new rear drive shaft assembly.
-
Keep the threaded parts free of oil and foreign matter.
-
-
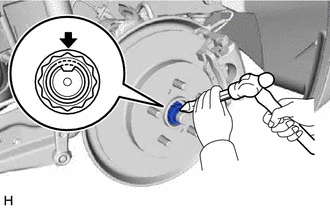
Using a 30 mm socket wrench, install the rear axle shaft nut.
- Torque:
- 216 N*m { 2203 kgf*cm, 159 ft.*lbf }
Note
Stake the rear axle shaft nut after inspecting for looseness and runout in the following steps.
Tech Tips
Depress the brake pedal to prevent the drive shaft from rotating.
-
Using a chisel and hammer, stake the rear axle shaft nut.
-
-
INSTALL REAR HEIGHT CONTROL SENSOR SUB-ASSEMBLY LH (w/ Height Control Sensor)
-
INSTALL REAR WHEEL
-
INSTALL REAR NO. 2 SUSPENSION ARM ASSEMBLY
-
Install the rear No. 2 suspension arm assembly (rear suspension member sub-assembly side) with the nut.
-
-
INSPECT AND ADJUST REAR WHEEL ALIGNMENT
-
CHECK FOR SPEED SENSOR SIGNAL
-
PERFORM INITIALIZATION (w/ Height Control Sensor)