WINDSHIELD GLASS REMOVAL
-
REMOVE FRONT ASSIST GRIP NO. 1 PLUG
-
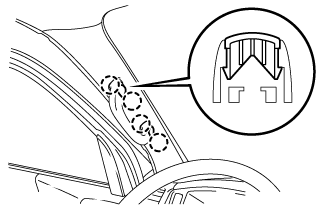
Using a screwdriver, detach the 4 claws and remove the 2 front assist grip plugs No. 1.
Tech Tips
-
Tape the screwdriver tip before use.
-
Use the same procedures described for the other side.
-
-
-
REMOVE ASSIST GRIP ASSEMBLY
-
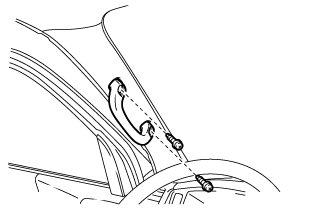
Remove the 2 screws and assist grip assembly.
Tech Tips
Use the same procedures described for the other side.
-
-
REMOVE FRONT PILLAR GARNISH LH
w/o Rear Cooler Click here
w/ Rear Cooler Click here
-
REMOVE FRONT PILLAR GARNISH RH
-
REMOVE ASSIST GRIP ASSEMBLY REAR
-
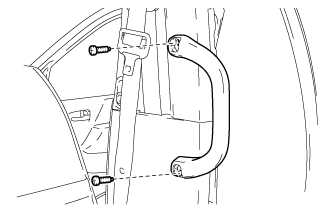
Remove the 2 screws and assist grip assembly rear.
-
-
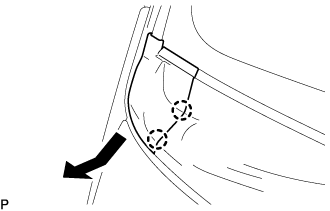
REMOVE VISOR HOLDER
Tech Tips
Use the same procedures described for the other side.
-
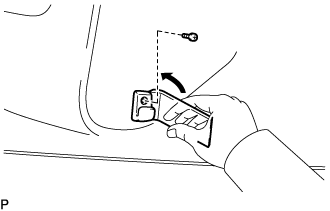
Remove the screw.
-
Using a moulding remover, detach the claw and remove the visor holder.
-
-
REMOVE VISOR ASSEMBLY LH
-
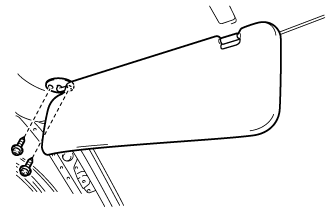
Remove the 2 screws and visor assembly LH.
-
-
REMOVE VISOR ASSEMBLY RH
Tech Tips
Use the same procedures described for the LH side.
-
REMOVE ROOM LIGHT ASSEMBLY NO. 1
-
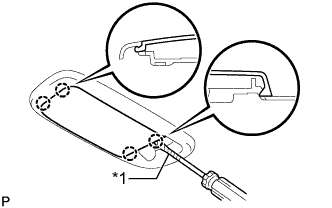
Text in Illustration *1 Protective Tape Using a screwdriver, detach the 4 claws and remove the light cover.
Tech Tips
Tape the screwdriver tip before use.
-
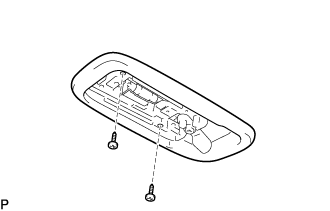
Remove the 2 screws and room light assembly No. 1.
-
Disconnect the connector.
-
-
REMOVE ROOF HEADLINING NO. 1
-

Remove the 4 screws.
-
Using a clip remover, remove the 8 clips.
-
Using a clip remover, detach the clip A and remove the roof headlining No. 1.
-
-
REMOVE INNER REAR VIEW MIRROR ASSEMBLY
-
REMOVE WINDSHIELD WIPER ARM COVER
-
Remove the 2 windshield wiper arm covers.
-
-
REMOVE FRONT WIPER ARM AND BLADE ASSEMBLY RH
-
Remove the nut and front wiper arm and blade assembly RH.
-
-
REMOVE FRONT WIPER ARM AND BLADE ASSEMBLY LH
-
Remove the nut and front wiper arm and blade assembly LH.
-
-
REMOVE COWL VENT COVER RH
-
Disengage the 2 claws and remove the cowl vent cover RH as shown in the illustration.
-
-
REMOVE COWL VENT COVER LH
-
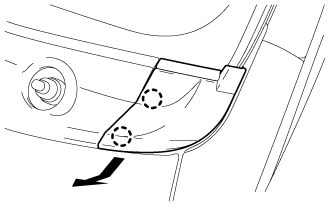
Disengage the 2 claws and remove the cowl vent cover LH as shown in the illustration.
-
-
REMOVE COWL TOP VENTILATOR LOUVER SUB-ASSEMBLY
-
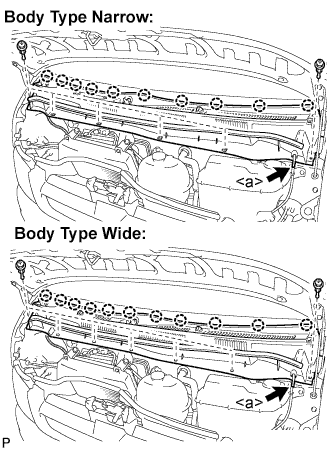
Disconnect the washer hose at position <a> shown in the illustration.
-
Body type narrow:
-
Disengage the 10 claws, and remove the 6 clips and cowl top ventilator louver sub-assembly.
-
-
Body type wide:
-
Disengage the 11 claws, and remove the 7 clips and cowl top ventilator louver sub-assembly.
-
-
-
REMOVE WINDSHIELD WIPER MOTOR AND LINK ASSEMBLY
-
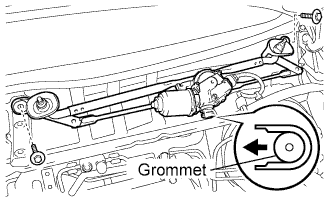
Disconnect the connector.
-
Remove the 2 bolts.
-
Disengage the grommet and remove the windshield wiper motor and link assembly as shown in the illustration.
-
-
REMOVE OUTER UPPER WINDSHIELD MOULDING
-
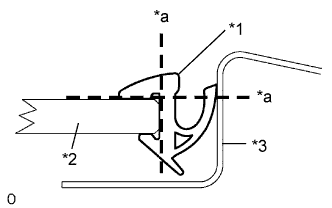
Text in Illustration *1 Moulding *2 Windshield Glass *3 Vehicle Body *a Cut Using a knife, cut off the moulding as shown in the illustration.
Note
Be careful not to damage the vehicle body with the knife.
-
Remove the remaining moulding.
Tech Tips
Make a partial cut in the moulding. Then pull and remove it by hand.
-
-
REMOVE WINDSHIELD GLASS
-

Text in Illustration *1 Plastic Sheet *2 Protective Tape *3 Stopper *4 Piano Wire Apply protective tape to the outer surface of the vehicle body to prevent scratches.
-
From the interior, insert a piano wire between the vehicle body and glass as shown in the illustration.
-
Tie objects that can serve as handles (for example, wooden blocks) to both wire ends.
Note
-
When separating the glass from the vehicle, be careful not to damage the vehicle's paint or interior/exterior ornaments.
-
To prevent the instrument panel from being scratched when removing the glass, place a plastic sheet between the piano wire and instrument panel.
-
-
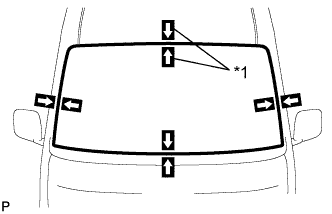
Text in Illustration *1 Matchmark Place matchmarks over the windshield glass and vehicle body on the locations indicated in the illustration.
Tech Tips
Matchmarks do not need to be placed if the windshield glass is not going to be reused.
-
Cut through the adhesive by pulling the piano wire around the windshield glass.
-
Disengaged the spacers.
-
Using a suction cup, remove the windshield glass.
Note
Leave as much adhesive on the vehicle body as possible when removing the windshield glass.
-