FUEL LID LOCK CONTROL CABLE ASSEMBLY(for Wagon RHD) REMOVAL
PROCEDURE
REMOVE FRONT SEAT ASSEMBLY RH
REMOVE FRONT SEAT ASSEMBLY LH
Tip:Use the same procedure as for the RH side.
REMOVE DECK BOARD SUB-ASSEMBLY (w/ Deck Board)
REMOVE DECK BOARD ASSEMBLY (w/ Deck Board)
REMOVE FRONT DECK FLOOR BOX (w/ Deck Board)
REMOVE REAR FLOOR MAT ASSEMBLY
REMOVE NO. 3 DECK BOARD SUB-ASSEMBLY (w/ Deck Board)
REMOVE DECK FLOOR BOX LH (w/o Woofer)
REMOVE TONNEAU COVER ASSEMBLY
REMOVE ROOM PARTITION NET ASSEMBLY (w/ Partition Net)
REMOVE REAR DECK TRIM COVER
REMOVE REAR SEAT CUSHION ASSEMBLY
REMOVE REAR SEAT HEADREST ASSEMBLY
DISCONNECT REAR NO. 1 SEAT LOCK CABLE ASSEMBLY
REMOVE REAR SEATBACK ASSEMBLY LH
REMOVE FRONT DOOR SCUFF PLATE LH
DISCONNECT FRONT DOOR OPENING TRIM WEATHERSTRIP LH
REMOVE REAR DOOR SCUFF PLATE LH
DISCONNECT REAR DOOR OPENING TRIM WEATHERSTRIP LH
REMOVE LAP BELT OUTER ANCHOR COVER (for LH Side)
DISCONNECT FRONT SEAT OUTER BELT ASSEMBLY LH
REMOVE CENTER PILLAR LOWER GARNISH LH
REMOVE FRONT DOOR SCUFF PLATE RH
Tip:Use the same procedure as for the LH side.
DISCONNECT FRONT DOOR OPENING TRIM WEATHERSTRIP RH
Tip:Use the same procedure as for the LH side.
REMOVE REAR DOOR SCUFF PLATE RH
Tip:Use the same procedure as for the LH side.
DISCONNECT REAR DOOR OPENING TRIM WEATHERSTRIP RH
Tip:Use the same procedure as for the LH side.
REMOVE LAP BELT OUTER ANCHOR COVER (for RH Side)
Tip:Use the same procedure as for the LH side.
DISCONNECT FRONT SEAT OUTER BELT ASSEMBLY RH
Tip:Use the same procedure as for the LH side.
REMOVE CENTER PILLAR LOWER GARNISH RH
Tip:Use the same procedure as for the LH side.
REMOVE REAR SEATBACK HINGE SUB-ASSEMBLY LH
REMOVE REAR SEAT SIDE GARNISH LH
REMOVE NO. 2 DECK SIDE TRIM HOOK
REMOVE RECLINING REMOTE CONTROL BEZEL LH
REMOVE DECK TRIM SIDE PANEL ASSEMBLY LH
REMOVE TONNEAU COVER HOLDER BRACKET LH (w/ Woofer)
REMOVE NO. 1 SPEAKER ASSEMBLY WITH BOX (w/ Woofer)
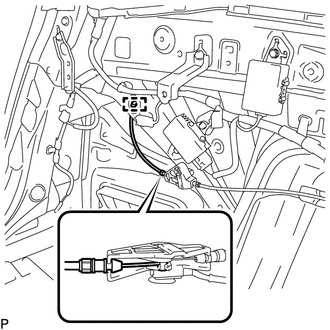
REMOVE FUEL LID LOCK OPEN LEVER SUB-ASSEMBLY
-
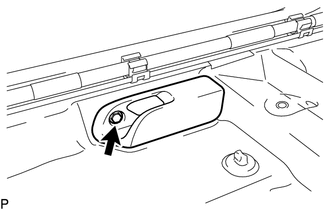
Remove the screw.
-
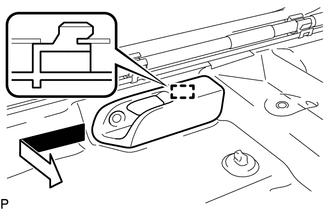
Disengage the guide and disconnect the fuel lid lock open lever sub-assembly as shown in the illustration.
-
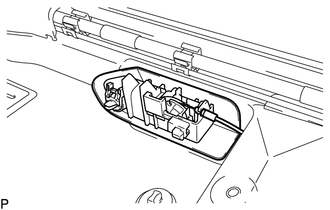
Disconnect the fuel lid lock control cable sub-assembly and remove the fuel lid lock open lever sub-assembly.
-
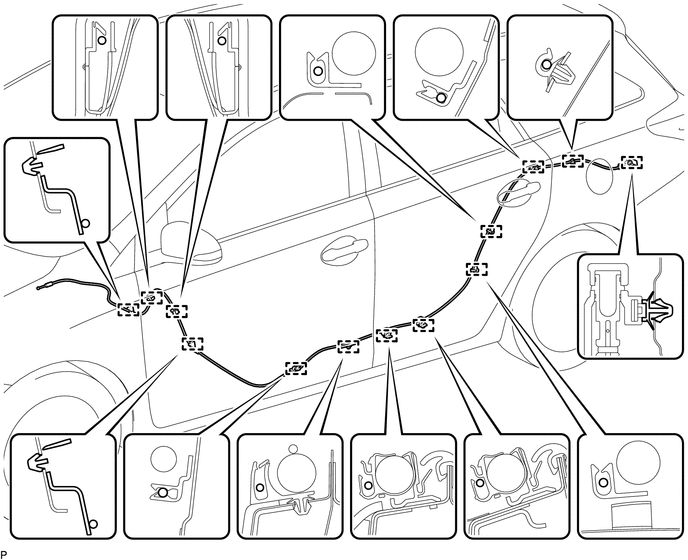
REMOVE FUEL LID LOCK CONTROL CABLE SUB-ASSEMBLY (for Rear Side)
-
Disconnect the fuel lid lock control cable sub-assembly.
Disengage the clamp.
-
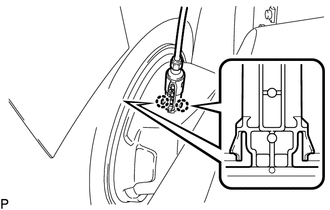
Disengage the 2 claws.
-
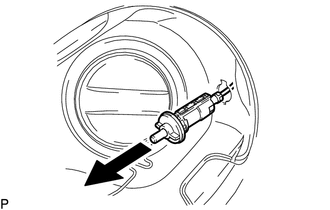
Remove the fuel lid lock control cable sub-assembly as shown in the illustration.
-
REMOVE FUEL LID LOCK CONTROL CABLE SUB-ASSEMBLY (for Front Side)
Turn back the floor carpet so that the fuel lid lock control cable sub-assembly can be removed.
Disengage the 13 clamps and remove the fuel lid lock control cable sub-assembly.