CURTAIN SHIELD AIRBAG ASSEMBLY REMOVAL

CAUTION / NOTICE / HINT
Tech Tips
-
Use the same procedure for the RH side and LH side.
-
The procedure listed below is for the LH side.
PROCEDURE
-
PRECAUTION
CAUTION:
Be sure to read Precaution thoroughly before servicing. Click here
Note
After turning the ignition switch off, waiting time may be required before disconnecting the cable from the negative (-) battery terminal. Therefore, make sure to read the disconnecting the cable from the negative (-) battery terminal notices before proceeding with work Click here.
-
REMOVE ROOF HEADLINING ASSEMBLY
-
REMOVE CURTAIN SHIELD AIRBAG ASSEMBLY
CAUTION:
When storing the curtain shield airbag assembly, keep the airbag deployment side facing upward.
-
Check that the ignition switch is off.
-
Check that the cable is disconnected from the negative (-) battery terminal.
CAUTION:
Wait at least 90 seconds after disconnecting the cable from the negative (-) battery terminal to disable the SRS system.
Note
The power window system utilizes a mechanism that the door glass moves down slightly when the door is opened, and that the glass moves up when closing the door in order to prevent the door molding from being damaged. When the battery negative (-) terminal needs to be disconnected for servicing, fully open the driver and passenger door glasses in advance.
-
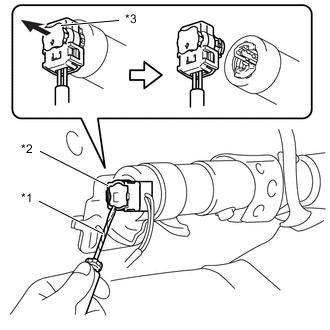
Text in Illustration *1 Protective Tape *2 Airbag Connector *3 Airbag Connector Lock Using a screwdriver with the tip wrapped with protective tape, release the airbag connector lock and disconnect the curtain shield airbag connector.
Note
When disconnecting any airbag connector, take care not to damage the airbag wire harness.
-
Remove the 9 bolts and engage the 9 guides to remove the curtain shield airbag assembly.

Note
When removing the curtain shield airbag assembly, have assistants hold it to prevent it from bending.
Tech Tips
Remove the bolts and guides in order, from the front.
-