CANISTER INSPECTION
PROCEDURE
-
INSPECT CHARCOAL CANISTER ASSEMBLY (for Metal Type)
Note
When applying vacuum, the needle may waver but, as long as the needle returns to its initial position immediately, it is not a malfunction.
-
Visually check the charcoal canister assembly for cracks or damage.
If cracks or damage is found, replace the charcoal canister assembly.
-
Check the air flow.
-
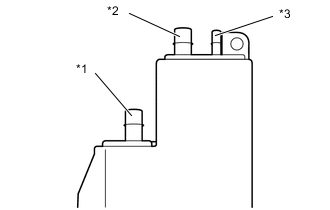
Text in Illustration *1 Port A *2 Port B *3 Port C Using a vacuum pump, check the air flow according to the procedures below.
OK Measurement Condition Specified Condition Ports B and C closed, and vacuum applied to port A (2 kPa (15 mmHg, 0.590 in.Hg)) No air leaks Port C closed, and vacuum applied to port A (2 kPa (15 mmHg, 0.590 in.Hg)) Air flows from port B Port C closed and air blown into port A (5 kPa (0.1 kgf/cm2, 0.725 psi))
Air flows from port B Air blown into port A (5 kPa (0.1 kgf/cm2, 0.725 psi))
Air flows from ports B and C If the result is not as specified, replace the charcoal canister assembly.
-
-
-
INSPECT CHARCOAL CANISTER ASSEMBLY (for Clamp Type)
Note
When applying vacuum, the needle may waver but, as long as the needle returns to its initial position immediately, it is not a malfunction.
-
Visually check the charcoal canister assembly for cracks or damage.
If cracks or damage is found, replace the charcoal canister assembly.
-
Check the air flow.
-
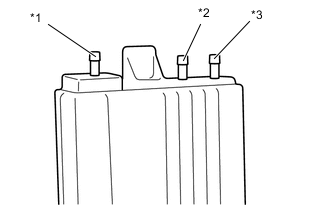
Text in Illustration *1 Port A *2 Port B *3 Port C Using a vacuum pump, check the air flow according to the procedures below.
OK Measurement Condition Specified Condition Ports B and C closed, and vacuum applied to port A (2 kPa (15 mmHg, 0.590 in.Hg)) No air leaks Port C closed, and vacuum applied to port A (2 kPa (15 mmHg, 0.590 in.Hg)) Air flows from port B Port C closed and air blown into port A (5 kPa (0.1 kgf/cm2, 0.725 psi))
Air flows from port B Air blown into port A (5 kPa (0.1 kgf/cm2, 0.725 psi))
Air flows from ports B and C If the result is not as specified, replace the charcoal canister assembly.
-
-
-
INSPECT CANISTER PUMP MODULE (for Metal Type)
-
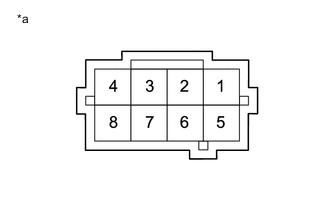
Text in Illustration *a Component without harness connected
(Canister Pump Module)
Measure the resistance according to the value in the table below.
Standard Resistance Tester Connection Condition Specified Condition 1 - 5 20°C (68°F) 25 to 30 Ω 1 - 5 60°C (140°F) 27 to 35 Ω -
Check the operation of the check valve.
-

Text in Illustration *1 Port A *2 Port B Install a clean hose to the purge valve.
-
Check that air flows from port A to port B.
-
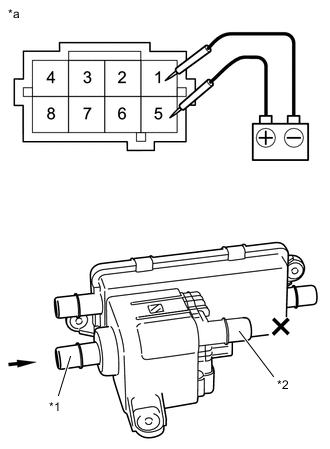
Text in Illustration *1 Port A *2 Port B *a Component without harness connected
(Canister Pump Module)
Connect the positive (+) lead of the battery to terminal 5 and the negative (-) lead to terminal 1.
-
Check that air does not flow from port A to port B.
-
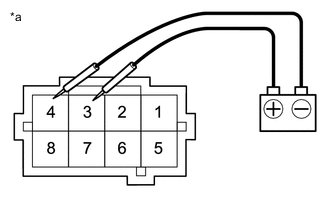
Text in Illustration *a Component without harness connected
(Canister Pump Module)
Connect the positive (+) lead of the battery to terminal 3 and the negative (-) lead to terminal 4.
-
Check that the vacuum pump operates.
Note
Do not operate vacuum pump for 5 minutes or more.
-
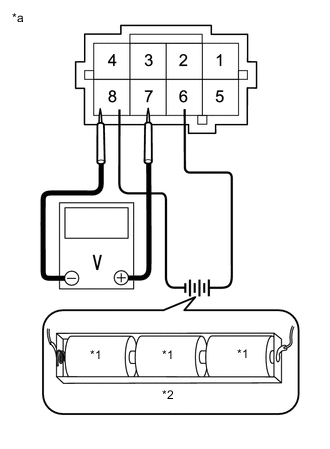
Text in Illustration *1 1.5 V *2 4.8 to 5.2 V *a Component without harness connected
(Canister Pump Module)
Connect the positive (+) lead of the battery to terminal 6 and the negative (-) lead to terminal 8.
-
Measure the voltage according to the value in the table below.
Standard Voltage Tester Connection Condition Specified Condition 7 - 8 25°C (77°F) 3.5 V -
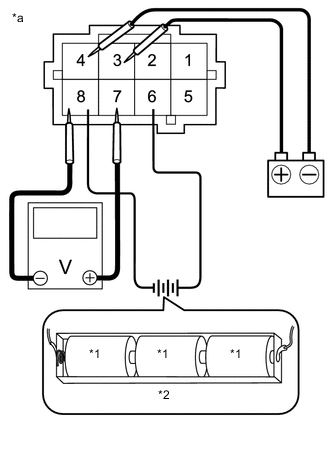
Text in Illustration *1 1.5 V *2 4.8 to 5.2 V *a Component without harness connected
(Canister Pump Module)
Connect the positive (+) lead of the battery to terminal 6 and the negative (-) lead to terminal 8.
-
Connect the positive (+) lead of the battery to terminal 3 and the negative (-) lead to terminal 4. Check that the voltage drops slightly from 3.5 volts.
-
-