REAR BUMPER REASSEMBLY
CAUTION / NOTICE / HINT
PROCEDURE
INSTALL REAR BUMPER PAD LH (w/ No. 2 Energy Absorber)
Tip:When installing the rear bumper pad LH, heat the rear bumper cover surface using a heat light.
Standard
Item
Temperature
Rear Bumper Cover
20 to 30°C (68 to 86°F)
Note:Do not heat the rear bumper cover excessively.
When using a new rear bumper cover:
Clean the rear bumper cover surface.
Using a heat light, heat the rear bumper cover surface.
When reusing the rear bumper cover:
Using a heat light, heat the rear bumper cover surface.
Remove the double-sided tape from the rear bumper cover.
Wipe off any tape adhesive residue with cleaner.
Install a new rear bumper pad LH.
Remove the peeling paper from the face of a new rear bumper pad LH.
Tip:After removing the peeling paper, keep the exposed adhesive free from foreign matter.
-
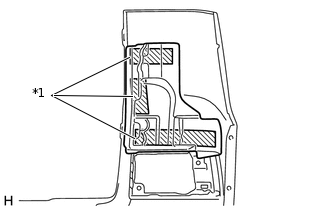
*1
Double-sided Tape
Install the rear bumper pad LH as shown in the illustration.
Tip:Press the rear bumper pad LH firmly to install it.
INSTALL REAR BUMPER PAD RH (w/ No. 2 Energy Absorber)
Tip:Use the same procedure described for the LH side.
INSTALL REAR BUMPER PROTECTOR SUB-ASSEMBLY LH
Install the rear bumper protector sub-assembly LH with the 3 screws.
Install a new grommet.
INSTALL REAR BUMPER PROTECTOR SUB-ASSEMBLY RH
Tip:Use the same procedure described for the LH side.
INSTALL NO. 2 ULTRASONIC SENSOR (w/ LEXUS Parking Assist-sensor System)
INSTALL NO. 2 ULTRASONIC SENSOR RETAINER (w/ LEXUS Parking Assist-sensor System)
INSTALL ULTRASONIC SENSOR CLIP (w/ LEXUS Parking Assist-sensor System)
INSTALL NO. 5 FLOOR WIRE (w/ LEXUS Parking Assist-sensor System)
Attach the 2 clamps to install the No. 5 floor wire.
Connect the 2 connectors.
INSTALL NO. 4 FLOOR WIRE (w/ LEXUS Parking Assist-sensor System)
Tip:Use the same procedure described for the No. 5 floor wire.
INSTALL BACK UP LIGHT ASSEMBLY LH
INSTALL BACK UP LIGHT ASSEMBLY RH
Tip:Use the same procedure described for the LH side.
INSTALL REAR BUMPER CENTER BRACKET
Attach the 6 claws to install the rear bumper center bracket.
Install the 4 clips.
INSTALL REAR BUMPER ENERGY ABSORBER
Tip:When installing the rear bumper energy absorber, heat the rear bumper cover surface using a heat light.
Standard
Item
Temperature
Rear Bumper Cover
20 to 30°C (68 to 86°F)
Note:Do not heat the rear bumper cover excessively.
When using a new rear bumper cover:
Clean the rear bumper cover surface.
Using a heat light, heat the rear bumper cover surface.
When reusing the rear bumper cover:
Using a heat light, heat the rear bumper cover surface.
Remove the double-sided tape from the rear bumper cover.
Wipe off any tape adhesive residue with cleaner.
When reusing the rear bumper energy absorber:
Remove the double-sided tape from the rear bumper cover.
Wipe off any tape adhesive residue with cleaner.
Install the double-sided tape as shown in the illustration.
Install a new rear bumper energy absorber.
Remove the peeling paper from the face of the rear bumper energy absorber.
Tip:After removing the peeling paper, keep the exposed adhesive free from foreign matter.
-
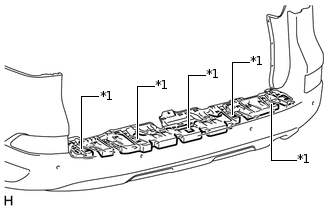
*1
Double-sided Tape
Install the rear bumper energy absorber to the rear bumper cover as shown in the illustration.
Tip:Press the rear bumper energy absorber firmly to install it.
INSTALL REAR BUMPER NO. 1 PLATE
Attach the 20 claws to install the rear bumper No. 1 plate.